Food

Auto Added by WPeMatico

LMNT Electrolyte Review: My Honest Results for Energy & Hydration Over 50

LMNT Electrolyte Review: My Honest Results for Energy & Hydration Over 50 As a personal trainer in my 50s (and now 60!), I started noticing my early morning workouts felt harder than they used to. Even though I was drinking plenty of water, I sometimes felt drained halfway through my workouts. That sent me down a hydration rabbit hole—and that’s how I discovered LMNT electrolyte drink mix. Electrolytes, explained Electrolytes are minerals like sodium, potassium, and magnesium that help regulate fluid balance, support muscle contractions, and maintain steady energy levels. How I found LMNT I started researching electrolyte supplements because I kept hearing about them from athletes and other trainers. I searched things like “best electrolytes for workouts” and “hydration for women over 50.” LMNT kept popping up in conversations, podcasts, and reviews—so I decided to try it myself. After using LMNT consistently for over a year, here’s my honest experience. What You’ll Love About LMNT If you’re considering trying LMNT electrolytes, these are the standout benefits I noticed after using the drink mix consistently in my workouts and daily routine. Strong electrolyte formula Each LMNT packet contains a powerful electrolyte blend designed to support hydration and muscle function: 1000 mg Sodium — helps regulate fluid balance and nerve function 200 mg Potassium — supports cellular and cardiovascular health 60 mg Magnesium — supports muscle recovery and energy production For people who sweat regularly during workouts, these minerals are incredibly important. No sugar or junk ingredients Unlike many sports drinks, LMNT contains: No sugar No artificial ingredients No gluten It’s also popular with people following keto or paleo lifestyles. Ingredients typically include: Sodium Chloride Potassium Chloride Magnesium Malate Citric Acid Natural Flavors Stevia Leaf Extract Convenient daily hydration The single-serve packets make LMNT easy to keep in your gym bag, travel bag, or kitchen. I simply mix a packet into water before workouts or during the afternoon slump. For busy women (especially moms and professionals), convenience matters. Sustained workout energy For me personally, this is the biggest benefit. I work out very early—around 5:30am. Since adding LMNT to my routine, I feel stronger and can power through my workouts with much better energy. After using it consistently for more than a year, it has become part of my daily supplement routine. My Experience Using LMNT Because this is a long-term LMNT electrolyte review, I want to walk you through exactly how I started using it, what surprised me, and how it fits into my daily hydration routine today. Unboxing & first impressions My first sip? I thought: Wow… this is salty. And honestly, that surprises a lot of people at first. But once I understood why sodium plays such an important role in hydration, the flavor started to make sense. Setup & first use Here’s my best beginner tip: Start with ½ packet in 32 oz of water. Add ice and mix well. Once you adjust to the flavor, you can increase to a full packet in 32–40 oz of water. My personal routine: Morning workout½ packet in 32 oz water Afternoon hydration boost½ packet in 32 oz water Routine & adaptation After a few weeks, something interesting happened. I actually started craving it during workouts. Now—after more than a year of daily use—it’s just part of my routine. Just like putting on my workout shoes. Results & reflections After over a year of using LMNT regularly, here’s what I’ve noticed: Better sustained energy during workouts Fewer afternoon energy crashes Less craving for salty snacks One unexpected change? My random menopausal headaches seem to happen less often. I can’t make any medical claims here, but it’s something I personally noticed. Alternatives I considered I looked at several other electrolyte drinks like Liquid IV and other hydration mixes. But many include added sugars or lower sodium levels, which wasn’t what I was looking for. LMNT stood out because it focuses on simple ingredients and effective electrolyte levels. Why Hydration Matters Even More After 50 Proper hydration becomes even more important as we age, especially for active women who exercise regularly and lose electrolytes through sweat. As we age, our bodies become less efficient at regulating fluids and electrolytes. That means proper hydration becomes even more important for: Muscle performance Energy levels Preventing cramps Supporting brain function Water alone isn’t always enough—especially if you exercise regularly. Electrolytes help your body absorb and utilize fluids more efficiently, which is why many athletes and trainers rely on them. The Science Behind Sodium (And Why It’s Often Misunderstood) Another reason I appreciate LMNT is the science behind sodium intake. For years we were told to drastically limit salt intake. But much of that research focused on sedentary populations eating highly processed diets. For active individuals who sweat regularly, sodium helps support: Cellular hydration Nerve function Muscle contractions LMNT focuses on replenishing the electrolytes your body actually loses through sweat. What to Consider Before Buying Before deciding if LMNT electrolyte packets are right for you, here are a few important things to consider including taste, cost, and who benefits most from electrolyte supplements. Cost LMNT costs roughly: $45 for 30 packets $39 with subscription That’s about $1.30–$1.50 per serving. It’s not the cheapest electrolyte drink available—but you’re paying for high-quality ingredients and higher electrolyte levels. Taste Some people find the saltiness surprising at first. Using more water or starting with half a packet usually solves that issue. Sodium sensitivity If you have high blood pressure or sodium sensitivity, it’s always best to consult your healthcare provider before adding electrolyte supplements. LMNT Flavors (My Favorites) One of the fun parts of trying LMNT is experimenting with the different flavors to find the ones you enjoy most during workouts or throughout the day. My favorites are: Citrus SaltMy absolute favorite—light lemon-lime flavor. Orange SaltRefreshing and crisp. Grapefruit SaltA big favorite among my followers. Raspberry SaltPerfect berry flavor. Watermelon SaltGreat for summer workouts. Mango ChiliMy go-to mocktail flavor mixed with sparkling water and lime. Other options include: Raw
Read More »

Mini-moon Pt. 1: Japan

Mini-moon Pt. 1: Japan Japan. Probably the number one shocker was learning that public trash cans are NOT a thing. And yet, the city is SO clean!   View this post on Instagram   A post shared by Cassey Ho (@blogilates) It was incredible to watch one of the densest cities in the world operate with such high efficiency and cleanliness. As I was admiring the organized chaos of Tokyo, I kept thinking that such a society is possible only if every individual lives by and respects the same rules. It’s inevitable for me to compare my own experience living in the U.S. vs being a visitor in Japan, but REAL TALK whyyyyy is it so hard for people to use public trash cans when they’re literally on every corner!? Between grinding our own matcha in Uji, finally trying all the viral foods I’ve been seeing on IG for YEARS in Tokyo and Osaka, being head-butted by a deer in Nara (no actually), and making a game out of trying to find trash cans, I really enjoyed wandering aimlessly through the streets of Japan with Sam. Exploring in the rain made it all the more romantic, especially among the cobblestone streets of Kyoto, even though I was complaining about being cold every 5 seconds. Arigato gozaimasu Japan! Japan. Probably the number one shocker was learning that public trash cans are NOT a thing. And yet, the city is SO clean!   View this post on Instagram  … Cassey{authorlink}https://www.blogilates.com/blog/minimoon-in-japan/Blogilates The official blog of Cassey Ho https://i0.wp.com/www.blogilates.com/wp-content/uploads/2021/02/fav-1.png?fit=32%2C32&ssl=1

Mini-moon Pt. 1: Japan Read More »

High-Protein Egg Bake for Busy Mornings

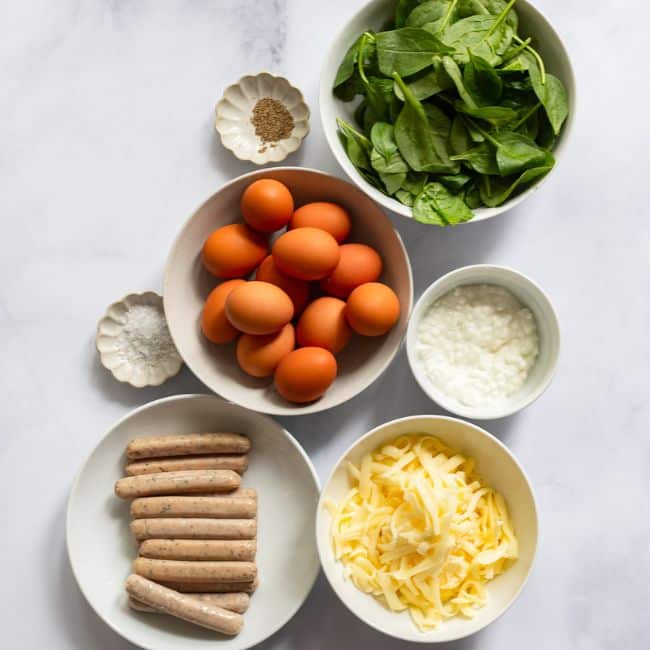
High-Protein Egg Bake for Busy Mornings Having this simple egg bake prepped in the fridge is a lifesaver for busy mornings; a protein packed breakfast that doesn’t skimp on flavor. The whole family will love this one. Mornings can be chaotic, which makes it hard to fit in a healthy breakfast. That’s why I love recipes that make a big batch that I can meal prep on the weekend to have something I can grab-and-go. This simple egg bake is one of those recipes! As a matter of fact, this is my go-to breakfast for weekends when my kids, spouses and families are home. I bake them a day in advance sometimes and keep in the refrigerator. Then I just pull it out in the morning and heat up on around 250 degrees in the oven. It makes weekends when I’m cooking for large groups so much easier. Prep is the key! You can follow the recipe as written with the chicken breakfast sausage and spinach or mix it up with other veggies or breakfast meat options. Round out your breakfast by pairing it with a piece of fruit or whole grain toast.  Explore even more healthy breakfast recipes to enjoy! Why You’ll Love this Recipe Meal Prep Friendly: this recipe makes 8 servings so you can easily bake it on the weekend and just reheat slices throughout the week for a healthy breakfast in 5 minutes or less.  High Protein: each serving of this simple egg bake is low in carbs and has 24 grams of protein to it’s a great way to start your day off right. Check out even more simple protein sources to add to your meal plan! Easily Customizable: make this egg bake recipe your own by swapping out the breakfast meat or veggies with other ingredients you have on hand. I included a few of our favorites but honestly the options are endless!  What You Need to Make It Here’s a quick snapshot of a few of the main ingredients you’ll need on hand to make this simple egg bake recipe. Check out the recipe card at the end of this post for the specific ingredient amounts.  Chicken breakfast sausage: reaching for chicken breakfast sausage helps keep the saturated fat and calories in this egg bake in check. You can also use turkey breakfast sausage or turkey bacon.  Baby spinach: adds color and nutrients to this egg bake. Fresh is what I typically use but you could use frozen spinach as well, just make sure to thaw and drain before adding to the egg bake.  Eggs: you’ll need a full dozen eggs for this recipe since we’re making a big casserole dish.  Cottage cheese: adds richness to this dish in place of heavy cream. It also ups the protein! Check out even more protein-packed cottage cheese recipes you’ll love! Mozzarella cheese: our top pick for cheese in this recipe, but you can easily swap with your favorite.  Variations There are an endless number of ways that you can mix and match the add-ins for this egg bake. Here are some of our top suggestions:  Try a different veggie: spinach is great, but you could add any number of veggies to this dish. Next time you make it try these: chopped broccoli, diced bell peppers, tomatoes, zucchini, or mushrooms. You’ll love the anti-inflammatory benefits! Swap the cheese: mozzarella is our top pick but you could swap for any cheese variety from cheddar to mexican cheese or even swiss.  Make it vegetarian: omit the breakfast sausage or substitute with a plant-based breakfast sausage.  How to Make this Simple Egg Bake This high protein egg bake recipe is simple to put together in a few steps.  Brown the Sausage: Sauté chicken sausage for about ten minutes until browned Whisk the Eggs: In a large bowl, whisk together the eggs, cottage cheese, half of the mozzarella cheese, sea salt, and black pepper. Assemble: Grease the bottom of a glass or ceramic 9×13 inch casserole dish. Arrange the browned sausage and spinach evenly at the bottom of the casserole dish. Pour the egg mixture over the sausage. Sprinkle the remaining cheddar cheese on top. Bake and Serve: Bake for approximately 30 minutes, until the eggs are set and the cheese is melted. Storage Fridge: refrigerate any leftovers in an airtight container in the fridge for up to 4 days. Allow to cool to room temperature before storing to prevent excess condensation on the inside of the container which may make the egg bake soggy. Freezer: slice and freeze this egg bake in an airtight container. Store for up to 3 months. Thaw overnight in the fridge and reheat slices in the microwave or toaster oven. Print High-Protein Egg Bake for Busy Mornings Whip up this high-protein egg bake for busy mornings—easy to meal prep, packed with flavor, and perfect for a quick, healthy breakfast! 🍳 Prep Time 5 minutes minutes Cook Time 45 minutes minutes Total Time 50 minutes minutes Servings 8 servings Calories 246kcal Equipment Large mixing bowl Whisk Casserole Dish Ingredients 1 lb chicken breakfast sausage sliced 3 cup baby spinach chopped 12 large eggs 1/2 cup cottage cheese 2 cups shredded mozzarella cheese 1/4 tsp sea salt 1/4 tsp black pepper Instructions In a skillet, sauté chicken sausage for about ten minutes until browned Meanwhile, preheat the oven to 375 degrees F (190 degrees C). In a large bowl, whisk together the eggs, cottage cheese, half of the mozzarella cheese, sea salt, and black pepper. Grease the bottom of a glass or ceramic 9×13 inch (22×33 cm) casserole dish. Arrange the browned sausage and spinach evenly at the bottom of the casserole dish. Pour the egg mixture over the sausage. Sprinkle the remaining cheddar cheese on top. Bake for approximately 30 minutes, until the eggs are set and the cheese is melted. Nutrition Serving: 1square | Calories: 246kcal | Carbohydrates: 3g | Protein: 24g | Fat: 15g | Fiber: 0.5g | Sugar: 1g Having this simple

High-Protein Egg Bake for Busy Mornings Read More »

Healthy Banana Bread with Oat Flour

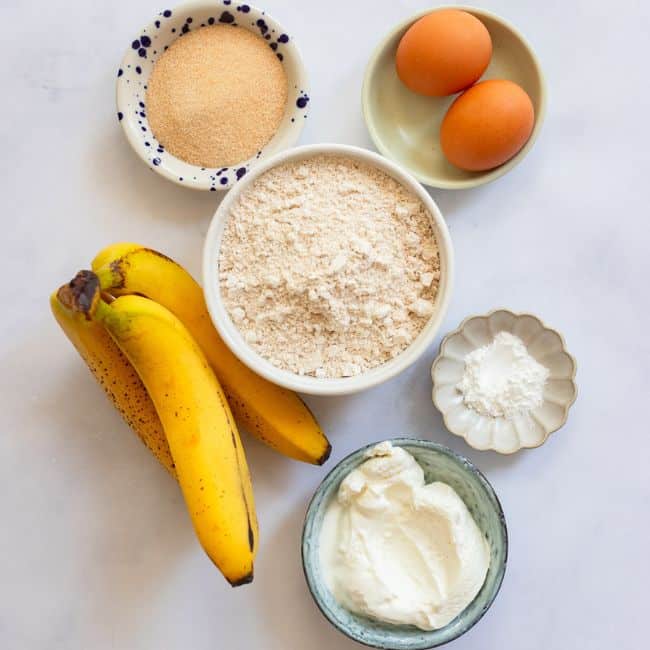
Healthy Banana Bread with Oat Flour This healthy banana bread with oat flour is not only easy (just one bowl!) but this gluten free loaf is also lower in sugar and fat since it’s made without butter or oil. Make sure to save your overripe bananas for this one! Banana bread got a healthy glow up in this oat flour banana bread recipe. This banana bread is made without any oil or butter and uses yogurt to add moisture to the loaf instead. I’ve also swapped out the all purpose flour for oat flour which is a bit higher in fiber and protein and used monk fruit for sweetness without added sugars. All that adds up to one delicious loaf! The texture of this banana bread is heartier than a standard loaf but with a tender crumb. I feel like it’s a cross between banana bread and baked oatmeal – both delicious in my book. And no, banana’s won’t make you fat. That’s a health myth women need to realize isn’t true! Why You’ll Love this Recipe Easy: all you need is one bowl for mixing up this delicious low sugar banana bread. Just mash the bananas first then add the rest of your ingredients. Easy peasy! Better for You: this banana bread recipe is low sugar, gluten free, and much lower in fat than traditional banana bread recipes.  Freezer Friendly: after baking, you can slice this healthy banana bread and store the slices as individual portions in the freezer. It’s such a tasty grab and go snack! Ingredients You’ll Need Here’s a short recap of some of the main ingredients to make this healthier banana bread recipe. Be sure to check out the recipe card for the exact amounts of each ingredient you’ll need.  Bananas: you’ll need 3 medium sized bananas for this recipe – the riper the better! You can also use frozen bananas, just thaw before mashing.  Yogurt: use a plain, unsweetened Greek yogurt for this recipe. It adds moisture and is a good source of protein! Monk fruit: I like using this sugar-free sweetener for baking. It works great in this recipe! If you don’t have monk fruit, substitute with your favorite baking friendly sugar free sweetener.  Oat Flour: I love baking with oat flour. It can usually be subbed cup-for-cup or all purpose flour in many recipes while adding a little extra fiber and protein to your finished recipe. Check out more great sources of fiber! Chocolate chips: add a handful of sugar free chocolate chips to this bread if you’d like! You can also substitute with chopped dark chocolate or chopped nuts (walnuts are my favorite).  Variations Add Fruit: instead of stirring chocolate chips into the batter before baking, try adding frozen blueberries or raspberries. You could also swap the chocolate chips for a dried fruit like raisins or cranberries.   Add Nuts: instead of or in addition to the chocolate chips, you can add some chopped nuts like walnuts or pecans. I also like baking this with some pumpkin seeds sprinkled on top.  How to Make Banana Bread with Oat Flour This healthy banana bread recipe is simple to put together in a few steps.  Prep the oven and pan: preheat the oven to 350 degrees Fahrenheit and spray a standard loaf pan with cooking oil and then line with parchment paper so you can lift it out of the pan after baking.  Mix the wet ingredients: In a large mixing bowl, mash the bananas with a fork. Whisk in the eggs, yogurt, and monk fruit sweetener.  Add the dry ingredients: Stir in the oat flour and baking powder just until combined. Fold in the chocolate chips (if using). Bake: Bake for 45-55 minutes or until golden brown on top and toothpick inserted in the center comes out clean. Allow to cool completely before slicing.  Storage Fridge: allow loaf to cool completely then slice. Store slices in an airtight container in the fridge for 3-4 days. You can also wrap the unsliced loaf in plastic wrap and store in the fridge.  Freezer: allow to cool completely then wrap tightly in plastic wrap and free for up to 3 months. You can also slice it and then freeze, storing them in an airtight container for up to 3 months. Allow to thaw in the fridge or on the counter. You can also reheat slices from frozen in the microwave.  More Healthy Banana Recipes to Enjoy If you love bananas, check out my other healthy banana recipes: Healthy Oat Flour Banana Muffins (My Family’s Favorite!) Creamy Chocolate Banana Smoothie Healthy Breakfast Cookies Cashew Banana Smoothie Print Healthy Banana Bread with Oat Flour Healthy banana bread made with oat flour—gluten free, lower in sugar and fat, and no butter or oil. Moist, fiber-filled, and naturally sweet! Prep Time 10 minutes minutes Cook Time 55 minutes minutes Total Time 1 hour hour 5 minutes minutes Servings 10 slices Calories 150kcal Equipment Standard loaf pan Parchment paper Large mixing bowl Whisk Ingredients 3 ripe bananas 2 eggs ½ cup plain unsweetened yogurt ½ cup golden monk fruit 2 cups oat flour 1 ½ teaspoons baking powder ½ cup sugar free chocolate chips optional Instructions Preheat the oven to 350 degrees Fahrenheit and spray a standard loaf pan with cooking oil and then line with parchment paper so you can lift it out of the pan after baking. In a large mixing bowl, mash the bananas with a fork. Whisk in the eggs, yogurt, and monk fruit sweetener. Stir in the oat flour and baking powder just until combined. Fold in the chocolate chips (if using). Bake for 45-55 minutes or until golden brown on top and toothpick inserted in the center comes out clean. Allow to cool completely before slicing. Nutrition Serving: 1slice | Calories: 150kcal | Carbohydrates: 26g | Protein: 5g | Fat: 4g | Fiber: 2g | Sugar: 5g This healthy banana bread with oat flour is not only easy (just one bowl!) but this gluten free

Healthy Banana Bread with Oat Flour Read More »

Healthy Pumpkin Blondies (Gluten-Free + Low-Sugar Fall Treat)

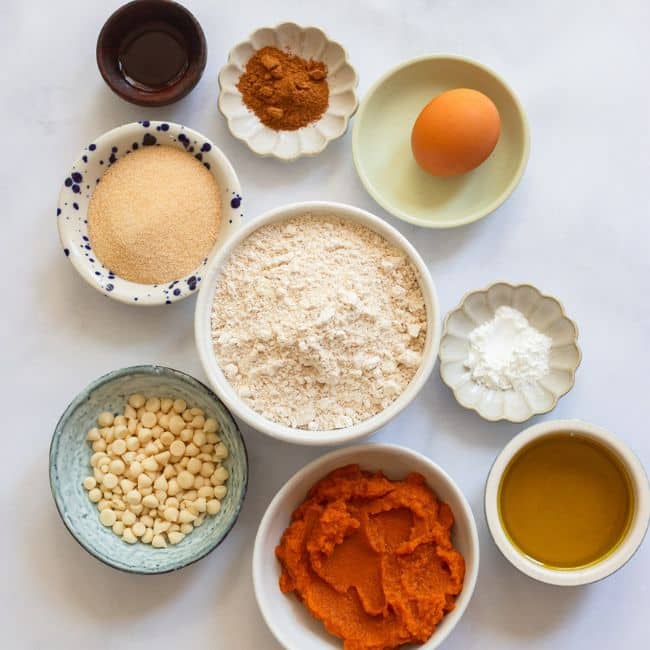
Healthy Pumpkin Blondies (Gluten-Free + Low-Sugar Fall Treat) The season for pumpkin treats is here! These pumpkin blondies are a healthier take on this popular fall dessert using some sugar free swaps, not to mention it’s gluten free too.  As soon as fall arrives, I always try to keep the kitchen stocked with at least one baked pumpkin recipe. Some weeks it’s a batch of pumpkin muffins and pumpkin protein balls, or others I’m baking up a batch of these delicious pumpkin blondies. To make these a little healthier, I swapped all purpose flour for oat flour and used sugar-free options to add sweetness without added sugars.  Despite being a little healthier, these blondies still never last long in our house! After they cool, I slice them up and store them in the fridge for an afternoon snack or post-dinner sweet treat.  If you know me, you know I love to eat! Check out my healthy dessert recipes that help curb your sweet-tooth cravings while keeping you on track with your health goals! Why You’ll Love this Recipe Easy to Make: everything gets mixed together in one bowl then dumped into a casserole dish to bake. Super easy! Freezer Friendly: these blondies freeze well so you can store leftovers in the freezer or even make a double batch and freeze the extra.  A Lower Sugar Treat: this pumpkin blondies recipe is much lower in sugar than most thanks to a few simple swaps like using monk fruit to sweeten and adding sugar free white chocolate chips.  Ingredients You’ll Need Here’s a short recap of some of the main ingredients to make this pumpkin blondies recipe. Be sure to check out the recipe card for the exact amounts of each ingredient you’ll need.  Olive oil: a healthier oil that works well in baking recipes like this one! Avocado oil is also a good option.  Monk fruit golden sugar: adds sweetness to this blondie recipe without the sugar.  Pumpkin puree: canned pumpkin puree adds tons of rich flavor to these bars. Make sure to grab plain canned pumpkin rather than pumpkin pie filling which is seasoned and sweetened.  Oat flour: using oat flour in place of all purpose flour increases the fiber and protein in the finished recipe. You can buy oat flour in the store or even make your own pureeing oats in a high-speed blender until finely ground into a flour.  White chocolate chips: to cut down on the added sugars in this recipe, I use Lily’s brand white chocolate chips which are sugar free but just as delicious. If you aren’t a fan of white chocolate, you can also use sugar free semi-sweet chocolate chips instead. Variations Make it Gluten Free: use a gluten-free certified oat flour to make these pumpkin blondies gluten free.  Add Nuts: use them in place of the white chocolate chips or use both if you prefer. These blondies would be tasty with some chopped walnuts or pecans mixed in. How to Make Pumpkin Blondies This healthy pumpkin blondies recipe is simple to put together in a few steps.  Whisk the Wet Ingredients: In a medium bowl, whisk together the olive oil and the golden sugar monk fruit. Add the egg, pumpkin puree, and vanilla; whisk until smooth. Add Dry Ingredients: To the same bowl, add the oat flour, pumpkin pie spice, baking powder, and ½ teaspoon salt. Stir until well combined. Fold in the white chocolate chips.  Bake: Transfer the batter into the prepared pan, spreading it evenly and smoothing the top with a spatula. Sprinkle additional white chocolate chips over top of the batter. Bake until the center is set, 35-40 minutes. Remove from the oven and let cool before cutting into 16 bars.  Storage Fridge: once cool, slice and transfer the pumpkin blondies to an airtight container and store in the fridge for up to a week.  Freezer: once cooled, slice and store in an airtight container, using parchment paper between each slice if stacked, and freeze for up to 3 months. Thaw overnight in the fridge or at room temperature. Warm them up in the microwave for an extra tasty treat.  Print Healthy Pumpkin Blondies (Gluten-Free + Low-Sugar Fall Treat) These healthy pumpkin blondies are gluten-free, lower in sugar, and full of fall flavor! Easy, cozy, and perfect for snacks or dessert. Prep Time 10 minutes minutes Cook Time 40 minutes minutes Total Time 50 minutes minutes Servings 16 bars Calories 167kcal Equipment Medium Bowl Whisk 8×8 baking dish Ingredients ¾ cup olive or avocado oil ¾ cup packed monk fruit golden sugar 1 large egg 1 cup canned pumpkin puree 1 teaspoon pure vanilla extract 1 ½ cups oat flour 1 tablespoon pumpkin pie spice 1 teaspoon baking powder ½ teaspoon fine salt ½ cup Lily’s white chocolate chips additional 3 tablespoons for topping Instructions Preheat the oven to 350°F. Mist an 8×8 inch glass or metal baking dish with cooking spray or line with parchment paper; set aside. In a medium bowl, whisk together the olive oil and the golden sugar monk fruit. Add the egg, pumpkin puree, and vanilla; whisk until smooth. To the same bowl, add the oat flour, pumpkin pie spice, baking powder, and ½ teaspoon salt. Stir until well combined. Fold in the white chocolate chips. Transfer the batter into the prepared pan, spreading it evenly and smoothing the top with a spatula. Sprinkle additional white chocolate chips over top of the batter. Bake until the center is set, 35-40 minutes. Remove from the oven and let cool before cutting into 16 bars. Store leftovers in an airtight container at room temperature for up to 4 days. Nutrition Serving: 1bar | Calories: 167kcal | Carbohydrates: 12g | Protein: 2g | Fat: 13g | Fiber: 1g | Sugar: 0.5g The season for pumpkin treats is here! These pumpkin blondies are a healthier take on this popular fall dessert using… Chris Freytag, CPT{authorlink}https://gethealthyu.com/healthy-pumpkin-blondies/Get Healthy U | Chris Freytag Realistic workouts and healthy aging for the middle-aged woman.

Healthy Pumpkin Blondies (Gluten-Free + Low-Sugar Fall Treat) Read More »

My Favorite Pumpkin Smoothie to Make During Fall

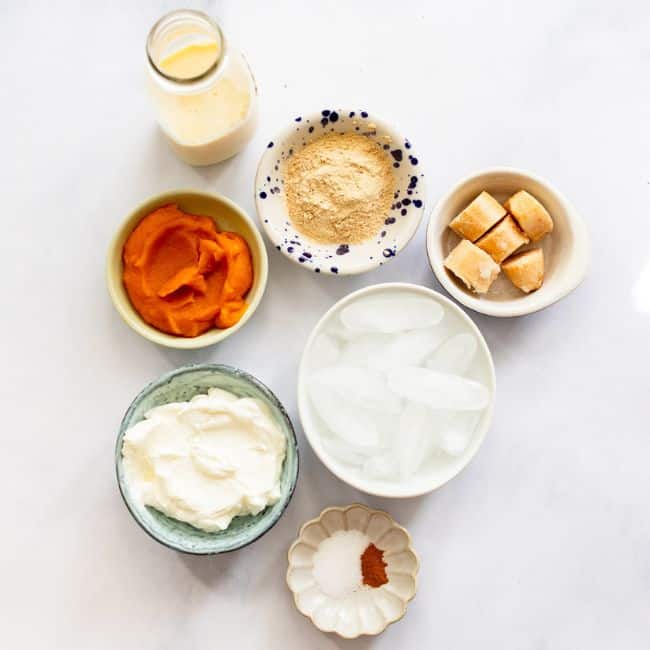
My Favorite Pumpkin Smoothie to Make During Fall Smoothies are a quick and easy breakfast that is perfect no matter the season. Swap out your go-to smoothie for this fall-inspired pumpkin smoothie that’s packed with filling protein.  Fall has arrived and pumpkin spiced foods are everywhere and I’m here for it! As a self-proclaimed pumpkin lover, I look forward to leaning into all the fall flavors as the season changes – and that includes my morning smoothie. This high protein pumpkin smoothie made with canned pumpkin, cinnamon, and protein powder is a go-to all season long.  What’s more, this smoothie is a great way to use up leftover pumpkin from other recipes since so many call for less than a full can. Not to mention, pumpkin is a nutrient-dense veggie that offers plenty of health benefits. For example, it’s rich in vitamins A and C, both of which are important for keeping your immune system running in tip top shape (a must for cold and flu season).  I enjoy a smoothie almost every day! Check out even more of my great healthy smoothie recipes designed for weight loss! Why You’ll Love It Texture: this makes for an extra thick smoothie (my favorite!), which means you can either sip or use a spoon to eat this one. Topping it with a bit of granola is the way to go. High Protein: for a smoothie that will actually fill you up and provide the protein you need post-workout, this smoothie has a scoop of protein powder and Greek yogurt added. (Cottage cheese also works well in place of the yogurt.) Customizable: use this recipe as a starting point and feel free to make the smoothie your own! See below for some of our favorite add-ins.  Ingredients You’ll Need Use these simple and fresh ingredients packed with nutritional value to make this delicious high protein pumpkin spice smoothie recipe. Be sure to check out the recipe card for the exact amounts of each ingredient you’ll need.  Ice cubes: adding a handful of ice cubes gives this smoothie an extra thick consistency. If that’s not your thing, you can skip them.  Frozen Banana: using frozen banana makes a thicker smoothie but you can use fresh banana too.  Greek Yogurt: use plain, unsweetened Greek yogurt for this smoothie. You can also substitute with the same amount of cottage cheese. Either one adds creaminess and boosts the protein in the finished smoothie. Check out even more protein-packed cottage cheese recipes you’ll enjoy! Sweetener: add a little sweetness with a sugar free sweetener like monk fruit or Stevia.  Protein Powder: Use your favorite brand of vanilla protein powder for this smoothie. I typically reach for a vanilla whey one. See all of my favorite protein powders with reviews! Pumpkin: you’ll want to use canned or homemade pumpkin that is unsweetened.  Cinnamon: the perfect spice to complement the pumpkin – it’s also a good source of antioxidants too. You can also substitute it with pumpkin spice if you’ve got it.  Almond milk: add a splash of milk to help blend this smoothie together. I like to use homemade almond milk (I use the Almond Cow machine and it takes less than a few minutes!), but you can swap with your milk of choice.  Variations There are a variety of ways that you can swap ingredients for this smoothie to make it your own. Here are a few of our favorite additions:  Almond butter: adds delicious flavor that complements the pumpkin while providing heart healthy fats. Seeds: ground flaxseeds and chia seeds are great additions to smoothies like this one since you’ll boost the filling fiber and get in some plant-based omega 3 fatty acids.  Add superfoods: you can up the antioxidant power of this smoothie by adding some fresh ginger root or turmeric powder to the blender before pureeing.  Make it vegan or dairy free: use a dairy free yogurt and a plant-based protein powder to make a vegan version of this recipe.  How to Make a Pumpkin Smoothie This healthy pumpkin smoothie recipe is simple to put together in a few steps.  Blend: Add all the ingredients to a high-powered blender and process until completely blended. Adjust the consistency by adding more ice if it’s too thin or adding an extra splash of milk if it’s too thick.  Serve: Pour this healthy smoothie into glasses and enjoy.  nutribullet Pro+ 1200 Watt Personal Blender Check Price We earn a commission if you make a purchase, at no additional cost to you. Storage This smoothie is best enjoyed right after blending. However, if you have leftovers, you can store them in a lidded jar or other airtight container in the fridge for up to 2 days.  You can also freeze this smoothie in an ice cube tray and then transfer the smoothie ice cubes to a freezer bag. Frozen smoothie cubes can be stored for up to 3 months in the freezer. Print Healthy Pumpkin Smoothie A creamy, high-protein pumpkin smoothie with cinnamon and protein powder—nourishing, immune-boosting, and perfect for fall. Prep Time 5 minutes minutes Total Time 5 minutes minutes Servings 1 smoothie Calories 255kcal Ingredients Ice cubes ½ frozen banana ½ cup Greek yogurt or sub cottage cheese 1 packet monk fruit or Stevia 1 scoop of protein powder such as vanilla whey 1/3 cup of pumpkin purée 1 dash ground cinnamon to taste ⅓ cup plain unsweetened almond milk Instructions Add all of your ingredients to a blender cup and puree until smooth. Nutrition Serving: 1smoothie | Calories: 255kcal | Carbohydrates: 23g | Protein: 37g | Fat: 4g | Fiber: 2g | Sugar: 14g Smoothies are a quick and easy breakfast that is perfect no matter the season. Swap out your go-to smoothie for… Chris Freytag, CPT{authorlink}https://gethealthyu.com/pumpkin-smoothie-recipe/Get Healthy U | Chris Freytag Realistic workouts and healthy aging for the middle-aged woman. https://gethealthyu.com/wp-content/uploads/2024/09/favicon-96×96.png

My Favorite Pumpkin Smoothie to Make During Fall Read More »

My Almond Cow Review: Ditching Store-Bought for Healthy Homemade Milk in Under a Minute

My Almond Cow Review: Ditching Store-Bought for Healthy Homemade Milk in Under a Minute If you’ve been following me for a while, you know I’m a huge fan of clean eating and avoiding unnecessary additives in my food. I’ve been on a mission for years to cut out ultra-processed foods and simplify what goes into my body. And let me tell you—almond milk was one of those sneaky “health foods” that wasn’t as clean as it claimed to be. I’ve always loved almond milk. It’s light, refreshing, and easy on the stomach. But once I started turning those cartons around and reading the ingredient labels—yikes. What I thought was a simple nut-based beverage turned out to be loaded with gums, preservatives, oils, and other ingredients I couldn’t pronounce. That was my wake-up call. So I went on a mission to go back to the basics. Real food. Fewer ingredients. And thanks to one life-changing discovery—I’m making my own almond milk at home in just one minute. Yep, one minute. No soaking. No mess. Just clean, delicious almond milk with two ingredients: almonds and water. Let me tell you how I got here. Why You Should Rethink Store-Bought Almond Milk It’s easy to assume almond milk from the store is healthy—and to be fair, it can be better than sugary dairy alternatives. But the more I learned, the more I realized that many store-bought almond milks are highly processed. Most are filled with: Thickeners and gums (like carrageenan or gellan gum) Preservatives to extend shelf life “Natural flavors” (never sure what those are?) Added sugars or artificial sweeteners Low actual almond content (some brands use as little as 2% almonds) This isn’t to scare you—just to empower you. Because when you know better, you can do better. And that’s exactly what led me to find a better way. Nutritional Benefits of Almonds (and Almond Milk!) Let’s not forget why we love almonds in the first place! These little powerhouses are loaded with healthy fats, vitamin E, plant-based protein, and are a good source of fiber. They support heart health, help balance blood sugar, and provide antioxidant protection. When you make your own almond milk at home, you’re getting a much more nutrient-dense version than the watered-down, additive-filled cartons from the store. No fillers, no preservatives—just the natural goodness of almonds and water. Bonus: homemade almond milk is easier on the gut for many women who struggle with digestion or inflammation. You’re skipping all those emulsifiers and gums that can cause bloating or discomfort. Making your own clean version of almond milk can be a great way to improve your gut health! I Thought Making Almond Milk Would Be Hard… Until I Found Almond Cow Here’s the thing. I used to assume that making almond milk was a long, messy, intimidating process. Soaking almonds overnight, blending, straining through a nut milk bag… I mean, who has time for that? But then I found the Almond Cow—and my whole perspective changed. This machine is a total game-changer. You throw in your almonds (no soaking required!), add water, press a button—and in under one minute, you’ve got fresh, creamy almond milk. I was like “What”? I was seriously amazed!! It’s too simple!  It makes about 5-6 cups per batch, stays fresh in the fridge for 5 to 6 days, and tastes amazing. It’s pure, light, and has that real nutty flavor you just can’t get from a carton. Besides almond milk, you can make any type of nut milk. I make pistachio milk often also because my family likes it in iced lattes- it’s decadent. For all my nut milks, I add a little vanilla and monk fruit sweetener and store it in the glass jar I received with the Almond Cow.    How To Make Almond Milk Using the Almond Cow – Step-by-Step Making almond milk with the Almond Cow is as simple as it gets. No soaking, no straining, no mess. Here’s how it works: 1. Add Almonds to the Filter Basket Measure 1 cup of raw almonds and place them inside the metal filter basket. Secure the basket to the top of the machine. 2. Fill the Base with Water Pour 5–6 cups of filtered water into the base of the Almond Cow (there’s a fill line for reference). Optional: Add a pinch of sea salt or a splash of vanilla extract to the water if you like your milk with a little flavor. 3. Attach the Top and Plug It In Twist the top blade attachment into the base. Plug in the machine—you’re ready to go! 4. Press the Button Press the cow icon on the front of the machine. It will run for just about 1 minute. You’ll hear a few cycles as it blends and extracts the milk. Enjoy Your Fresh Almond Milk! Once it’s done, pour the milk into a glass jar or container and refrigerate. Store in the fridge for up to 5-6 days. Use or Save the Pulp Scoop out the leftover almond pulp and use it. See my suggestions below.  View this post on Instagram A post shared by Chris Freytag: Over 50 Health and Fitness Expert (@chrisfreytag) How I Use Homemade Almond Milk In My Everyday Life I keep a batch of homemade almond milk in my fridge at all times now. It’s become a staple in so many of my daily habits: In my morning coffee as a clean creamer Blended into healthy smoothie recipes after workouts Poured over overnight oats or chia pudding (try my vanilla overnight oats or my chocolate chia seed pudding) Added to smoothies for a silky texture Used in baking recipes and healthy desserts Honestly, once you taste the difference, you’ll never want to go back. Bonus: What To Do With The Leftover Almond Pulp One thing I love about the Almond Cow is that nothing goes to waste. After making your almond milk, you’re left with almond pulp. You can throw it away or you can use it for other

My Almond Cow Review: Ditching Store-Bought for Healthy Homemade Milk in Under a Minute Read More »

10 Delicious Summer Mocktail Recipes You’ll Make on Repeat

10 Delicious Summer Mocktail Recipes You’ll Make on Repeat You’ll love these delicious mocktail recipes! Enjoy festive, flavorful drinks without alcohol—perfect for summer wellness, energy, and vibrant living. If you’ve found that alcohol doesn’t sit quite right anymore—maybe it’s messing with your menopause symptoms, hurting your sleep routine, zapping your energy, or just not aligning with your health goals—you’re not alone. Many women over 50 are embracing a “sober curious” or alcohol-free lifestyle in exchange for better sleep, clearer skin, and a stronger sense of vitality. For me personally, headaches have been my nemesis since menopause and a cocktail on the weekend here or there is sometimes relaxing, but other than that—it’s just not worth it for me. But that doesn’t mean skipping out on the fun! Enter mocktails—refreshing, special and full of natural flavor. The pretty colors and fresh ingredients can make you feel festive and fun without the side effects, so you can stay energized, feel great, and still be part of every celebration. And hey, if you’re in the mood to turn one of these into a cocktail every now and then, just add a splash of tequila, vodka, or your favorite spirit—these recipes make a great base for that too! Let’s dive into these delicious recipes! Here are some of my favorite healthy mocktail recipes that are incredibly easy to make and guaranteed to be a hit. Get ready to impress your taste buds and your guests! Skinny Mango Chili Spicy Margarita Mocktail with LMNT (makes 4) This mocktail offers a delightful kick with a perfect balance of sweet and spicy. Bonus: it’s made with LMNT electrolytes for an extra wellness boost. You’ll notice I’m using LMNT in the first three mocktail recipes—because that sweet-salty combo is so good, especially in a refreshing drink. The bonus? It’s loaded with electrolytes to help with hydration, has zero added sugar, and gives you that little something extra without compromising your health goals. Read my full LMNT electrolytes review to learn more! Recipe: To a pitcher, add 2 packets mango chili LMNT and the fresh squeezed juice from 4-5 limes. Stir well to dissolve the LMNT. Add 2 cans of lime sparkling water and stir. Pour into 4 glasses filled with ice with tajin added to the rim. Garnish with jalapeño slices or lime. Salty Paloma Mocktail with LMNT (makes 4) A refreshing and tangy twist on a classic, perfect for a hot day. Bonus: it’s made with LMNT electrolytes for an extra wellness boost. Read my full LMNT electrolytes review to learn more! Recipe: Mix 2 packets of grapefruit LMNT, 1 cup grapefruit juice, and fresh squeezed juice from 2 limes in a small pitcher. Divide between 4 glasses filled with ice and top with lime sparkling water. Raspberry Spritz Mocktail with LMNT (makes 2) Fruity and fragrant, this spritz is a true summer delight. Bonus: it’s made with LMNT electrolytes for an extra wellness boost. Read my full LMNT electrolytes review to learn more! Recipe: Add 1 packet raspberry LMNT, 1/2 cup fresh raspberries, fresh squeezed juice from 1 lime, and 1 sprig rosemary into a cocktail shaker and muddle, strain into 2 glasses. Top with lime sparkling water. Watermelon Mint Mojito Mocktail A cooling and sweet sensation that’s pure summer in a glass. Recipe: Add 1/2 heaping cup chopped watermelon, a few mint leaves, 1/2 lime freshly juiced, and 1 packet stevia, to a cocktail shaker and muddle. Strain into a glass and add lime sparkling water. Strawberry Basil Mocktail This mocktail is a fantastic blend of sweet berries and aromatic basil. Bonus: berries are a great anti-inflammatory food to add to your diet! Recipe: Add 4-5 strawberries, 3-4 basil leaves, fresh squeezed juice from 1/2 lemon, and 1 packet stevia to a cocktail shaker and muddle. Strain into a glass and add lemon sparkling water. Bonus: There are tons of great health benefits of drinking lemon water! Moscow Mule Mocktail All the zesty ginger flavor you love, without the alcohol. Recipe: Add sugar free ginger beer, fresh squeezed juice from 1/2 lime, and mint to a glass. Option to add a little sparkling water to lighten the ginger flavor. Arnold Palmer Mocktail A classic combination that’s incredibly simple and satisfying. Recipe: Add 1/2 cup unsweetened iced tea and 1/2 cup sugar free lemonade to a large glass with ice. Top with a splash of lemon sparkling water. Tart Cherry Hibiscus Mocktail A vibrant and slightly tart drink that’s rich in antioxidants. Recipe: Add 1/2 cup brewed (and chilled) hibiscus tea, 1/3 cup tart cherry juice, and the fresh squeezed juice from 1/2 lime, to a tall glass with ice. Top with lime flavored sparkling water. Love the flavor of cherries? You might also love my viral sleepy girl mocktail, perfect for bedtime! Cucumber Lime Mint Fizz Mocktail Crisp, cool, and incredibly refreshing for those extra warm days. Recipe: Add a 4-inch piece cucumber (sliced), fresh squeezed juice from 1/2 lime, 5-6 mint leaves, and 1 packet stevia, to a cocktail shaker and muddle. Strain into a glass and top with lime flavored sparkling soda. Blueberry Thyme Spritz Mocktail An unexpectedly delicious combination of sweet blueberries and earthy thyme. Recipe: Add 1/2 cup blueberries, 1 sprig thyme, fresh squeezed juice from 1/2 lemon, and 1 packet stevia to a cocktail shaker and muddle. Strain into a glass and top with lemon flavored sparkling water. I hope these healthy mocktail recipes inspire you to get creative with your summer drinks! Which one are you excited to try first? Let me know in the comments below! You’ll love these delicious mocktail recipes! Enjoy festive, flavorful drinks without alcohol—perfect for summer wellness, energy, and vibrant living. If… Chris Freytag, CPT{authorlink}https://gethealthyu.com/summer-mocktail-recipes/Get Healthy U | Chris Freytaghttps://gethealthyu.com/wp-content/uploads/2024/09/favicon-96×96.png

10 Delicious Summer Mocktail Recipes You’ll Make on Repeat Read More »

15 Easy Ways to Get 20g of Protein

15 Easy Ways to Get 20g of Protein Getting enough protein in your diet is crucial for muscle repair, satiety, and overall health. Whether you’re an athlete, looking to manage your weight, or simply aiming for a balanced diet, hitting your protein goals can sometimes feel challenging. As a certified personal trainer, I can attest to the vital role protein plays in our overall wellness, especially for women. You might be surprised by these 10 reasons women need more protein as they age. The good news is, it doesn’t have to be! Here are 15 simple and effective ways to get 20 grams of protein into your day with ease. Download a Printable PDF with My Easy Ideas to Get 20g of Protein!​ GET THE LIST! ​ 1. Three Eggs Eggs are a versatile and complete protein source, meaning they contain all nine essential amino acids. They’re also quick to prepare and can be enjoyed at any meal. Healthy Egg Recipes to Try Delicious Egg White Bites (Starbucks Copycat) Creamy Cottage Cheese Scrambled Eggs Simple Microwave Omelette in a Mug 2. Half of a Chicken Breast (75g/2.5oz) Chicken breast is a lean protein source, making it an excellent option for building and repairing muscle tissue. It’s also very adaptable for various recipes. Healthy Chicken Recipes to Try Southwest Chicken Salad Low Calorie Southwestern Chicken Soup Viral Chicken Caesar Salad Pizza 3. Three Handfuls of Nuts (100g/2.5oz) Nuts offer a good source of plant-based protein, healthy fats, and fiber. They make for a convenient and satisfying snack. 4. Parmesan Cheese (50g/2oz) Parmesan cheese can add a flavorful protein boost to your meals. It’s a simple way to increase your protein intake, especially when grated over dishes. 5. Half a Portion Beef, Duck, or Pork (75g/2.5oz) Red meats like beef, duck, and pork are excellent sources of high-quality protein and essential nutrients like iron and B vitamins. They are substantial and can be the centerpiece of a meal. Healthy Beef Recipes to Try Viral Beef Bowl with Hot Honey Shepherd’s Pie with Sweet Potato Topping Easy Hamburger Soup with Potatoes 6. One Can of Chickpeas (250g/8oz) Chickpeas are a fantastic plant-based protein option, also providing a good amount of fiber. They can be added to salads, stews, or roasted for a crispy snack. Healthy Chickpea Recipes to Try Crispy Ranch Roasted Chickpeas Easy Chickpea Power Bowl Viral Jennifer Aniston Salad Recipe 7. Two and a Half Cups Cow’s Milk (600mL/20fl.oz) Cow’s milk is a readily available source of complete protein, along with calcium for bone health. It can be consumed on its own, with cereal, or in smoothies. 8. One Small Fish Portion (100g/3.5g) Fish is a great source of lean protein and often provides beneficial omega-3 fatty acids. Including fish in your diet can support heart and brain health. Healthy Fish Recipes to Try The Perfect Grilled Salmon Every Time Healthy Teriyaki Salmon Salad 9. One Can of Lentils (250g/8oz drained) Lentils are another excellent plant-based protein, also rich in fiber and various minerals. They are very filling and can be used in soups, stews, and salads. 10. Full-Fat Greek Yogurt (200g/7oz) Greek yogurt is known for its high protein content, which can help with satiety. It’s also a good source of probiotics for gut health. Healthy Yogurt Recipes to Try Frozen Yogurt Bark with Fruit Treat 5-Ingredient High Protein Bagels 11. Tofu (250g/8oz) Tofu is a versatile plant-based protein that readily absorbs flavors, making it a great meat alternative. It can be stir-fried, baked, or grilled. 12. Five to Six TBSPs Nut Butter (80-100g) Nut butter provides a combination of protein and healthy fats, making it very satisfying. It’s delicious on toast, with fruit, or in smoothies. Healthy Nut Butter Recipes to Try Peanut Butter Cup Protein Shake Homemade Protein Bars with Peanut Butter No Bake Energy Bites with Peanut Butter 13. One Cup Cottage Cheese (200g/7oz) Cottage cheese is a dairy product packed with casein protein, which is digested slowly, promoting fullness. It’s a simple and effective way to increase protein intake. Healthy Cottage Cheese Recipes to Try Delicious 3 Ingredient Pancakes Cottage Cheese Ranch Dip (2 Ingredients!) Strawberry Cottage Cheese Ice Cream For even more ideas, check out my full list of high-protein cottage cheese recipes for women over 50! 14. Tempeh (100g/3.5oz) Tempeh is a fermented soybean product that is rich in protein and has a firm, chewy texture. It’s a great plant-based option for those looking for a more substantial meat alternative. 15. One Scoop of Protein Powder Protein powder is a concentrated and convenient way to quickly boost your protein intake, especially after workouts. It can be easily mixed into shakes or smoothies. Check out my list of the best protein powders, with reviews! Healthy Protein Powder Recipes to Try Green Protein Smoothie Snickerdoodle Protein Balls High Protein Overnight Oats For even more great ideas, check out my full list of healthy smoothies for weight loss! There you have it! Incorporating these protein-rich options into your daily meals and snacks can help you easily meet your nutritional needs. Experiment with these ideas to find what works best for your taste and lifestyle, and enjoy the benefits of a diet rich in protein! Download a Printable PDF with My Easy Ideas to Get 20g of Protein!​ GET THE LIST! ​ Getting enough protein in your diet is crucial for muscle repair, satiety, and overall health. Whether you’re an athlete, looking… Chris Freytag, CPT{authorlink}https://gethealthyu.com/easy-protein-sources/Get Healthy U | Chris Freytaghttps://gethealthyu.com/wp-content/uploads/2024/09/favicon-96×96.png

15 Easy Ways to Get 20g of Protein Read More »

Everything Bagel Avocado Toast (Easy, Savory Breakfast!)

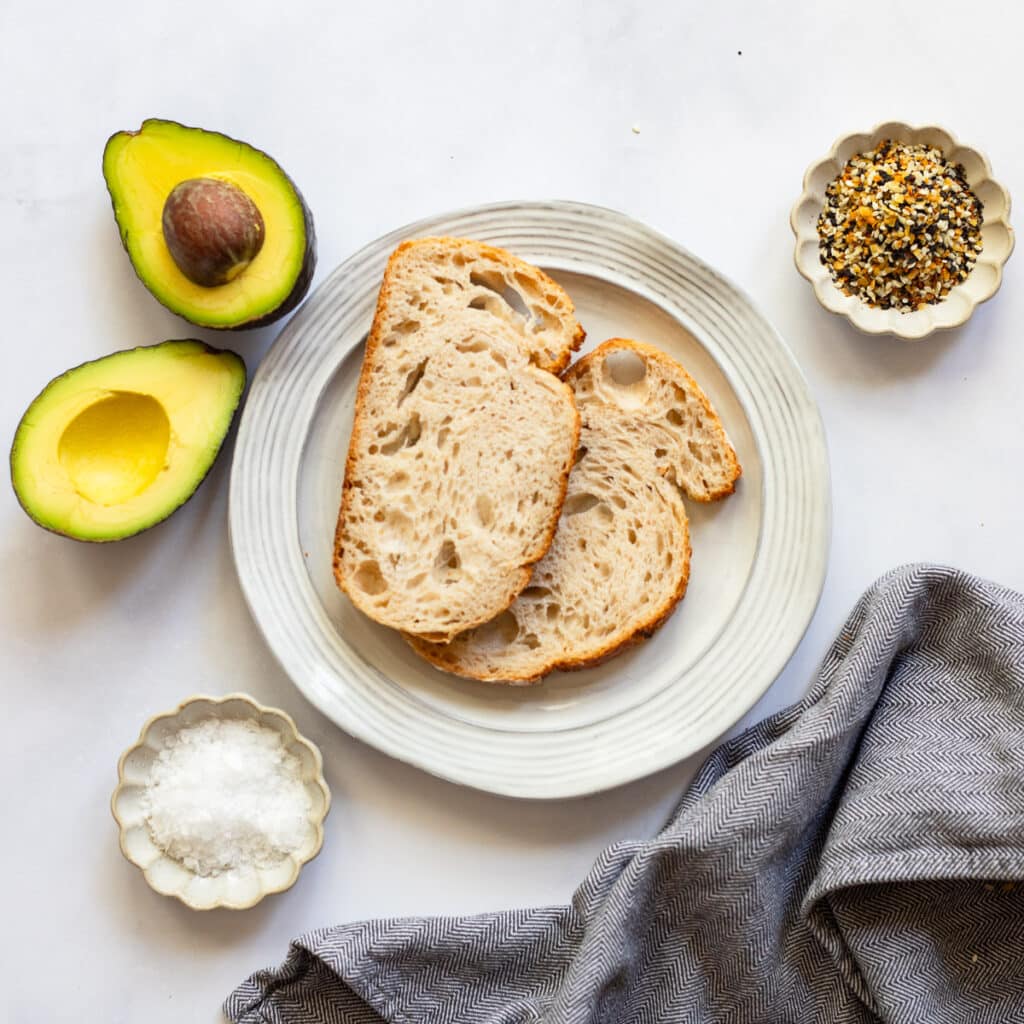
Everything Bagel Avocado Toast (Easy, Savory Breakfast!) This everything bagel avocado toast is simple to make in 5 minutes or less. However, despite its simplicity, it still has plenty of nutrition benefits to offer from fiber to healthy fats and antioxidants.  Social media has quickened the speed with which food trends come and go. I admit, I love trying a new viral recipe. However, one trendy food that continues to stick around is avocado toast. It makes some sense though, avocado toast is super simple to make and the flavor combinations are endless which has helped solidify its place as a delicious brunch staple. This everything bagel avocado toast is a combo that I make again and again.  In fact, this toast is the reason our pantry is always stocked with everything bagel seasoning. Beyond being delicious and easy, avocado toast is actually good for you too. Avocados are rich in heart healthy fats and fiber and a good source of nutrients like folate and vitamin K – a great breakfast or snack choice if you ask me.  Check out even more healthy breakfast recipes for busy mornings! Ingredients for Avocado Toast with Everything Bagel Seasoning Use these simple and fresh ingredients packed with nutritional value to make this delicious everything bagel avocado toast recipe. Be sure to check out the recipe card for the exact amounts of each ingredient you’ll need.  Avocado: you’ll want to use an avocado that has just reached peak ripeness for avocado toast. You can tell when an avocado is ripe and ready when it yields to firm gentle pressure (it shouldn’t feel “mushy”). Bread: if you want to make a great avocado toast, you need to use really good bread. I love using fresh sliced sourdough bread from the farmers market but any high-quality bread will work. Use a whole grain toast if you want to score some additional fiber. Use a gluten-free bread if you want to make a gluten free avocado toast.  Everything Bagel Seasoning: this popular seasoning blend (also called everything but the bagel seasoning) features black and white sesame seeds, poppy seeds, dried garlic and onion and sea salt flakes. A variety of spice brands sell their own blend (including Trader Joe’s). You can also make your own at home.  Flakey Salt: although the bagel seasoning usually has some salt, I like to add another pinch of flakey salt (like Maldon salt) but you can omit it if you’d prefer.  How to Make Avocado Toast This healthy avocado toast recipe is simple to put together in a few steps.  Toast Your Bread: start by putting your bread in the toaster. Then, while it toasts you can get your avocado ready. Halve and Chop Your Avocado: slice your ripe avocado in half lengthwise, running your knife along the edge of the pit. Twist the two halves in opposite directions to open the avocado and then use your knife to pop out the pit.  For a pretty presentation, peel and thinly slice your peeled avocado and transfer to the top of your toast.  Otherwise, use a paring knife to score the avocado in the skin then scoop it out onto your toasted bread and mash well with a fork until evenly spread on the slice of bread.  If you don’t want to smush your bread, you can also mash your avocado on a cutting board and then scoop it onto your toast. However, be sure to leave some texture – you’re not making guacamole! Add Seasoning: Sprinkle the mashed avocado with the everything bagel seasoning and a pinch of flaky sea salt. Enjoy! More Avocado Toast Topping Ideas The great thing about avocado toast is that you can be endlessly creative with different topping combinations. Here are a few of our favorites to get you started: Pickled red onion Soft boiled or fried egg Sprouts, microgreens, or fresh arugula and a squeeze of fresh lemon juice Kimchi Crumbled goat cheese and pomegranate seeds Sliced tomatoes Sriracha or hot sauce Nuts or seeds like pumpkin seeds or sunflower seeds Steamed edamame or canned chickpeas  What to Serve with Avocado Toast Avocado toast is quick and easy to make; enjoy it as a side with your favorite breakfast or toast a slice for a tasty snack in the morning. Here are some ideas of what to serve with your avocado toast.  Smoothies (try this immune boosting smoothie or a chocolate banana smoothie) Creamy cottage cheese eggs Fresh fruit Egg white bites Microwave omelette in a mug Print Everything Bagel Avocado Toast (Easy, Savory Breakfast!) This everything bagel avocado toast is simple to make in 5 minutes or less. However, despite its simplicity, it still has plenty of nutrition benefits to offer from fiber to healthy fats and antioxidants.  Prep Time 5 minutes minutes Cook Time 2 minutes minutes Total Time 7 minutes minutes Servings 2 servings Calories 335kcal Ingredients 1 medium avocado mashed 2 slices whole-grain bread toasted 2 teaspoons everything bagel seasoning Pinch of flaky sea salt such as Maldon Optional: pickled red onion sprouts Instructions Start by putting your bread in the toaster. Then, while it toasts you can get your avocado ready. Slice your ripe avocado in half lengthwise, running your knife along the edge of the pit. Twist the two halves in opposite directions to open the avocado and then use your knife to pop out the pit. Use a paring knife to score the avocado in the skin then scoop it out onto your toasted bread and mash well with a fork until evenly spread on the slice of bread. Sprinkle your avocado toast with the everything bagel seasoning and a pinch of flaky sea salt. Enjoy! Nutrition Serving: 0.5recipe | Calories: 335kcal | Carbohydrates: 42g | Protein: 9g | Fat: 16g | Fiber: 8g | Sugar: 4g This everything bagel avocado toast is simple to make in 5 minutes or less. However, despite its simplicity, it still… Chris Freytag, CPT{authorlink}https://gethealthyu.com/everything-bagel-avocado-toast/Get Healthy U | Chris Freytaghttps://gethealthyu.com/wp-content/uploads/2024/09/favicon-96×96.png

Everything Bagel Avocado Toast (Easy, Savory Breakfast!) Read More »