Pain + Recovery

Auto Added by WPeMatico

4 Shoes I’ve Walked 20,000+ Steps In Without Foot Pain

4 Shoes I’ve Walked 20,000+ Steps In Without Foot Pain I get asked this all the time: what shoes can you actually walk all day in and still have your feet feel good at the end of it? And, I get why women ask. A shoe can look great when you first put it on, but that doesn’t mean it’s going to hold up when you’re 12,000 steps in, your arches are tired, and you still have half the day to go. As a personal trainer and a seasoned walker, I feel very qualified to talk about this. Walking is part of my everyday life. I walk at home, I walk when I travel, and I’ve tested shoes on real streets, real vacations, and real long walks and hikes. So when I say these are shoes I’d recommend for long-distance walking, I’m not guessing. I’m sharing the pairs that have truly worked for me. These shoes give me the combination I care about most: arch support, cushioning, comfort, and the ability to keep going without my feet hurting later. What I Look for in a Shoe for Long Walking Days When I’m choosing a comfortable and supportive shoe for big walking days, I keep it simple. I want cushioning, but not so much that I feel unstable. I want arch support that helps my whole body feel better. I want enough room in the toe box so my feet don’t feel cramped. And I want a shoe that still feels good hour after hour, not just for the first 20 minutes. Now let’s get to the shoes. 1. Nortiv8 Active Float Walking/Running Shoe This has been the number one best-selling shoe in my Amazon storefront, and honestly, I understand why. It’s cushioned, has great arch support, and a roomy toe box. It’s one of my favorite budget-friendly athletic shoes, and I’ve been wearing this brand for about two years now. The feel really reminds me of the Hoka Clifton in both comfort and performance, but at about one-third of the price. Sometimes you want a shoe that feels a little softer and more forgiving, especially if your feet are sensitive or you’re logging a lot of miles. This is that shoe for me. I’ve had plenty of days over 20,000 steps in this pair, and it has held up so well. Why I Like It Soft but supportive cushioning Great arch and heel support Lightweight and breathable mesh upper Roomy toe box for long walking days Excellent value for the price Best For Women who want an affordable athletic walking shoe that feels supportive, cushioned, and comfortable for all-day wear. Shop It Here NORTIV 8 Women’s Walking Shoes – Cushion Tennis Shoes Check Price We earn a commission if you make a purchase, at no additional cost to you. 2. ALLSWIFIT Road Running Shoe This was my walking shoe all over France! I wore this pair on the days we hiked and walked for miles, and it passed the test beautifully. We walked all day, and my feet still felt supported, cushioned, and comfortable by the end of it. That’s what made this pair stand out to me. It reminds me a lot of the Hoka Bondi. It has that super-cushioned, supportive, protective feeling that makes long days of walking or standing much easier on your feet. It also has slight rocker technology that helps propel you forward, along with max cushioning. It’s made for both walking and running, and I think it has a sporty, modern look too. Why I Like It Maximum cushioning for high-step days Strong arch and heel support Lightweight and breathable Toe box allows room for your feet to spread naturally Great for travel and sightseeing Best For Women who want maximum cushion, lots of support, and a shoe that travels well. Shop It Here Women s Road Running & Walking Shoes Check Price We earn a commission if you make a purchase, at no additional cost to you. 3. Paul Green Hadley Sneaker This one is a little different from the others because it doesn’t look like an athletic shoe. It looks more like a fashion sneaker, which is exactly why I wanted to include it. My sister just got back from Italy, and she walked 20,000 steps a day in this pair. She has foot issues, so she’s not someone who can wear just anything and hope for the best. This was the shoe she was told to wear, and she came back raving that her feet felt amazing the entire trip. If you can spend the money, you won’t be disappointed. Paul Green is known for quality comfort shoes, and this one really seems to hit that sweet spot between style and support. If you want a shoe that looks polished and pulled together but still feels comfortable enough for travel, this is a strong option. Not every day calls for a workout shoe. Sometimes you want to stay comfortable and still feel stylish in your outfit. This shoe gives you that. Why I Like It Stylish without sacrificing comfort Great for travel and city walking Supportive enough for women with foot issues Elevated look compared to athletic sneakers Extremely comfortable right out of the box After my sister gave these such a rave review, I ordered them too. They may honestly be the most comfortable “fashion” sneaker I’ve ever worn. They’re definitely coming with me on my trip to Greece, apparently this is my year of international travel! Best For Women with foot issues, travel days, city walking, and anyone who wants comfort in a more elevated sneaker. Fit Note Size down a half size. Shop It Here Shop the Paul Green Hadley Sneaker here. 4. Teva Women’s Original Universal Slim Lea Sandal I have women ask me all the time: is there really such a thing as a sandal you can walk long distances in? And my answer is yes, but not every sandal is up for the job.

4 Shoes I’ve Walked 20,000+ Steps In Without Foot Pain Read More »
7 Workout Mistakes Causing Pain Over 40 (and How to Fix Them)

7 Workout Mistakes Causing Pain Over 40 (and How to Fix Them) Whether you’re lacing up your sneakers before sunrise, squeezing in a power walk between meetings, or hitting the gym after a long workday, let me just say: good for you. Showing up for yourself is half the battle, and that consistency is what keeps your body strong and your mind clear. But here’s the reality check: even the most dedicated fitness routines can backfire if you’re not mindful of a few common mistakes. And those mistakes? They’re the sneaky culprits behind soreness, strain, and sometimes even full-blown injuries. As a trainer who’s been working with women over 40 for decades (and as a 59-year-old myself!), I’ve seen these slip-ups more times than I can count, and I’ve made a few of them, too. The upside? A few simple tweaks can go a long way in keeping you injury-free and feeling your best. Let’s walk through seven common workout mistakes, and how to fix them so you can stay moving pain-free! 1. Skipping the Warm-Up I get it, we’re all busy. But jumping into a workout cold can be a mistake especially as you age. Your muscles need a little wake-up call, and your joints need some gentle movement before you hit go. The Fix Take 5–10 minutes to warm up. As I’ve gotten older, I’ve realized how essential this step is. Try mobility moves like runner’s lunges, cat-cow, and down dog to ease in. Then flow into some bodyweight squats, arm circles, and hip openers. Remember what I always say: motion is lotion! Your joints need lubrication before they go to work. I recommend these warm up moves for middle aged before every workout! 2. Skipping the Cool Down We’ve all done it, class ends, and you’re out the door before the music stops. Or you finish a run, come in the house and just start doing the next thing. But skipping your cooldown is like slamming on the brakes without easing off the gas. Your body needs time to downshift. The Fix Carve out at least five minutes to slow your heart rate and stretch. This is your time to lengthen those hard-working muscles and support recovery. Static stretching helps prevent soreness and improves flexibility, something that becomes more essential as we age. That extra five minutes can be the difference between feeling fantastic or waking up stiff as a board. 3. Pushing Too Hard, Too Often There’s a myth that workouts only count if they leave you drenched in sweat and gasping for air. But for women in midlife, that “no pain, no gain” mentality can backfire. I like to push hard like many of you but what I’ve noticed is now that I’m older, I also need to build in recovery time. The Fix High-intensity workouts are great, in moderation. But rest and recovery are where the magic happens. Mix in gentler options like walking, Pilates, or yoga. If back pain is an issue, try this sciatica stretch for women over 50 to keep pain away! I wear an Oura ring, and it gives me a low readiness score when I haven’t prioritized recovery. Trust me, the data doesn’t lie, rest is not weakness. It’s wisdom. 4. Doing More Than Your Body Is Ready For Let’s be honest, it can be tempting to jump into advanced workouts before your body is quite ready, especially if you’re feeling motivated or trying to keep up with others. But doing too much too soon can lead to unnecessary aches or injuries. The Fix Challenge yourself within reason. Growth takes time, and you’ll get stronger by gradually increasing weights or intensity. It’s not a race. The goal is consistency over the long haul, not crushing yourself on day one. You’ve got plenty of time to level up! Check out even more tips to build muscle after menopause! 5. Letting Your Form Slide You’ve probably heard me say it before: “Poor form, poor results.” It doesn’t matter how many reps you’re doing, if your form’s off, you’re not doing your body any favors. The Fix Slow down and check your technique. Whether it’s in a group class, a one-on-one session, or even watching a tutorial video, learn the right way to move before you add speed or weight. You’ll get better results, and avoid injury. 6. Skipping Strength Training If you’re skipping strength work, you’re missing a key ingredient for aging well. Cardio is great, but strength training is what keeps your muscles firm, your bones strong, and your metabolism humming. The Fix Lift weights at least twice a week. Start with bodyweight exercises like squats or push-ups and progress to dumbbells. Use resistance that feels challenging by the 10th or 12th rep. Strength training is your ticket to more energy, better balance, and a faster metabolism. Don’t be afraid to start, it’s never too late. 7. Ignoring Pain or Discomfort A lot of us have been taught to tough it out. But pain is your body’s way of waving a red flag. Muscle fatigue is one thing, but real pain means something’s not right not right. The Fix Pay attention to your body’s signals. If something hurts in a sharp, “ouch” kind of way, stop. Rest. Seek help if you need to. Pushing through pain doesn’t make you a warrior, it increases your risk of long-term injury. Staying active in your 40s, 50s, and beyond is one of the best gifts you can give your body. I do things differently now at 60 than I did at 40, and that’s okay. The way you move matters just as much as how often you move. With a few smart shifts, you can stay strong, mobile, and pain-free. Remember: fitness isn’t about beating yourself up, it’s about feeling good in your body and living the life you want to live. Whether you’re lacing up your sneakers before sunrise, squeezing in a power walk between meetings, or hitting the gym after… Chris

7 Workout Mistakes Causing Pain Over 40 (and How to Fix Them) Read More »

The Best Sciatica Stretch for Women Over 50 to Relieve Back and Hip Pain

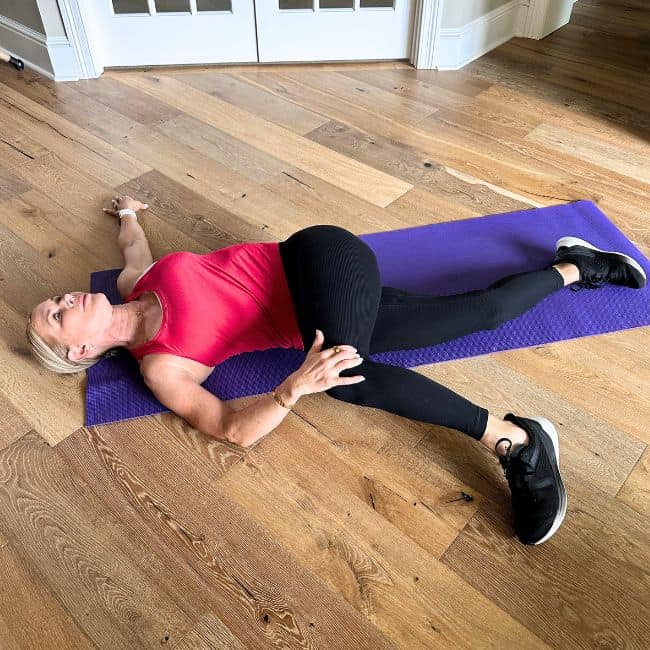
The Best Sciatica Stretch for Women Over 50 to Relieve Back and Hip Pain If you spend hours each day sitting, whether you are at your desk, commuting, or relaxing on the couch, your body is feeling the effects more than you might realize. Prolonged sitting keeps your hips in a shortened position, rounds your spine forward, compresses your spinal discs, and limits the natural rotation and extension your back needs to stay healthy. Over time, this can lead to poor posture, stiff muscles, tight hips, and even pressure on your sciatic nerve. For women in midlife and beyond, these issues can be even more noticeable. As we age, our muscles and connective tissues lose some elasticity, our joints may become stiffer, and years of repetitive movement patterns can cause imbalances. That means the little aches you feel now can become bigger problems if you ignore them. One of the most effective ways to combat this? The best sciatica stretches for women over 50 is the lying spinal twist. Why the Lying Spinal Twist is So Beneficial for Women Over 50 I recommend the lying spinal twist stretch to so many of my clients, especially women over 50, because it addresses several common trouble spots at the same time. Not only does it feel amazing, it helps counteract the exact muscle patterns that develop from years of sitting and leaning forward. Here’s why this stretch is so valuable for sciatic and lower back pain: Stretches and relieves tension in the spine, which can take pressure off the sciatic nerve Improves spinal mobility and flexibility, helping you move with less stiffness Targets the glutes, lower back, and hips, key areas that often contribute to sciatic pain Encourages deep breathing and relaxation, which reduces stress and helps your body let go of tension For women in midlife, these benefits are especially important. Sciatica often becomes more common after 50 because of natural changes in spinal discs, a decrease in muscle mass, and tightness in the hips and hamstrings from less daily movement. A stretch like the lying spinal twist helps restore mobility and reduces discomfort without requiring intense exercise or high-impact movement. You might also appreciate these 7 ways I prevent joint pain during exercise in my 50’s! How to Do the Lying Spinal Twist Follow these simple instructions to perform the lying spinal twist with proper form. Lie on your back with your knees bent and feet flat on the floor. Extend your arms out to the sides so your body forms a T-shape. Let both knees gently fall to one side while keeping your shoulders pressed into the floor. Hold the position for 20 to 30 seconds, breathing deeply and allowing your body to relax into the twist. Slowly bring your knees back to the center, then repeat on the other side. For fast sciatica relief, alternate sides back and forth, completing 20 total repetitions, 10 on each side, in the morning and again before bed. Why It Works for Sciatica When you sit for long periods, the muscles in the front of your hips (hip flexors) tighten and pull your pelvis out of alignment. The lower back muscles can become shortened and stiff, and your spine loses its natural rotation. This creates pressure on the sciatic nerve, which runs from your lower back down the backs of your legs. The lying spinal twist helps in two ways. First, it stretches the muscles and connective tissue along your back, hips, and glutes, opening up space in the lower spine and reducing compression. Second, it restores gentle rotation to your spine, which improves mobility and helps prevent that “locked up” feeling. When to Add This Stretch to Your Day The beauty of this move is that it requires no equipment, takes very little time, and can be done anywhere you have room to lie down. Do it first thing in the morning to loosen up after sleeping Add it as a midday break after hours of sitting at a desk Make it part of your evening routine before bed to release tension and improve sleep quality If you are dealing with nagging lower back stiffness, tight hips, or occasional sciatic nerve pain, adding the lying spinal twist to your daily routine can be a game-changer. The Takeaway For women over 50, protecting your spine and maintaining flexibility is key to staying active, strong, and pain-free. You do not have to overhaul your entire fitness routine or spend hours stretching each day. A few minutes with the lying spinal twist, done consistently, can help reduce back and sciatic discomfort, improve posture, and restore movement to your spine. If you have been telling yourself that back pain is just part of getting older, I encourage you to try this simple move twice a day for the next two weeks. You might be surprised at how much better you feel. If you spend hours each day sitting, whether you are at your desk, commuting, or relaxing on the couch, your… Chris Freytag, CPT{authorlink}https://gethealthyu.com/sciatica-stretch-for-women-over-50/Get Healthy U | Chris Freytag Realistic workouts and healthy aging for the middle-aged woman. https://gethealthyu.com/wp-content/uploads/2024/09/favicon-96×96.png

The Best Sciatica Stretch for Women Over 50 to Relieve Back and Hip Pain Read More »

9 Essential Stretches For Walking That Help Prevent Injuries

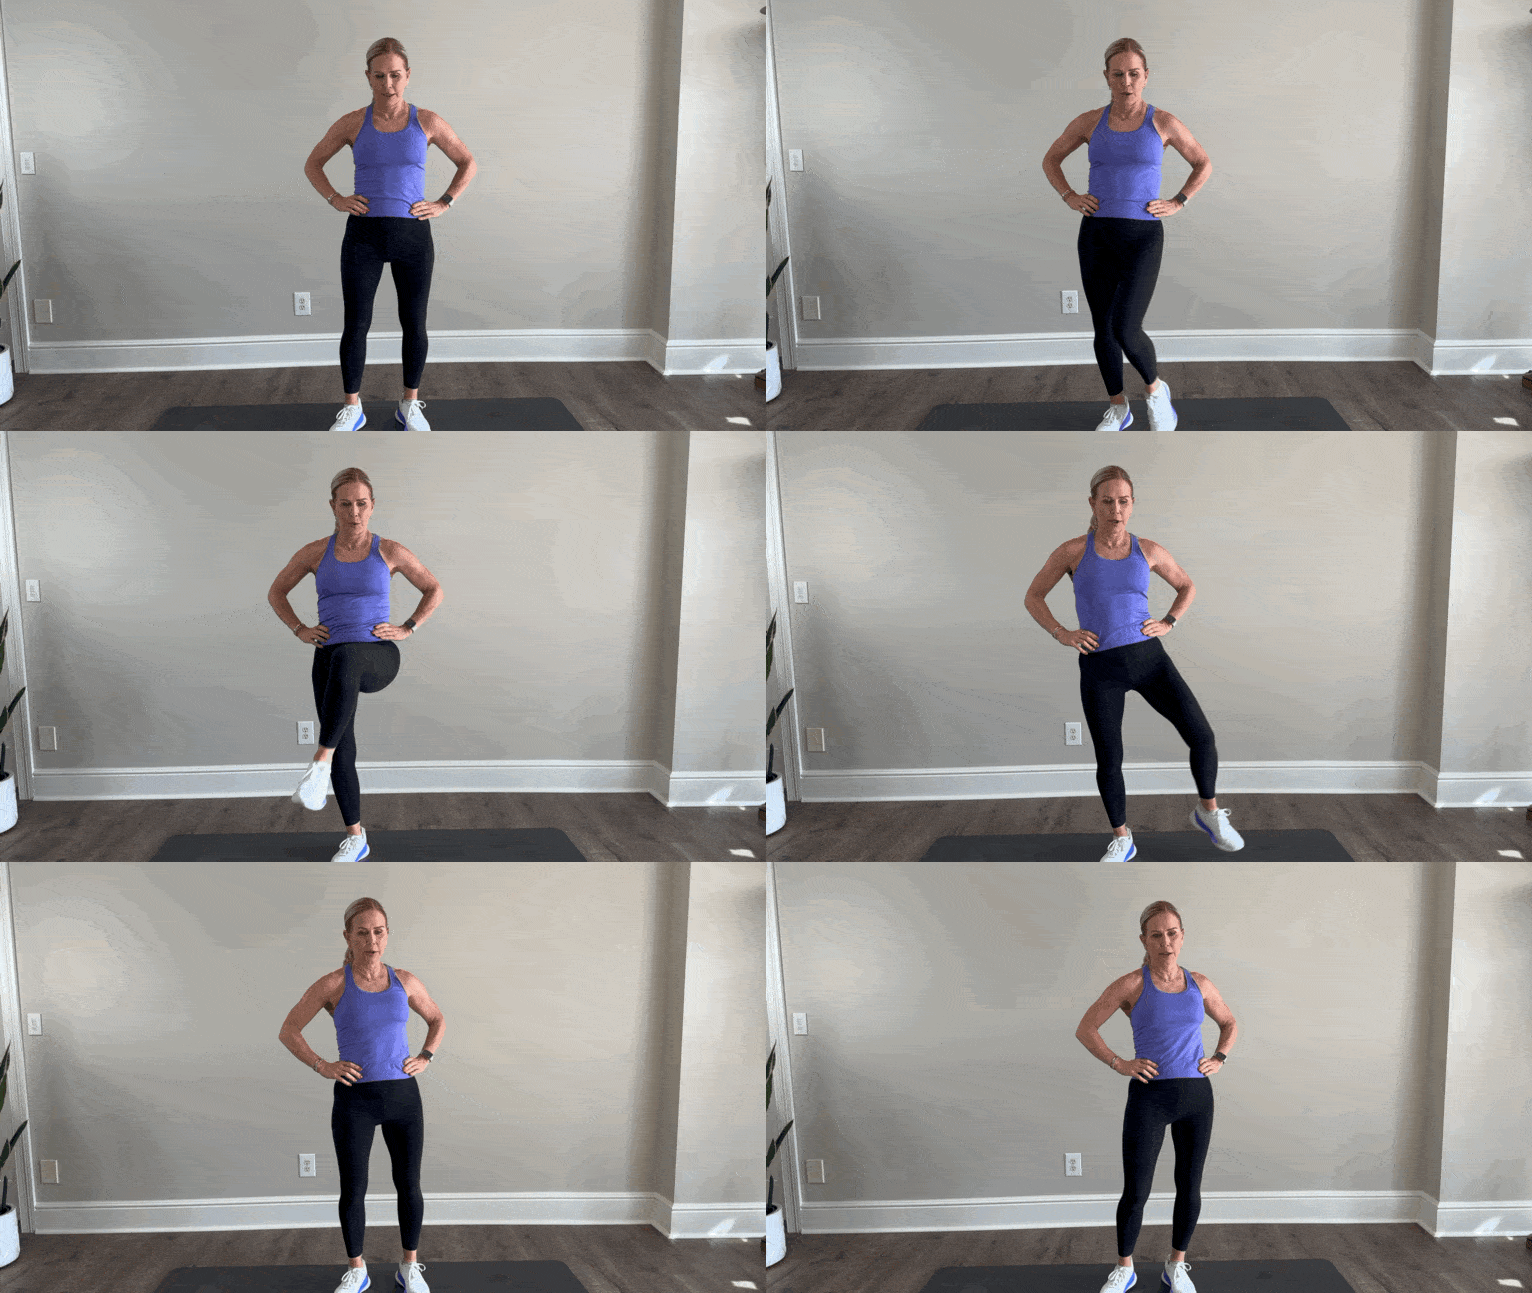
9 Essential Stretches For Walking That Help Prevent Injuries Boost your walks and prevent injuries with my 9 essential stretches for walking, perfect for casual strollers and seasoned hikers alike. I’m a health coach, personal trainer, and lifelong advocate for movement at every age. And one of my all-time favorite ways to move my body? Walking. Whether I’m squeezing in a couple mile power walk before work or getting in a longer 6-mile stroll with the dog, walking clears my head, gets my heart rate up, and just makes me feel good. But here’s the thing—if you’re putting in the miles, even if it’s “just walking,” you need to be stretching. Seriously. I’ve learned the hard way that skipping stretching exercises can lead to tight hips, cranky hamstrings, and an achy low back, especially as we get older. So let’s talk about why walking is such a fantastic low-impact workout and why a stretching routine—before and after—needs to be part of your workout. Why Walking Deserves More Credit Walking is often underestimated. But make no mistake—it’s one of the best low-impact ways to burn calories, get your heart rate up, and support your overall health. It’s gentle on the joints, accessible for most fitness levels, and can be done anywhere, anytime. Plus, walking helps with: Cardiovascular health Mental clarity (seriously, walking is my moving meditation!) Bone strength (especially when combined with resistance work- I wear a weighted vest.) Weight management Mood boosting from endorphins (your body’s natural happy drug.) If you’re in midlife like me, walking can be the perfect go-to cardio to stay active without over-stressing your body. But… tight muscles and limited mobility can sneak in if you’re not doing your part to warm up and cool down. Why Stretching Is Non-Negotiable for Walkers If you’ve ever noticed your hips or legs getting tight during or after a walk, you’re not alone. Walking uses a lot of repetitive motion, and if you’re doing it daily like I am, you’ve got to make time for flexibility and mobility. Stretching can help: Prevent injuries (yes, walkers can get them too!) Improve circulation Increase range of motion Relieve tension in overused muscles and reduces muscle soreness Support better posture and alignment Plus, let’s be honest—as we age, we get tighter. Our muscles and ligaments and joints are aging with us. It’s just the truth. But, it doesn’t mean we can’t work on staying mobile and feeling good in our bodies. It’s time to start paying attention to your body in a new way and being diligent about our self care which includes stretching. Let’s dive into my favorite pre-walk and post-walk stretches. I use them myself and recommend them to all my clients—especially those over 50 because our ligaments, tendons and muscles need a little more attention than they did 30 years ago! These movements are practical, quick, and effective and are easy for you to add to your walking routine. All you need is an extra 5 minutes on the front and back of your walk! Pre-Walk Stretches (Dynamic & Standing Only) Before a walk, you want to move the muscles—not hold static stretches. These dynamic stretching moves help to increase blood flow and range of motion in your joints while prepping your body for movement. 1. Standing Hip Circles This one’s for your hip joints—great for loosening up stiffness. How to do it: Stand tall, hands on your hips. Slowly lift your right leg in a circular motion (like you are lifting it up and over a step stool). And then bring it back the other direction. Do it 5 times on the right and then repeat on the left leg. Why it helps: Warms up the hip sockets and lower back area and gently activates your core. 2. Toe Touch Reaches I’m not talking about the static kind—this one gets your hamstrings moving. How to do it: Stand with feet shoulder-width apart. Reach both arms up to the sky, then sweep them down toward your toes in a flowing motion. Repeat 10 times. Why it helps: Warms up the hamstrings, glutes, lower back and upper back while encouraging circulation. Also opens up your shoulders. 3. Standing Side Stretch A gentle side bend that wakes up your spine and obliques. How to do it: Reach your arms overhead, then gently lean to one side. Come back to center, and lean the other way. Repeat 5 times each side. Why it helps: Opens up the sides of the body and helps with torso muscles used during walking. 4. Standing Knee Hugs We’re targeting the hips and glutes with this one. How to do it: Stand tall. Bring one knee up toward your chest, hugging it with your arms for a second or two, then release and switch sides. Alternate for 10 total reps. Why it helps: Activates the hip flexors and glutes while challenging balance a bit (always a good thing!). 5. Calf Raises Don’t forget those calf muscles—they do a lot of work while you walk! How to do it: Stand with feet hip-width apart. Slowly rise onto your toes, then lower back down. Do 10-15 reps. Why it helps: Strengthens your lower legs and promotes circulation before you hit the trail. Post-Walk Stretches (Gentle, Grounded & Static) Now that your body is warm, it’s the perfect time to go deeper. These stretches are designed to release tension, lengthen muscles and aid recovery post workout. 1. Toe Touch Hold Yes, again! But this time it’s a hold. How to do it: With feet hip width apart, gently fold forward from your hips and reach toward your toes. Let your head and neck relax. Hold for 30 seconds. Why it helps: A deeper hamstring and lower back release after your walk. 2. Deep Squat (aka Yoga Squat) This one’s my go-to for opening the hips. How to do it: Stand with feet slightly wider than hips, toes slightly out. Sink your hips down toward the floor, bringing your hands to prayer position at your chest. Elbows can gently press into your knees. Why it helps: Stretches your hips, ankles, and lower back—and feels amazing after walking hills or inclines. 3. Cat-Cow Stretch Perfect for

9 Essential Stretches For Walking That Help Prevent Injuries Read More »

Myofascial Release Explained: The Secret to Muscle Recovery & Flexibility

Myofascial Release Explained: The Secret to Muscle Recovery & Flexibility Ever feel tight, sore, or stiff after a workout? Myofascial release might be the game-changer your muscles need for faster recovery and better flexibility. Many people experience muscle tightness that stretching alone can’t seem to fix. The culprit? Fascial restrictions—deep knots and adhesions that limit movement and cause discomfort. This is where myofascial release comes in. It’s a simple, science-backed manual therapy that helps release muscle tension, improve flexibility, and speed up recovery—all without needing an expensive physical therapist. I learned about self-myofascial release in 2014 when I was plagued with some bad low back pain. Along with infrared light therapy, it eliminated my pain. Now I practice myofascial release every day as a part of my quick morning routine that I will share with you in a video below. But if you have no idea what it is, keep reading! I’m going to break down what myofascial release is, why it’s essential for your body, and how to do it using foam rollers and trigger point massage balls (spoiler: the ball is a game-changer for deep knots!). What Is Myofascial Release Your body is wrapped in a web-like connective tissue called fascia, which surrounds your muscles, joints, and organs. When fascia gets tight due to stress, repetitive movements, poor posture, or intense workouts, it creates knots, stiffness, and pain. Myofascial release is a hands-on technique that uses gentle, sustained pressure to loosen these tight spots, restoring natural movement and reducing discomfort. How Self Myofascial Release Works Unlike traditional stretching (which lengthens muscles), myofascial release targets trigger points—small, tight areas in the fascia that can cause pain and restrict range of motion. Applying pressure with tools like foam rollers and massage balls helps: Increase blood flow Reduce muscle soreness Improve range of motion Break up adhesions in the fascia Think of it like untangling a knot in a shoelace—instead of pulling harder (stretching), you work directly on the knot to loosen it. 5 Benefits of Myofascial Release for Recovery & Flexibility Whether you’re an athlete, an active walker, or simply someone who experiences muscle tightness from sitting too much or daily stress, myofascial release therapy is one of the most effective ways to keep your body feeling loose, strong, and pain-free. Let’s talk about some of the amazing benefits! 1. Speeds Up Muscle Recovery & Reduces Post-Workout Soreness Faster After exercise, your muscles experience micro-tears, which is part of the normal repair and strengthening process. But when fascia tightens around those muscles, it can trap tension and prolong soreness. Myofascial release accelerates recovery by: Breaking up knots and adhesions that restrict movement. Increasing blood circulation, which flushes out lactic acid and delivers nutrients for faster healing. Allowing your muscles to return to their natural, relaxed state more quickly. This means less soreness, better mobility, and a faster return to your favorite workouts! 2. Increases Flexibility & Mobility Helping You Move Freely Without Stiffness Tight fascia can limit your range of motion—making it harder to bend, twist, squat, or even reach overhead comfortably. By regularly performing self-myofascial release, you are: Unbinding restrictions in your fascia, which allows for smoother, more fluid movement. Helping your muscles lengthen properly, so they don’t feel stiff or restricted. Improving joint mobility, making everyday activities (like walking, yoga, or lifting groceries) feel effortless. Many people think flexibility only comes from stretching, but myofascial release is the missing piece that helps unlock true mobility and can relieve chronic pain. 3. Prevents Injuries Keeping Your Muscles Balanced & Healthy When fascia becomes too tight, it pulls on surrounding muscles and joints, creating imbalances that can lead to pain or injury. Regular myofascial release helps: Even out muscle imbalances, reducing strain on weaker areas. Prevent compensation patterns (e.g., if your right hip is tight, your left side won’t overcompensate). Decrease the risk of overuse injuries, like runner’s knee, IT band syndrome, and lower back pain. Think of it as body maintenance—just like changing the oil in your car, keeping your fascia loose prevents breakdowns before they happen! 4. Improves Circulation & Reduces Inflammation Helping You Heal Faster & Feel Better Poor circulation can lead to stiff, achy muscles, fluid retention, and sluggish recovery. By breaking up fascial adhesions, myofascial release: Boosts blood flow, delivering oxygen and nutrients to tired muscles. Helps flush out toxins and metabolic waste, reducing soreness and inflammation. Stimulates the lymphatic system, which supports immune function and tissue repair. This natural detox effect can leave you feeling lighter, looser, and more energized. 5. Relieves Tension & Stress Helping to Calm Your Nervous System Tension isn’t just physical—it’s neurological. Stress, anxiety, and poor posture can cause fascia to tighten and hold onto tension, making you feel stiff and fatigued. Myofascial release activates the parasympathetic nervous system, helping you: Relax and release stored tension from stress and poor movement habits. Reduce muscle guarding (when your muscles stay involuntarily tensed due to stress). Improve breathing patterns, which naturally relaxes tight fascia. Many people instantly feel calmer after a session because they’re releasing not just physical tension, but mental stress stored in their body. If you struggle with stress, explore the tips I used to reduce stress from everyday life. Why You Should Add Myofascial Release To Your Self Care Routine Most importantly—myofascial release is simple, effective, and accessible. You don’t need an expensive massage to experience these benefits. With just a foam roller or a trigger point massage ball, you can take control of your recovery, flexibility, and overall well-being in just a few minutes a day. Anything you can do yourself at home to take care of your body is key to longevity. It’s not easy or affordable to schedule weekly massages or chiropractor appointments. But if you can do pain management at home, you’ll be better off in the long run. If you’re new to myofascial release, start with just 5-10 minutes a day and notice the difference in how your body moves and feels! My Exact Myofascial Release Routine I use myofascial release every morning with a massage ball to loosen the tension in my fascia and muscles surrounding my low back and along my Quadratus Lumborum. I lay on my bathroom floor with a mat and just do my 5-10 minutes of my own physical therapy along with deep breathing. At my age, it’s pretty common to wake up with a stiff or tight back. For

Read More »

How I Use Infrared Light Therapy to Manage Pain in Midlife

How I Use Infrared Light Therapy to Manage Pain in Midlife Discover how infrared light therapy can be a game-changer for managing pain in middle age. Learn how this natural, non-invasive treatment supports muscle recovery, reduces inflammation, and improves overall well-being as we age. If you’re like me—59, active, and maybe dealing with a few aches and pains—you know the importance of staying proactive with our health. About ten years ago, I struggled with terrible back pain. Years of activity as a fitness professional, mixed with regular wear and tear, had left me in pain that just wouldn’t quit. After trying everything, I found a solution in infrared light therapy and daily stretching. These two became my go-to tools, helping me ease tight muscles and get back to moving without that stubborn pain. Now, it’s become a daily ritual for me—I wear my infrared therapy pad each morning as a kind of “preventative medicine.” And recently, it’s also been a lifesaver for my knee, which has been acting up, likely from years of overuse. I use an infrared light therapy joint wrap that has been an easy and effective way to manage the inflammation and get back to what I love. Let me tell you why I’m such a fan of how this therapy actually works to relieve pain, and what I’ve learned from experience and research. The Benefits of Infrared Light Therapy for Pain Management Infrared therapy isn’t just for back pain—although it’s excellent for that! It can help with a variety of issues, including: Chronic pain: Helps relax muscles and lessen joint pain. Infrared light treatment increases circulation and reduces inflammation to treat pain from long term conditions like arthritis, neuropathy, tendinitis, and more. Acute pain: Helps manage those sudden, sharp pains. Injury recovery: Speeds up the healing process after an injury. Workout recovery: Eases muscle soreness, and improves blood flow so you’re ready for your next session. Muscle spasms: Relaxes muscles, preventing the tightness that leads to spasms. How Does Infrared Light Therapy Therapy Alleviate Back Pain? Back pain, whether from arthritis, daily strain, or injuries, can often feel deeply embedded in our tissues. That’s because this type of pain is often due to cellular damage far within our muscles. Unlike using heat or ice to treat pain that only works on the surface, infrared light therapy can penetrate through layers of skin, reaching deeper into the muscle tissues stimulating cells and increasing circulation to target pain at the source. Yes, heating pads feel good but they can’t do the job alone! And something to note, both red and infrared light therapy are typically combined to deliver maximum results for pain relief. The two light sources can complement each other in treating soreness in the body at different depths of tissue. They are especially effective when combined with back pain exercises to stretch and strengthen your muscles! They are a little different, with the infrared being the hero but here is what they each do. Red Light Therapy: Surface-Level Benefits Red light therapy is a go-to for improving skin health, thanks to its shorter wavelength that interacts mostly with the skin’s surface. This makes it fantastic for treating fine lines, wrinkles, and skin texture. However, red light also encourages blood circulation, making it a good tool for mild pain relief by enhancing circulation and supporting cellular recovery. Infrared Light Therapy: Deep-Tissue Healing Infrared light, on the other hand, has a longer wavelength that penetrates much deeper, reaching beyond the skin to muscle and nerve tissues. This makes it ideal for pain relief and healing below the skin’s surface. By boosting blood flow in targeted areas, infrared light reduces inflammation and supports faster healing. It’s particularly effective for those with arthritis, muscle soreness, or injuries, as it can relieve tightness and discomfort more effectively than red light alone. Additionally, infrared light therapy promotes cellular regeneration, which means it can assist in both wound healing and recovery after physical strain. It’s being hailed for it’s ability to safely alleviate deeper pain and support tissue recovery. Most pain relief devices are created using a combination of red and infrared light. These tools provide powerful results and there’s a ton of research backing this up. For instance, a study from the National Institutes of Health found that infrared light therapy could reduce chronic back pain by 50% over just six weeks. For me, it worked just like that! After 4-6 weeks of consistent use of my dpl® Flex Pad, I was moving freely again. Now, I use it like my “insurance policy” along with my back strengthening exercises to keep back pain at bay. The Infrared Therapy Device I Use Daily I use the dpl® Flex Pad which is a combination of red and infrared light therapy. It’s a large, bendable pad and can be used anywhere on the body. You just charge it up and then it’s hands free. It’s easy to move around and do whatever tasks you have to do around the house. You can feel better in just 20 minutes, right in your own home! And remember what I said earlier, consistency is the key to relieving pain so having something easy to use at home makes that way more achievable. I also use the dpl® Joint Wrap on my knee. Again, hands free and easy to use. You can also use it on your shoulders, elbows, and ankles.  If you were a fly on the wall in my home, you’ll see me wearing infrared light therapy every morning as I get my coffee and get my morning going. Plus, it’s FSA and HSA approved. The Bottom Line Incorporating this type of therapy into my routine has been a game-changer. For me, it’s about actively investing in my long-term health, listening to my body, and using tools that support my recovery and well-being. It’s non-invasive and not a medication! If you’re dealing with pain or simply want a method to support active recovery, consider giving infrared light

How I Use Infrared Light Therapy to Manage Pain in Midlife Read More »

7 Plantar Fasciitis Stretches to Soothe Heel Pain

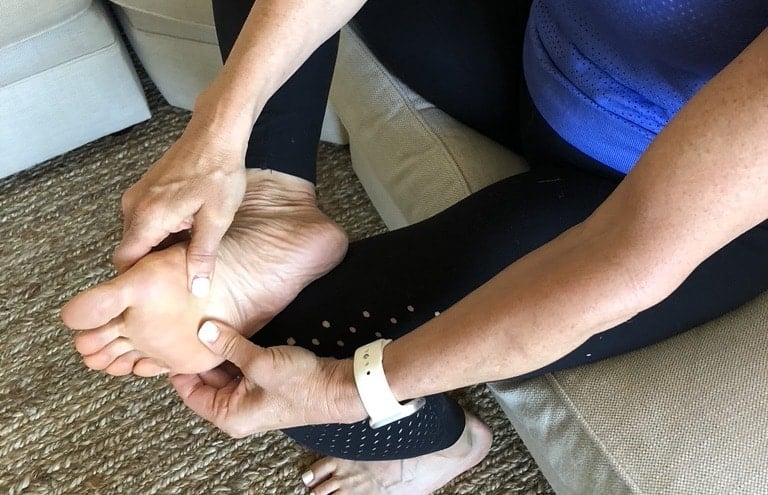
7 Plantar Fasciitis Stretches to Soothe Heel Pain Discover effective stretching exercises for plantar fasciitis relief! Learn gentle, targeted stretches to reduce heel pain, improve flexibility, and support recovery, helping you stay active and pain-free. Plantar fasciitis can be a painful roadblock in daily life, especially for those who love staying active. But the good news is, stretching can be a powerful tool for relief! The stretches below will help loosen tight muscles, increase flexibility, and support your recovery journey. Whether you’re dealing with occasional flare-ups or chronic discomfort, adding these exercises to your routine can make a big difference! Regular and consistent stretching is going to be key for any plantar fasciitis treatment plan. It is best to do each exercise not only daily but in some cases several times a day. The good news is they can be spread out throughout the day. Here’s a sample of how to easily work them into your daily routine. Make sure you do these for BOTH of your feet, even if you only have pain on one side. Plantar Fasciitis Stretches for Before You Get Out Of Bed These plantar fasciitis focused stretches are best to do before you even get out of bed! Add these into your morning wake up routine for better relief! Hand Stretch & Massage Before you get out of bed, use your hands to gently pull the top of your foot back stretching it very lightly. Then take your thumbs and, starting in the middle of your foot pull each thumb toward the outer edges of the foot almost like you are trying to get rid of a wrinkle. Do this in 3 or 4 different places at the bottom of your foot. Alphabet Game Next, sit up in bed and hang your legs over the side to play the alphabet game with your foot. Point your big toe and draw the alphabet from A to Z with each foot to strengthen and stretch the foot and calf. Roll It Out After the alphabet game, slowly stand up and place one foot on a massage ball, tennis ball, or frozen water bottle and slowly roll it across the bottom of the foot starting at the heel. Once you reach your toes go back slowly in the other direction. Repeat 3 times for each foot. Choosing a frozen water bottle gives you the bonus of reducing inflammation while the rolling massage helps you get prepared to step and move. Plantar Fasciitis Stretches for Before or After Lunch Incorporate these stretches for plantar fasciitis either before or after your lunch. They are perfect for the midday break. Step Stretch Find the nearest set of stairs and stand on the bottom step. Put the ball of the foot you want to stretch on the step and let the heel drop down for 30 seconds. Switch to the other foot and do the same. Stretch each foot 3 times. Heel Press Stand facing a wall and place both hands against the wall. Step one foot back and press the heel of that foot firmly into the ground keeping your leg straight. Move your hips forward until you feel a stretch in your calf. Hold 30 seconds. Switch legs and repeat. Try 3 times per foot. Don’t bounce! Remember that tight calves are often the origin of heel pain. Plantar Fasciitis Stretches for Just Before Bed Add these plantar fasciitis stretches to your bedtime to routine to finish of you day of exercises! Washcloth Exercise Sit on a chair or the edge of your bed with a washcloth on the floor. Keep your heel on the ground and lift the washcloth with your toes. Release and repeat 10 times. Repeat on the other foot. Seated Straight Leg Stretch Grab a long band and or towel and sit down on the floor with your legs straight out in front of you. Place the band or towel around one foot, keeping that leg straight. Gently pull back on the band or towel holding for 30 seconds and breathing gently. Switch to the other floor. Stretch each side 3 times. Additional Plantar Fasciitis Treatments In addition to performing the above stretches for plantar fasciitis, you may want to add on some additional treatments. When plantar fasciitis is treated early, most people resolve their pain with conservative treatments within six weeks. However, sometimes it takes a few treatments stacked on top of one another. Here are some tried and true treatment options that can be utilized to relieve plantar fasciitis pain: Ice Just like with other injuries, the inflammation of plantar fasciitis can be helped with ice. The best way to do this is to use a frozen water bottle and roll it back and forth under your foot for about 10 minutes, several times a day. Do it at meals, under your desk while you work, or even at night when you watch TV. Be consistent. Massage No, you don’t have to pay for it. While you are sitting, roll a tennis ball around under your foot to massage the area. It works like a foam roller for your foot. Of course, the frozen water bottle also serves this purpose. Medication Over-the-counter anti-inflammatories can help. Ibuprofen or Naproxin are good bets to reduce inflammation and provide pain relief. Rest Your feet need time off from whatever is causing the issue. Stop or cut way back on high-impact exercises. New Shoes What a great prescription, huh? Most people wear their workout shoes for far too long before replacing them. Remember that the plantar fascia muscle, which runs along the bottom of your foot, helps support the arch of your foot. So it makes sense that if you do not wear shoes with proper support you are putting extra wear and tear on that fascia. This leads to the muscle being strained and small tears can be created. Also, many find relief by wearing supportive shoes or shoe inserts (more on that below) very regularly.

7 Plantar Fasciitis Stretches to Soothe Heel Pain Read More »

12 Best Yoga Poses for Back Pain

12 Best Yoga Poses for Back Pain If you are experiencing back pain, adding a yoga practice into your day is essential to feel better! By incorporating these 12 best yoga poses for back pain will help reduce pain as well as stress. Back pain affects all ages and sadly, 85 percent of the U.S. population suffers from back pain. It’s the second most common reason for seeing a doctor in the United States, and exactly why I have a whole guide dedicated to back pain exercises. What you may not know, is that a consistent yoga practice may reduce your back pain and prevent additional future injuries as well. Incorporate the following 12 yoga poses for back pain into your weekly exercise routine, and enjoy the benefits! Yoga for Back Pain Routine Instructions: Start with some deep breathing exercises in and out of the nose called pranayama. Think of a slight lengthening as you inhale and a releasing as you exhale. Complete each of the 12 moves for 3-5 rounds (depending on your individual needs) while continuing this practice of breath awareness throughout each. Do the following pain-relieving yoga sequence two to three times a week to start feeling back pain relief. Grab your yoga mat and let’s go! Product Image Product Name Primary Button Gaiam Yoga Block – Soft Non-Slip Surface with Beveled Edges for Yoga, Pilates, Meditation Check Price Gaiam Yoga Mat Premium Solid Color Non Slip Exercise & Fitness Mat for All Types of Yoga, Pilates & Floor Workouts, New Lilac, 5mm Check Price Yoga Mat Non Slip, Hot Yoga Mat(72″X 26″/5mm), Rubber Exercise Mat Check Price Amazon Basics Extra Thick Yoga Mat with Carrying Strap Check Price Amazon Basics Neoprene Coated Hexagon Workout Dumbbell Hand Weight, 3 Pound – Set of 2 Check Price Gaiam Yoga Block – Soft Non-Slip Surface with Beveled Edges for Yoga, Pilates, Meditation Check Price Gaiam Yoga Mat Premium Solid Color Non Slip Exercise & Fitness Mat for All Types of Yoga, Pilates & Floor Workouts, New Lilac, 5mm Check Price Yoga Mat Non Slip, Hot Yoga Mat(72″X 26″/5mm), Rubber Exercise Mat Check Price Amazon Basics Extra Thick Yoga Mat with Carrying Strap Check Price Amazon Basics Neoprene Coated Hexagon Workout Dumbbell Hand Weight, 3 Pound – Set of 2 Check Price 1. Child’s Pose The child’s pose lengthens and stretches the spine while relieving tension in the neck and shoulders. Start on the hands and knees and sit hips back towards the heels. Bring the big toes together and keep the knees together to create support to round the back over the legs and get into the thoracic spine. You can also try using a block under the forehead for more relief. You can come back here as often as needed. 2. Cat and Cow Pose From child’s pose, rise up to hands and knees. For Cow: Lift the chin up and drop the belly to the mat as you look up arching the tail bone upward, then round the spine upward dropping the tailbone down as you look back to the thighs, like a cat-back. Try this a couple of times slowly, wallowing in each pose to feel the stretch, then move with the breath for a few times: inhaling as you move into Cow Pose with the chin and tail bone up, exhale into Cat Pose. Movement with the breath is called vinyasa and this will create some synovial fluid along the spine which will lubricate the back, making it feel more supple. 3. Downward Dog The Downward dog pose lengthens and strengthens at the same time. It’s also a big stretch for the hamstrings which can be the root of back pain. Come on to the balls of the feet and lift the hips up, then release the heels down toward the mat. This is another option to come back to in between poses. Take some time here to pedal the feet, twist the hips, and rock side to side. Down Dog 4. Crescent Lunge On One Knee Crescent lunge helps open up the hips which can significantly impact the back. It’s a great pose for sciatica pain relief. Step right foot forward between the hands. Aim to place the foot right below the knee so the shin is vertical. You can keep your hands on the mat for balance or reach the arms up over your head to lengthen the spine and open the chest. Add a twist: lift your right hand up, with the left hand by the right foot, and rotate the chest into the thigh or upwards. Twists are great for improving spinal range of motion. Repeat on the left side and come back child pose or down dog. 5. Warrior 1 The Warrior 1 pose is an energizing move that creates stability and improves balance. Having better posture can significantly impact and alleviate back pain. Bring the right foot between the hands and bend the right knee, release the back foot down to the mat and lift the body and arms up. Think of bringing the back hip forward so that the hips are aligned. This creates some twists in the low back. Warrior One 6. Triangle This Triangle pose gets into the spinal nerves and strengthens the lower back. Straighten the right leg and reach the right hand forward and down to the right leg. You can make contact above the knee, on the shin, foot, floor, or use a block and place the hand on the block near the front foot. Left-arm is up and the chest is open to the side. 7. Revolved Triangle Revolved triangle is another pose that improves balance with the help of the internal and external obliques. This pose activates the spine! Legs stay the same, switch the arms so the left hand is down toward the right leg and the right arm is reaching up. Repeat on left side. 8. Locust Pose Locust pose will strengthen and elongate all the muscles along the spine. Lie face down on your belly and lift the chest and

12 Best Yoga Poses for Back Pain Read More »

9 Hip Bursitis Exercises To Build Strength & Relieve Pain

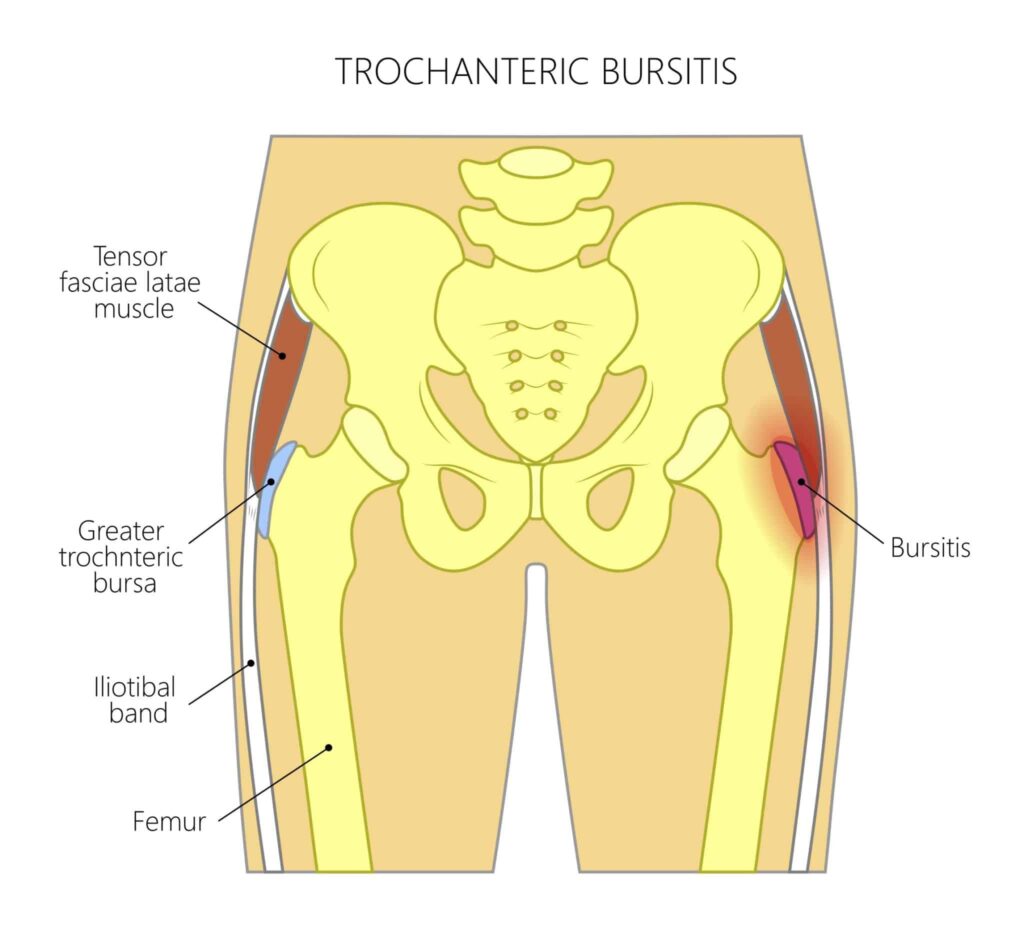
9 Hip Bursitis Exercises To Build Strength & Relieve Pain Ease your hip pain with these 9 safe hip bursitis exercises. Find out the safest moves for hip bursitis pain, and which ones to skip for effective relief. If you’ve been feeling persistent hip pain, especially when lying down or standing up, you might be grappling with hip bursitis. It’s a condition that many, especially athletes and those over 50, experience as it results from inflammation in the bursa sacs located in the hip joint. These small, fluid-filled sacs are crucial for reducing friction between bones, tendons, and muscles. When they become inflamed, discomfort can range from mild to severe. But here’s the good news—managing and even healing hip bursitis can be achievable through targeted exercise and rest. This blog post will guide you through nine hip strengthening exercises specifically designed to ease hip bursitis, enhance mobility, and prevent future flare-ups. Understanding Hip Bursitis Before jumping into exercises, let’s discuss what hip bursitis is. This condition involves the inflammation of the bursae, which are small sacs filled with lubricating fluid that reduce friction and cushion pressure points between your bones, tendons, and muscles around your joints. In the hip, this inflammation can cause significant discomfort. Anatomy of Trochanteric Bursitis Many factors can contribute to hip bursitis, including repetitive motions, prolonged pressure on the joint, or even poor posture (PS. Have you tried my posture exercises?!). For athletes, the condition often arises from overuse, while for menopausal women or those over 50, it can be due to decreased flexibility or muscle imbalances. Knowing what causes bursitis can help with prevention. Awareness and mindfulness in daily activities can go a long way in preventing future occurrences of this condition. Benefits of Targeted Hip Bursitis Exercises Exercise is a powerful tool in the recovery and management of hip bursitis. By engaging in specific strengthening exercises, you can stabilize the hip joint, improve muscle balance, and reduce the friction that exacerbates bursitis. These exercises mainly target the glute muscles, particularly those at the sides of the hips. Strengthening these muscles supports your legs during movement, thereby reducing stress on the bursae. Additionally, regular exercise helps maintain flexibility and improves overall joint health, which is essential for anyone experiencing or looking to prevent hip bursitis. Remember, the key is consistency combined with adequate rest. Try a few of these nine exercises to help give you some healing and relief. The Best Hip Bursitis Exercises Here are nine exercises you can do at home to treat your bursitis and work your whole body: Workout Instructions: Follow the instructions on each exercise, focusing on your form and proper technique to avoid additional strain As you build strength, you can gradually increase the intensity and repetitions. Glute Bridges The glute bridge is a foundational exercise that strengthens the glutes, core, and lower back. Glute bridges are a gentle yet effective way to engage the muscles supporting the hip joint, crucial for anyone experiencing hip bursitis. How to Perform Glute Bridges Starting Position: Lie on your back with knees bent and feet flat on the floor, hip-width apart. Arms should rest at your sides with palms facing down. Execution: Press through your heels to lift your hips off the ground while squeezing your glutes. Hold at the top for a count of two, ensuring a straight line from shoulders to knees. Return: Lower your hips back to the ground gently, maintaining control throughout the movement. Repeat for 10-15 reps. The glute bridge is also a great option for seniors because it’s gentle, but powerful. I put together a handy guide to hip strengthening exercises for seniors that take age and ability into special consideration. Fire Hydrants The fire hydrant move targets the gluteus medius, essential for hip stability. This exercise is named after its resemblance to a dog lifting its leg by a fire hydrant. While it may seem funny, it effectively strengthens the muscles necessary for hip stability. How to Perform Fire Hydrants Starting Position: Begin on all fours, with hands under shoulders and knees under hips. Execution: Keeping the knee bent, raise one leg out to the side until thigh is parallel to the ground. Your core should remain engaged. Return: Slowly lower the knee back to the starting position. Perform 10 reps on each side. Clam Shells Clamshells are perfect for targeting the hip abductors. This exercise is fantastic for strengthening the muscles that support your hips and help stabilize your gait when walking or running. How to Perform Clam Shells Starting Position: Lie on your side with legs stacked, knees bent at 90 degrees. Execution: Keeping feet together, lift the top knee as high as possible without moving your pelvis. Hold the position briefly. Return: Lower the knee back to the starting position. Complete 10-12 reps per side. Side Plank The side plank move challenges your core and hip stability. They work your glute muscles to lift and stabilize your pelvis. How to Perform Side Planks Starting Position: Lie on your side with your legs straight and stacked on top of each other. Rest your forearm on the floor, aligning your elbow under your shoulder. Execution: Engage your core and lift your hips and knees off the floor. Your body should be in a straight line from your head to your feet with only your forearm and bottom foot touching the floor. (Drop your bottom knee to the floor for a modification.) Return: Hold this position for 15-30 seconds. Then, slowly lower down to the starting position.Repeat on other side. Iliotibial Band Stretch Stretching the IT band helps alleviate tightness that can aggravate bursitis. Stretching the IT band can be especially beneficial if you tend to experience bursitis discomfort on the outer part of your hip. How to Perform the Iliotibial Band Stretch Starting Position: Stand upright, cross your right leg behind your left. Execution: Lean to the left, pushing your right hip out until you feel a stretch along the outside of your

9 Hip Bursitis Exercises To Build Strength & Relieve Pain Read More »

5 Squat Alternatives For Bad Knees

5 Squat Alternatives For Bad Knees Discover five effective squat alternatives for bad knees that target your lower body muscles while minimizing knee strain. Improve strength and stability with these safe exercises. Working your legs is essential for your overall fitness! After all, your legs not only move you, but as the largest muscles in your body, they help you perform those big calorie-burning exercises which bump up your metabolism. The problem is that bad knees can get in the way—and they’re a common problem. One study from Gallup-Healthways found that 26% of the adult population in the United States suffers from knee pain. Injuries, surgeries, arthritis, and runner’s knee—there are many reasons you might be experiencing knee pain, but it should never cause you to skip leg day. I’m going to show you the best exercises for bad knees so you can strengthen your legs without putting stress on your knees. Follow along with this video or read the exercises below as I show you the five great squat alternatives for bad knees, or people who just don’t like squats ; ). If you’re looking to rebuild knee strength carefully, check out my 10 exercises for bad knees which focus on carefully strengthening and toning your legs with little to no strain on your knee joints. [adthrive-in-post-video-player video-id=”kW9yUMDJ” upload-date=”2020-07-24T22:45:18.000Z” name=”5 Exercise Modifications For Bad Knees and A Low-Impact Workout Plan” description=”Your workout with five great exercise modifications for bad knees! Try this workout and make your knees happier, while still working up a sweat! ” player-type=”static”] 1. Stability Ball Wall Squats Stability ball squats are a great alternative to regular squats for those with knee issues because they reduce stress on the knees by providing support and cushioning through the ball. These squats still effectively work the quadriceps, hamstrings, and glutes while improving balance and core strength, making them beneficial for maintaining lower body muscle tone without aggravating knee pain. Stability ball wall squat How to Perform a Stability Ball Wall Squat Lean slightly back against the ball with your feet shoulder-width apart in front of you and begin your squat. Not only will this take some pressure off your knees, but you’ll also be able to adjust the move on the fly to suit your own strengths and weaknesses. Get a feel for this and then add some dumbbells in your hand to make it harder. Tip: Choose your range of motion—go lower if you can, but stay higher if your knee pain kicks in. The key is to sit back as you squat, keep legs hip width apart, and focus your weight in your heels! 2. Reverse Lunges The reverse lunge exercise is a good alternative to regular lunges for those with knee issues because they place less pressure on the front knee by shifting the weight backward. This exercise targets the quadriceps, hamstrings, and glutes, and is beneficial for building lower body strength while minimizing strain on the knee joints. Reverse lunges How to Perform Reverse Lunges Stand tall with your feet hip distance apart. Take a large step backward and lower your body toward the floor.  Both legs should be bent at a 90-degree angle at the bottom of the lunge. Rise back to start and repeat. Tip: Pay attention to your glutes. You should feel this move in your rear end and put very little weight into the leg that goes behind you. 3. Deadlifts The deadlift move is a good alternative to regular squats for those with knee issues because they emphasize hip hinge movement rather than knee flexion, reducing stress on the knees. They primarily work the hamstrings, glutes, and lower back, offering a powerful way to build lower body and core strength while minimizing knee strain. How to Perform Deadlifts: Start standing with feet hip distance apart and dumbbells resting in front of thighs. Tighten your abdominals and keep a flat back as you bend the knees slightly, lowering the dumbbells towards the floor. Squeeze the glutes and use your hamstrings and legs to lift and return to your upright position. Tip: Use heavy weights—either barbells or dumbbells—since you have many muscles recruited to do this lift. Keep your knees slightly bent and legs hip width apart – but do all the work in your abs and glutes. 4. Glute Bridges The glute bridge exercise is an excellent alternative to regular squats for those with knee issues because they engage the glutes and hamstrings without placing any strain on the knees. This exercise helps strengthen the lower body and core while improving hip stability, making it beneficial for maintaining muscle tone and reducing knee discomfort. Glute bridges How to Perform a Glute Bridge: Lie on your back with knees bent and feet flat on the floor close to your glutes. Your knees should be in line with your hip bones. Place your arms flat on the floor at your sides and tuck your shoulders under your back. Press your palms into the ground as you raise your hips, squeezing your glutes and abdominals. Keep your neck relaxed on the mat. Continue to move your hips up and down for 30 seconds. Tip: Try single leg glute bridges too! Isolating one leg will target the hamstrings and give you an extra challenge once you’ve mastered traditional glute bridges. 5. Stability Hamstring Roll-In Performing stability ball hamstring roll-ins are a good alternative to regular squats for those with knee issues because they target the hamstrings and glutes without involving knee flexion, thereby reducing knee strain. This exercise also enhances core stability and balance, making it beneficial for building lower body strength while protecting the knees from excessive stress. How to Perform Stability Ball Hamstring Roll Ins Begin lying on back, arms by side and feet on top of stability ball. Squeeze glutes and abs and lift body up so you are in a straight line with only shoulders and head relaxed on mat. Pull heels toward glutes rolling ball in, then push the ball back out. Continue

5 Squat Alternatives For Bad Knees Read More »