Workouts + Exercises

Auto Added by WPeMatico

Posture and Balance After 50: The Reason You Feel Wobbly Might Start at Your Chin

Posture and Balance After 50: The Reason You Feel Wobbly Might Start at Your Chin Your balance problem might not be in your feet. It might be in your chin. I know that sounds strange, so stick with me. Posture and balance are so tightly connected that when one changes, the other follows, and for most women over 50, posture changes first. Quietly. A little more screen time, a little more rounding in the upper back, the head creeping forward year by year, and suddenly turning quickly in the kitchen feels different than it used to. There’s a 10-second test I use to check this, and you can do it against any wall in your house. I’ll give it to you before the end of this post. But first you need to understand what’s actually happening, because once you see it, you can’t unsee it (and you can absolutely fix it). Why Balance Feels Different After 50 Let’s name the stakes, because this is bigger than feeling a little wobbly. According to the CDC, more than 1 in 4 adults over 65 falls each year, and falls are the leading cause of injury in older adults. Falls are also one of the biggest threats to the thing we all want most: our independence. But here’s what I want you to hear. Balance is not something you lose because a birthday came. Balance is a skill, and skills respond to practice. As a trainer, I’ve watched women in their 50s, 60s, and 70s dramatically improve their steadiness in a matter of months. Every single one of them started by working on posture and balance together, not separately. How Posture and Balance Actually Work Together Think of your body as a stack: head over ribs, ribs over pelvis, pelvis over feet. When the stack is lined up, staying upright is almost effortless. Your muscles make tiny corrections all day and you never notice. Now slide the top of the stack forward. When your head shifts ahead of your shoulders (hello, kyphosis, commonly known as tech neck) and your upper back rounds, your center of gravity moves toward your toes. Your muscles and nervous system have to work overtime just to keep you steady, which leaves less in the tank for reacting when you catch a toe on the sidewalk or turn to grab something. This isn’t just my theory from 35 years of training women. A 2025 research review found that hyperkyphosis (the excessive upper-back rounding that becomes more common as we age) is linked with reduced postural stability and higher fall risk in older adults. The wobble you feel when you stand on one leg to put on a sock? It may have started years earlier, inches higher. The Posture Changes That Sneak Up on Us Nobody wakes up with rounded shoulders one morning. It builds slowly, and these are the usual suspects: Hours of sitting (desks, cars, couches, repeat) Looking down at phones and screens all day Muscle loss as we age, especially in the upper back and core, when we’re not strength training Tight chest muscles from all of the above Bone changes, including osteoporosis-related shifts in the spine That last one matters, ladies. Bone health and posture are deeply connected, which is why I’m always pointing you back to how to build bone density. And if a strength routine isn’t part of your week yet, my strength training moves for women over 50 is the place to start. Strength training is healthcare, and your posture is one of the first places it pays off. Still with me? Good, because the test is coming. One more thing you need to know first. “Stand Up Straight” Is Bad Advice (Here’s What Works Instead) I’m going to say something that would horrify our mothers: stop trying to stand up straight. Forcing yourself into a rigid, shoulders-pinned, military posture doesn’t fix anything. You can’t white-knuckle your way to better alignment for more than about 90 seconds, because you can’t simply decide your way to good posture. Your posture reflects your strength, your mobility, and your habits. If the muscles of your upper back and core are weak, no amount of “remembering to sit up” will hold. What actually works is training. Strengthen the upper back so it can hold you tall without effort. Open up the tight chest. Build the deep core that keeps your spine supported. I’ve put my favorite moves in one place in my posture exercises to stand taller post, and if your back needs extra love, these back strengthening exercises pair with it perfectly. Train Posture and Balance Together Here’s where it all comes together. Posture work makes balance work easier, and balance work makes posture work stick. Train them as a team: Strengthen your upper back and open your chest. Start with my posture exercises, a few minutes most days. Build your core (no crunches required). Your deep core is your built-in balance system. Try my standing core exercises that beat crunches or these core exercises for seniors. Practice actual balance moves 2 to 3 times a week. Single-leg stands, heel-to-toe walking, weight shifts. My favorite exercises to improve your balance walk you through all of them with modifications. Sneak balance into daily life. Stand on one leg while you brush your teeth. Heel-to-toe walk down the hallway. I balance on one foot while I wait for my coffee, and yes, my husband thinks I’m nuts. Five to ten minutes a day is enough to see real change. Consistency beats duration every single time. The 10-Second Wall Test I Promised OK, here it is. This is a simplified version of a screening tool physical therapists use, and it takes ten seconds. Stand with your back against a wall, heels about two inches away from it. Let your bottom and shoulder blades touch the wall. Now, without lifting your chin toward the ceiling, try to gently bring the back of your head to the wall. If your

Posture and Balance After 50: The Reason You Feel Wobbly Might Start at Your Chin Read More »

The 5 Pillars of Fitness Every Woman Needs During Menopause

The 5 Pillars of Fitness Every Woman Needs During Menopause Menopause changes your body, but that doesn’t mean you stop feeling strong, energetic, and confident. In fact, this stage of life is one of the most important times to move your body with purpose. As a 60-year-old trainer who has worked with women for decades, I can tell you this: the workouts that worked in your 20s and 30s may not serve you the same way now. Hormonal shifts affect muscle mass, bone density, metabolism, sleep, recovery, and even balance. That’s why a smarter, more balanced approach matters. The good news? You don’t need punishing workouts or hours at the gym. The best menopause workout plan focuses on five key areas that support healthy aging, mobility, strength, and overall wellness. When you combine these pillars consistently, you build a body that feels capable for the long haul. Here are the five areas I encourage every woman in midlife to prioritize. 1. Resistance Training for Muscle, Bones, and Metabolism If there’s one thing I want women over 40 to embrace, it’s strength training. During menopause, declining estrogen contributes to muscle loss and decreased bone density. This can affect everything from metabolism to posture to everyday energy levels. Resistance training helps counteract those changes. Strength training can: Preserve lean muscle mass Support bone health Improve posture and balance Help maintain a healthy metabolism Increase confidence and functional strength And no, lifting weights will not make you bulky. That’s just one of those common women’s fitness myths I’m begging you to ignore. I often tell women that strength training is about building capability. You want to carry groceries with ease, get up off the floor comfortably, travel confidently, and stay independent as you age. Beginner-Friendly Resistance Exercises Squats Deadlifts Push-ups with modifications Resistance band rows Dumbbell shoulder presses If you’re new to strength training, start with two to three sessions per week and focus on consistency over intensity. Use my favorite strength training moves for women over 50 to get started! At 60, I still prioritize lifting weights because I feel stronger, steadier, and more energized when I do. Helpful Gear A good pair of dumbbells and resistance bands can completely transform home workouts. I also love supportive training shoes that cushion joints during strength sessions. CAP Barbell Coated Dumbbell Weight Check Price We earn a commission if you make a purchase, at no additional cost to you. Women s Road Running & Walking Shoes Check Price We earn a commission if you make a purchase, at no additional cost to you. Resistance Bands with Handles Check Price We earn a commission if you make a purchase, at no additional cost to you. 2. Mobility Work to Keep Joints Healthy Many women notice increased stiffness during menopause. Hips feel tighter. Shoulders ache. Getting out of bed suddenly takes a minute longer. Mobility training helps keep your joints moving well and supports better movement patterns during daily life and workouts. Mobility is different from flexibility. Flexibility focuses on muscle length, while mobility helps improve how your joints move through their full range of motion. This becomes especially important during midlife because: Estrogen changes can impact connective tissue Sedentary habits increase stiffness Joint discomfort becomes more common Recovery may take longer Simple Ways to Improve Mobility Dynamic warm up stretching before workouts Foam rolling Yoga flows Hip openers Thoracic spine rotations Ankle mobility drills Even 10 minutes daily can make a noticeable difference. I personally love adding mobility work in the morning because it helps me feel less stiff and more energized for the day ahead. Use my favorite mobility exercises to get started! Joint-Friendly Tip Low-impact workouts like yoga, Pilates, and walking pair beautifully with mobility training during menopause. If your knees or hips are sensitive, choose supportive mats and foam rollers that provide extra cushioning and stability. Amazon Basics High Density Foam Roller for Exercise and Recovery $24.99 Buy Now We earn a commission if you make a purchase, at no additional cost to you. 05/22/2026 06:02 am GMT 3. Balance Training to Prevent Falls and Build Confidence Balance often gets overlooked until we start noticing changes. Hormonal shifts, muscle loss, and aging can all affect stability and coordination. Practicing balance exercises now helps prevent falls later and improves confidence in everyday movement. Balance training also strengthens smaller stabilizing muscles that support your joints. Easy Balance Exercises to Try Standing on one foot Heel-to-toe walking Step-ups Single-leg deadlifts Stability ball exercises Tai chi or daily yoga Explore my favorite balance exercises for seniors as a gentle way to get started. One of my favorite habits is practicing balance while brushing my teeth. It sounds simple, but those little moments challenge your body in functional ways. Why Balance Matters During Menopause Good balance supports: Joint stability Core strength Coordination Better posture Injury prevention And honestly, feeling steady and confident in your body is empowering at every age. 4. Cardiovascular Exercise for Heart Health and Energy Heart health becomes increasingly important after menopause. Estrogen helps protect cardiovascular health, so when levels decline, women may face a higher risk of heart disease. That’s why cardio matters, but it doesn’t have to mean endless high-intensity workouts. The goal is to keep your heart healthy while supporting recovery and reducing stress on your joints. Menopause-Friendly Cardio Options Walking Cycling Swimming Hiking Low-impact HIIT Dance workouts Walking remains one of my favorite forms of cardio because it’s accessible, gentle on joints, and incredibly effective. I always encourage women to find movement they genuinely enjoy because consistency matters more than perfection. How Much Cardio Do You Need? Aim for: 150 minutes of moderate cardio weeklyor 75 minutes of vigorous cardio You can break this into manageable sessions that fit your schedule. Walking Essentials Supportive walking shoes are worth every penny during midlife. Proper cushioning and arch support can make a huge difference for knees, hips, and lower back comfort. I put together a guide on how to choose comfortable

The 5 Pillars of Fitness Every Woman Needs During Menopause Read More »

8 Ways to Build Lean Muscle While Walking (Without Destroying Your Joints)

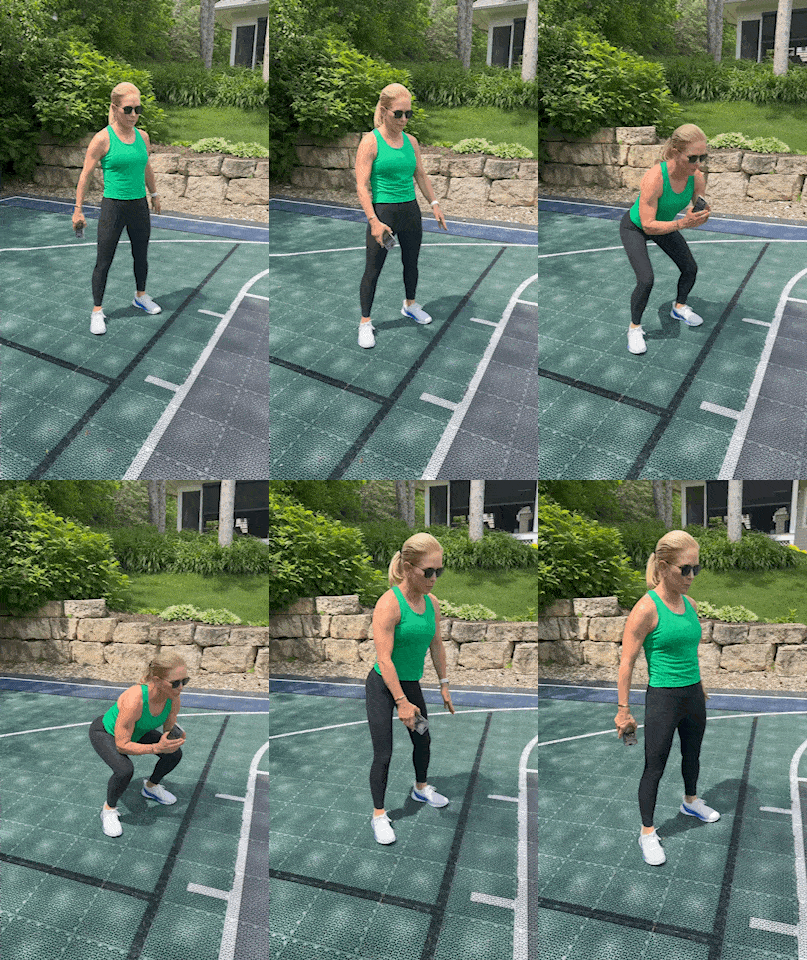
8 Ways to Build Lean Muscle While Walking (Without Destroying Your Joints) Walking is one of the best low-impact workouts for women over 40, especially if your joints don’t love high-intensity exercise anymore. But here’s the question I hear all the time: Can walking actually help you build lean muscle? The answer is yes. While walking won’t create bulky muscles, it absolutely helps strengthen your lower body, preserve lean muscle during menopause, and improve endurance, balance, and metabolism. And with a few smart upgrades, your daily walk can become a surprisingly effective strength-building workout. At 60, walking is still one of my favorite tools for staying strong, energized, and consistent without beating up my body. If you’re looking for a joint-friendly way to support healthy aging, walking deserves a spot in your routine. Does Walking Build Lean Muscle? Yes. Walking can help build and maintain lean muscle mass, especially in your lower body. Every step activates important muscles that support strength, posture, stability, and mobility. While walking isn’t the same as lifting heavy weights, it still challenges your muscles enough to improve endurance and support muscle tone. This becomes even more important after 40. As estrogen levels decline during menopause, women naturally begin losing muscle mass more quickly. That loss can affect: metabolism balance bone health strength energy levels That’s why preserving lean muscle is one of the best things you can do for healthy aging. Walking regularly, especially when combined with strength training and enough protein, helps support muscle maintenance without unnecessary stress on your joints. Which Muscles Does Walking Work? Walking activates several major muscle groups throughout your body. Glutes Your glutes help stabilize your hips and power your stride. Quadriceps The muscles on the front of your thighs help straighten your knees as you walk. Hamstrings These muscles support hip movement and help bend your knees. Calves Your calves push you forward with every step. Core Muscles Your core helps maintain posture, balance, and stability while walking. When you add hills, speed, or resistance, these muscles work even harder. 8 Ways to Build Lean Muscle While Walking These simple walking upgrades can help women over 40 strengthen their legs, support metabolism, preserve lean muscle, and stay active without putting extra stress on their joints. 1. Pick Up Your Pace Walking faster increases muscle engagement and raises your heart rate. You don’t need to sprint. A brisk pace that feels challenging but manageable is enough to recruit more muscle fibers and increase calorie burn. I often tell women to aim for a pace where conversation feels slightly harder, but still possible. You should finish your walk feeling energized, not exhausted. 2. Walk Hills or Add Incline If you want to strengthen your legs and glutes, hills are your best friend. Walking uphill increases activation in your: glutes hamstrings calves quadriceps Incline walking also boosts your heart rate without adding the pounding that comes with running. If you’re on a treadmill, try increasing the incline by 2–5%. Outdoors, seek out gentle hills or stadium stairs. Your backside will definitely feel the difference. 3. Wear a Weighted Vest One of my favorite ways to safely increase walking intensity is by wearing a weighted vest. A weighted vest adds resistance evenly across your torso, helping your muscles work harder while also supporting bone strength, something women in menopause should absolutely prioritize. Start light. Even a 5- to 8-pound vest can make a walk feel significantly more challenging. I prefer weighted vests over heavy backpacks because they distribute weight more comfortably and place less strain on the shoulders and lower back. ZELUS Weighted Vest 12lb Weight Vest with Reflective Stripe for Workout Check Price We earn a commission if you make a purchase, at no additional cost to you. 4. Use Walking Intervals Intervals are an excellent way to build endurance and support lean muscle. Try this simple interval walking workout: Walk briskly for 1 minute Recover at an easier pace for 2 minutes Repeat for 20–30 minutes You can also add short uphill pushes or gentle jogging intervals if your joints tolerate it well. Remember, low impact still counts. 5. Add Strength Exercises During Your Walk This is one of my favorite ways to turn a simple walk into a total-body workout. Try adding bodyweight strength moves every few minutes. Example: Walk 5 minutes Perform 10 squats Walk 5 minutes Perform 10 walking lunges Walk 5 minutes Perform 10 calf raises Simple. Efficient. Effective. This combination helps build strength while keeping your heart rate elevated. Amazon Basics Neoprene Coated Dumbbell Hand Weight Set Check Price We earn a commission if you make a purchase, at no additional cost to you. 6. Walk Backward Carefully Backward walking activates your muscles differently than forward walking, especially your quads and core. Now, safety first here. Only try backward walking in a flat, open area or on a treadmill at a very slow pace while holding support if needed. Even 30 seconds at a time can challenge your balance and muscle coordination in a completely new way. 7. Engage Your Upper Body Don’t let your arms go along for the ride. Purposefully swinging your arms or using walking poles can activate your shoulders, upper back, and arms, making walking feel more like a full-body workout. Good posture matters too. Stand tall. Relax your shoulders. Keep your core gently engaged. Those little adjustments make a big difference over time. TREKOLOGY Trekking Poles Collapsible Nordic Hiking Poles – Check Price We earn a commission if you make a purchase, at no additional cost to you. 8. Prioritize Protein After Your Walk Exercise stimulates muscles, but nutrition helps rebuild and maintain them. Protein becomes increasingly important as we age because our bodies become less efficient at preserving muscle mass. After a walk or workout, I aim for protein-rich foods like: Greek yogurt eggs cottage cheese lean chicken fish protein smoothies Women over 40 benefit from spreading protein throughout the day instead of eating most of it at

8 Ways to Build Lean Muscle While Walking (Without Destroying Your Joints) Read More »

5 Cardio Step Strength Exercises for Women Over 50 to Build Muscle

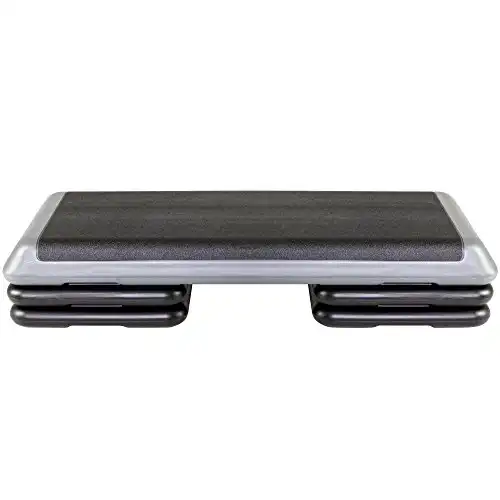
5 Cardio Step Strength Exercises for Women Over 50 to Build Muscle As we age, maintaining muscle mass and cardiovascular health becomes more important than ever. After 50, women naturally start to lose muscle due to hormonal changes, which can lead to a slower metabolism and decreased strength. But here’s the good news: strength training paired with a little cardio is one of the most effective ways to keep your body strong, your bones healthy, and your energy levels up. That’s where cardio step strength exercises come in. This type of workout combines the best of both worlds, heart-pumping movement and muscle-building exercises, using just a step platform and a pair of dumbbells. You can do it right in your living room, and it’s low-impact, joint-friendly, and easily adjustable to your fitness level. If you’re ready to burn calories, build strength, and improve balance, let’s dive into the exact moves you can do today. What You Need for This Workout Step Platform: A sturdy aerobic step or even a low bench works. I recommend this one! Dumbbells: A medium set, choose a weight that feels challenging by the last few reps but still allows good form. I recommend these basic hand weights! Timer: Your phone or watch for 45-second intervals. The Workout Format This is a quick, efficient 15-minute step strength workout you can do at home. I always recommend these essential warm up moves for middle aged women before any exercise! It helps protect your joints and prevent injury. Here’s how: Perform each move for 45 seconds, then rest for 15 seconds. After completing all five exercises, rest for one minute. Repeat the circuit three times for a total of 15 minutes. Want an extra challenge? Add another round for 20 minutes of sweat and strength! The 5 Cardio Step Strength Exercises Follow these exercises for an impactful workout you can do over and over again! 1. Bulgarian Split Squat This lower body powerhouse targets your quads, glutes, and hamstrings while also challenging your balance. How to do it: Stand facing away from the step, holding dumbbells at your sides. Place your right foot on the step behind you. Bend your left knee to lower into a lunge, keeping your chest tall and core engaged. Push through your left heel to return to standing. Pro tip: Keep your front knee aligned over your ankle, not past your toes.Modification: Skip the weights and just use body weight for balance practice.Why it’s great: Improves single-leg strength and stability, which is crucial for preventing falls as we age. 2. Incline Push-Up A classic move made easier on the wrists and shoulders thanks to the step. Great for chest, shoulders, and core strength. How to do it: Place your hands on the edge of the step, slightly wider than shoulder-width apart. Walk your feet back into a high plank position. Lower your chest toward the step, elbows at a 45-degree angle. Press back up to starting position. Pro tip: Engage your core and keep your body in a straight line, no sagging hips.Modification: Use a wall for even less pressure on the wrists.Why it’s great: Builds upper body strength without getting on the floor. You might also enjoy these five exercises to tone your arms over 50! 3. Alternating Reverse Lunge Off the Step This move strengthens your legs while giving you a little cardio boost. How to do it: Stand on the step holding dumbbells at your sides. Step your right foot back into a reverse lunge, bending both knees to 90 degrees. Return to the step and switch legs. Pro tip: Move with control, don’t rush.Modification: Leave the dumbbells out for a lower-intensity version.Why it’s great: Builds lower body strength and improves hip mobility. 4. Glute Bridge with Feet on the Step One of the best moves for targeting your glutes and hamstrings while supporting your lower back. How to do it: Sit on the floor with your heels on the step, knees bent. Lie back and place your arms by your sides. Press through your heels to lift your hips until your body forms a straight line from shoulders to knees. Lower with control and repeat. Pro tip: Squeeze your glutes at the top for maximum activation.Modification: Keep your hips lower if you feel pressure in your lower back.Why it’s great: Strengthens your posterior chain, key for posture and power. 5. Renegade Row + Walk the Plank This compound move works your back, arms, and core all at once. How to do it: Start in a high plank position with dumbbells in each hand on the step. Row one dumbbell to your ribcage, then the other. After both rows, “walk” your hands down from the step to the floor and back up. Pro tip: Keep your hips square to the ground, no rocking!Modification: Perform the rows from your knees if needed.Why it’s great: Builds upper body strength and serious core stability. Focusing on my core is one of the most important things I do differently at 60 vs. 40! Why Women Over 50 Should Add Step Strength Workouts to Their Routine Bone health: Weight-bearing moves like lunges and squats help prevent osteoporosis. Check out my favorite osteoporosis exercises geared towards building bone strength! Muscle maintenance: Strength training helps offset age-related muscle loss. Improved balance: Single-leg moves like the Bulgarian Split Squat reduce fall risk. Cardio boost: You’ll burn calories without pounding your joints. Convenience: No gym required, just a step, some dumbbells, and a small space. Ready to Step Up Your Fitness? These five cardio step strength exercises are simple, effective, and perfect for any woman over 50 who wants to stay strong, active, and confident. Whether you do this as a quick 15-minute circuit or repeat for a longer session, consistency is what counts. So grab your step, grab your weights, and give this workout a try today! Pin it, save it, or share it with a friend who loves a good at-home workout. Product Image Product Name

5 Cardio Step Strength Exercises for Women Over 50 to Build Muscle Read More »

Kyphosis (Dowager’s Hump): Why It Happens and How Midlife Women Can Improve It

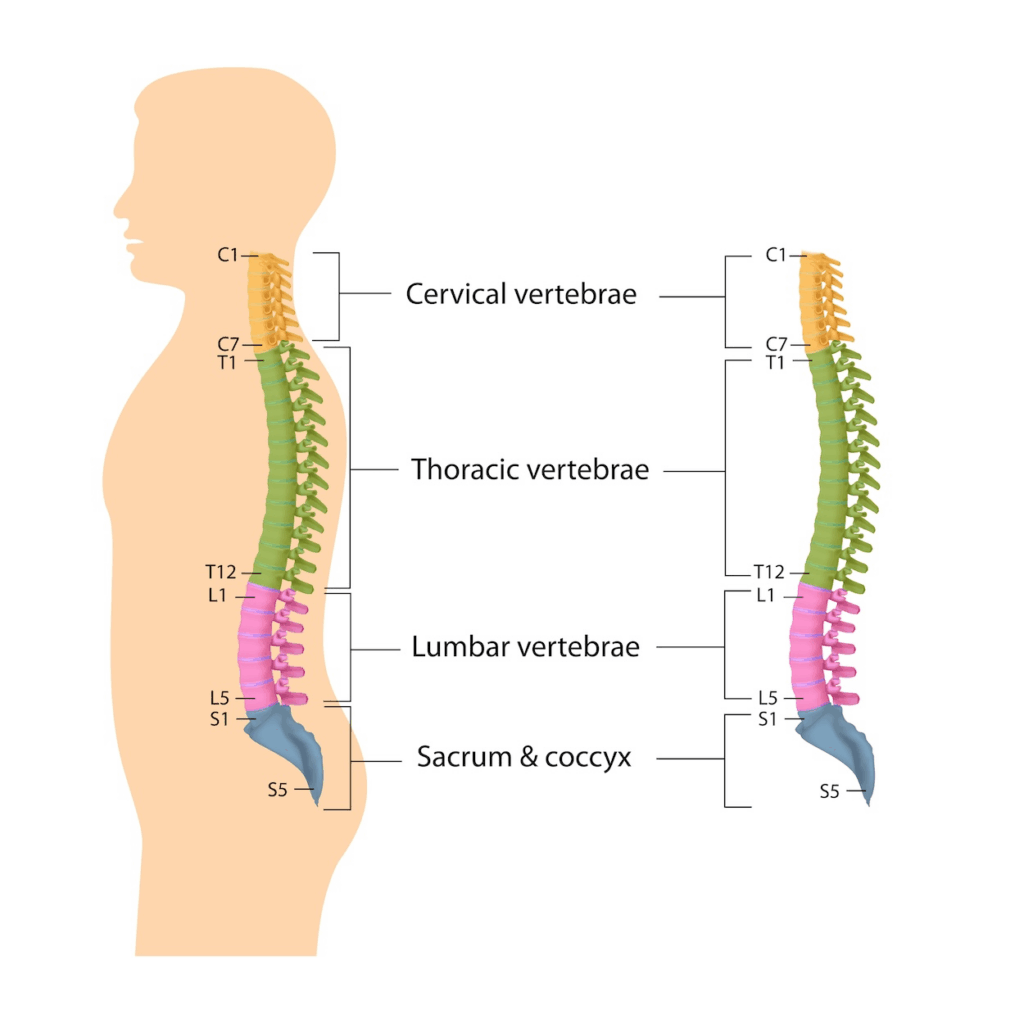
Kyphosis (Dowager’s Hump): Why It Happens and How Midlife Women Can Improve It If you’ve ever glanced in the mirror and thought, “Where did that little hump at the base of my neck come from?” — you are so not alone. Many of us in midlife start to notice rounding through the upper back or a forward head posture that just wasn’t there in our 30s. It’s often called kyphosis or Dowager’s Hump, and while it can feel discouraging, here’s the good news: You are not stuck with it. You didn’t “fail” at posture — your body simply adapted to how you use it. As a 35+ year trainer and certified Pilates instructor, I’ve coached thousands of women through this. Strengthening the upper back — from the cervical vertebrae in your neck through the thoracic spine (mid-back) — is one of the biggest game changers for posture, confidence, and long-term mobility. Let’s break this down in a way that feels empowering and understandable. What Exactly Is Kyphosis? Kyphosis refers to an exaggerated forward curve in the upper spine. Everyone has a natural curve — that’s normal and healthy. But when the thoracic spine rounds too much, it can become what many call a “hump.” While genetics and structural issues can play a role, most midlife women experience postural kyphosis, meaning it’s functional and influenced by: Lifestyle habits Muscle imbalances Daily movement patterns The good news? Postural kyphosis is highly responsive to movement. Spine Anatomy (In Simple Terms) Your spine isn’t one long stick. It’s made up of 24 movable vertebrae, each designed to articulate and share load. Cervical spine (neck): 7 vertebrae that control head position Thoracic spine (upper/mid back): 12 vertebrae that anchor the ribs and support posture Lumbar spine (low back): 5 vertebrae built for stability and load-bearing A healthy spine forms gentle curves that act like springs. But sitting, slouching, screen time, stress, and age-related changes can exaggerate the thoracic curve while shifting the cervical spine forward. The result? Forward head posture Rounded shoulders Weak upper-back muscles A visible “hump” or fullness at the base of the neck Why Midlife Women Are Especially Prone to Kyphosis Kyphosis in middle age is not about blame — it’s about biology, lifestyle, and knowing what we’re up against so we can take action. Hormonal Changes + Bone Density Shifts After menopause, bone density naturally declines and disc height can decrease. This makes it easier for the upper back to collapse forward. A Lifetime of “Forward Living” Think about how much of life happens in front of you. The term “tech neck” has become increasingly popular and more people are noticing the outcome of spending time on: Phones Laptops Driving Cooking Caring for kids Reading Even workouts (hello push-ups and planks!) Your body adapts to its most repeated position. Weak Upper Back + Tight Chest This classic imbalance in middle age women presents as: Tight chest muscles Weak upper-back muscles Head drifting forward Shoulders rounding Spine following Sedentary Time Adds Up Women today sit more than ever. Prolonged sitting — especially unsupported — is directly correlated with progression of postural kyphosis. That’s why I’ve personally added a walking pad to my workday routine. More time on my feet, and less time bent over my computer in a chair! Stress and Breathing Patterns Shallow breathing tightens the chest and collapses the spine forward. Posture and breath are deeply connected. What Happens If You Ignore Kyphosis? Not to scare you — but to inspire action — here’s what can happen if kyphosis progresses: Increased neck, shoulder, and upper-back pain Stiffness and reduced mobility Tension headaches Limited thoracic extension (harder to stand tall) Reduced lung capacity in severe cases Decreased confidence (posture absolutely affects mood and self-image) Important reminder: Posture can improve at any age. I’ve seen women in their 70s make incredible changes. The Real Cause: Poor Upper-Back Muscle Control This is where Pilates taught me so much. Posture is not just about “pulling your shoulders back.” That often creates tension. The real issue is weak or under-used muscles deep between the shoulder blades and along the spine, including: Rhomboids Mid and lower trapezius Spinal extensors Scapular stabilizers When these muscles aren’t activated regularly, the front body takes over and pulls you into rounding. Add a forward-thrusting head (which weighs 8–12 pounds — thanks, Jerry Maguire 😉), and the body adapts by building soft tissue at the base of the neck for stability. What Research Shows: Yes, Kyphosis Can Improve If your kyphosis is postural — which is true for most midlife women — improvement is absolutely possible. Research shows: Strengthening upper-back muscles reduces rounding Thoracic mobility improves extension Stretching the chest increases spinal freedom Strength + mobility together work better than stretching alone The Best Exercises to Improve Kyphosis (Pilates-Inspired & Midlife-Friendly) Strength + mobility + awareness = your recipe for a taller, healthier spine. Improving kyphosis isn’t about forcing yourself to “stand up straight.” It’s about: Restoring mobility in the upper spine Strengthening postural muscles Building awareness you carry into daily life These exercises are gentle, effective, and perfect for midlife women. No fancy equipment required. Remember, consistency beats intensity. Doing 5–10 minutes daily helps far more than one intense session per week. 👉 Move slowly, breathe deeply, and focus on quality over quantity. 1. Foam Roller Thoracic Extension Why it helps: This is one of my favorite exercises for kyphosis. It helps restore extension in the thoracic spine- an area that often gets stiff from sitting and slouching. How to do it: Place a foam roller horizontally on the floor. Lie on your back with the roller under your upper back (mid-back area). Support your head with your hands. Gently extend your upper back over the roller – no crunching, no forcing. Pause briefly, then return to neutral. Reps: 10–15 slow reps Coaching cue:“Think length, not how far you bend.” 2. Cat–Cow Stretch Why it helps: This move mobilizes every vertebra in your spine and helps reconnect your neck, upper back, and core.

Kyphosis (Dowager’s Hump): Why It Happens and How Midlife Women Can Improve It Read More »

Pushups For Beginners: How To Build Strength One Rep At A Time

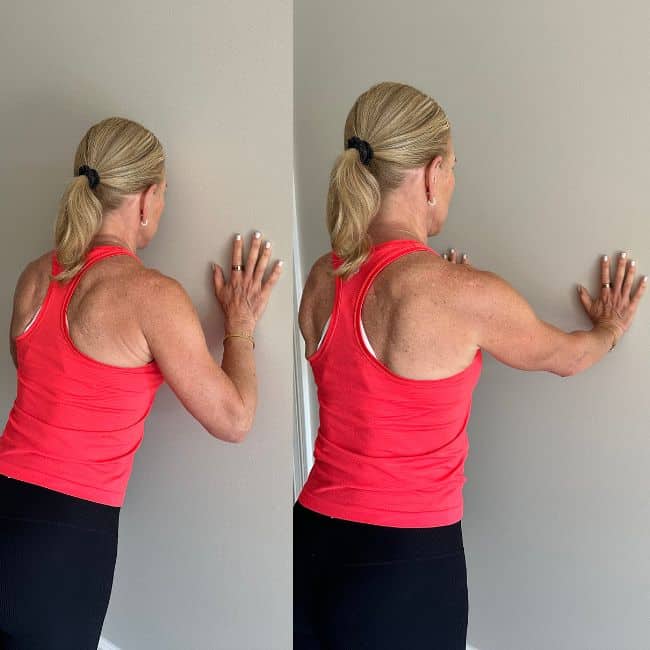
Pushups For Beginners: How To Build Strength One Rep At A Time Let’s talk about the pushup — one of the simplest (but toughest!) bodyweight exercises out there. And lately, pushups have been having a moment. When Dr. Vonda Wright appeared on a Mel Robbins podcast episode and said women should be able to do 11 pushups on their toes, it set off a viral wave on social media. Suddenly, “11 pushups” became the new fitness challenge — with everyone testing their strength. But here’s the truth: that number? It’s just a number. What really matters is building your strength, in a way that works for your body and your journey. Pushups are a powerful, functional move that builds muscle in your chest, shoulders, arms, and core — no equipment needed. And the best part? You can do them anywhere – in your living room, at the park, or while traveling. But here’s the deal: most of us don’t start off being able to bang out perfect pushups on our toes. And that’s not a failure! That’s just normal. Strength takes time to build, and the best way to get there is with smart, progressive training. Let’s break it down with a few variations to help you work your way up to full pushups. Progressing to Pushups While you may be familiar with standard pushups, there are many variations that may help you get started, progress, or increase difficulty. Try doing sets of 2 or 3. Then move to 5-10 in a row.  Take breaks if needed. Remember what I say, “Strive for progress, not perfection.”  Performing fewer pushups with correct form will be better over time than completing many with incorrect form. Also remember my saying, “There is no shame in the modify game”. You are better off with a FULL range of motion and on your knees than a pushup on your toes where you barely bend your elbows. Half range of motion = half the results.  Start Here: Pushup Variations for Beginners (With Step-By-Step Instructions) Follow these steps to progress your push ups, starting from wherever you are now! 1. Wall Pushups A great entry point if you’re brand new to pushups or easing back in after injury. How to do wall push ups: Stand an arm’s length from a wall, feet hip-width apart. Place your hands on the wall at shoulder height, slightly wider than your shoulders. Engage your core and keep your body in a straight line from head to heels. Slowly bend your elbows and bring your chest toward the wall, keeping your heels flat on the ground. Exhale and push back to your starting position. Tip: Don’t arch your back. Stay controlled and tight through the core. 2. Incline Pushups A great middle-ground move that builds strength while reducing the intensity. How to do incline push ups: Place your hands on a sturdy surface like a bench, table, or counter -shoulder-width apart. Walk your feet back until your body forms a straight line from shoulders to heels. Inhale as you bend your elbows to lower your chest toward the edge. Exhale and push through your palms to return to the starting position. Keep your core tight and avoid letting your hips sag or pike. Tip: Start at a higher incline and as you progress, lower the surface you use to get stronger.  3. Kneeling Pushups This is where real progress happens. Focus on control, not speed. How to do kneeling push ups: Start on all fours, then walk your knees back a few inches so they’re behind your hips. Place your hands just outside your shoulders, keeping your elbows slightly tucked. Engage your core and squeeze your glutes to keep your body aligned. Lower your chest to the floor, aiming for your elbows to form a 45-degree angle (or keep them tight to your ribs for a tricep focus). Exhale as you push back up. Tip: Keep your movement smooth and steady. Your chest – not your chin or hips, should be leading the way down. 4. Standard Pushups (Toes!) Once you’ve built strength and confidence, try the full version. It’s okay to start with just a few reps. How to do standard push ups: Begin in a high plank: hands under shoulders, legs extended, feet hip-width apart. Engage your core, squeeze your legs, and maintain a straight line from head to heels. Inhale as you bend your elbows -either at a 45-degree angle or keep them close to your ribcage and lower your chest toward the floor. (I’m a fan of the tricep pushups lie I explain below.) Pause briefly at the bottom, then exhale and push back up. Tip: Don’t rush! Fewer reps with full range and great form are better than fast, sloppy pushups. Tips For Better Pushups Good form matters more than quantity. Start strong with these tips: Keep your wrists stacked directly under your shoulders. Place your hands on dumbbells if you feel wrist discomfort, this keeps the wrists in a more neutral position and can help relieve pressure. Use a mat for knee support or a towel for extra comfort. Look down, not ahead. Keep your neck in a neutral position. Engage your core to protect your spine. Breathe with control -inhale on the way down, exhale as you push up. Focus on full range of motion. You need to stretch a muscle to strengthen it. Going low (with good form!) is key for building strength and seeing results. Elbow Positioning: Narrow vs. 45 Degrees Let’s talk about your elbow angle because yes, it matters. You might wonder how elbow positioning can affect difficulty or joint stress. Here’s the scoop: I’m a big fan of keeping your elbows tucked in close to your rib cage -think “narrow pushup” or “tricep pushup.” This style engages the triceps more, targets the chest in a slightly different way, and most importantly, puts less stress on your shoulders. In fact, I teach nearly all my clients this variation. It’s a win-win for: Stronger arms Defined triceps Happier shoulders Try to think about brushing your

Pushups For Beginners: How To Build Strength One Rep At A Time Read More »

The Daily 50 Workout Challenge

The Daily 50 Workout Challenge As a fitness coach who’s been working with women for over three decades, I’m always on the lookout for simple, effective workouts that you can do anywhere — and that’s exactly why I love the Daily 50 Workout Challenge. This bodyweight workout is deceptively simple but don’t be fooled. It’s tougher than it looks and will have your whole body working, your heart rate climbing, and your muscles thanking you (or maybe cursing you!) by the end. Here’s how it works: five bodyweight moves, 50 reps (or seconds) each. No equipment, no time limit, and no excuses. Whether you’re traveling, at home, in a hotel room, or just short on time — this challenge is for YOU. The Daily 50 Workout Exercise Guide Here’s what the Daily 50 Workout consists of: 50 Bodyweight Squats 50 Lunges 50 Push-Ups 50-Second Wall Sit 50-Second Plank Hold That’s it! But, trust me, it’s more than enough to get your heart pumping and your muscles fired up. This is a full-body functional workout you can do solo or alongside a friend, spouse, or even your kids. Think of it like fitness meets friendly competition, and who doesn’t love a little challenge? Let’s break it down with tips on how to perform each move with good form so you get the most benefit without risking injury. 1. Bodyweight Squats (50 reps) Squats are a powerhouse move that target your glutes, hamstrings, and quads and they’re great for functional strength. How to do them: Stand with feet hip-width apart, toes pointed forward. Lower your hips back and down as if sitting into a chair. Keep your weight in your heels, chest lifted, and knees tracking over your toes. Press through your heels to return to standing. Pro Tip: Keep your core tight to support your lower back and don’t let your knees collapse inward. Focus on depth and control — quality over speed. 2. Lunges (50 total, 25 each leg) Lunges challenge your balance, build lower-body strength, and are great for hip mobility. How to do them: Start standing tall. Step forward with one leg, lowering your body until both knees are bent at about 90 degrees. Your front knee should be directly above your ankle, and your back knee should hover just above the floor. Push through your front heel to return to standing and alternate legs. Pro Tip: Need more balance support? Try holding onto a wall or chair when first starting out. 3. Push-Ups (50 reps) Ah yes, the one that gets most of us — push-ups. They’re definitely the hardest part of this challenge but also one of the most effective exercises for building upper body and core strength. How to do them: Start in a plank position with hands just wider than shoulder-width. Lower your chest to the ground by bending your elbows. Try to keep your triceps close to your ribcage to activate more tricep and use less of you trapezius muscles. Keeping your core engaged and you back flat. Press back up. Modifications: Drop to your knees if needed or take your hands up on a table or countertop— form first, always! And if 50 full push-ups feel impossible, break it into smaller sets. That’s what I do Try 5-10 at a time and rest as needed. 4. Wall Sit (50 seconds) This static hold works your thighs like crazy and don’t be surprised if your legs start shaking! How to do it: Stand with your back against a wall, then slide down until your thighs are parallel to the floor. Knees should be stacked above your ankles. Press your back and shoulders into the wall and hold for 50 seconds. Pro Tip: Don’t cheat the depth — aim for a true 90-degree bend in your knees, but don’t go lower than that. 5. Plank Hold (50 seconds) This one’s all about your core — but it also strengthens your shoulders, glutes, and even your legs. How to do it: Get into a forearm plank position with elbows under your shoulders. Engage your abs, squeeze your glutes, and keep your body in a straight line from head to heels. Don’t let your hips sag or pike. Modifications: Drop to your knees to modify, and make sure your form stays tight. Why Try the Daily 50? The Daily 50 workout is a simple, no-equipment routine that builds strength, boosts energy, and takes just minutes a day to stay consistent and feel accomplished. It’s quick and effective. Perfect when you’re short on time or traveling. It works your entire body. You’ll get strength, cardio, and core all in one. It’s fun! Yep, I said it. Challenge a friend or family member to do it with you. See who gets to 50 fastest or who can complete it (with good form, of course). No equipment needed. All you need is your body and some determination. And remember there’s no time limit. The goal isn’t to finish it in record time. It’s to finish it — period. Pace yourself, rest when you need, and come back the next day feeling just a little stronger. The Daily 50 is all about progress, not perfection. Some days it might feel easy, others it might humble you. But the key is to show up, do your best, and keep going. Ok – go give it a try! As a fitness coach who’s been working with women for over three decades, I’m always on the lookout for simple,… Chris Freytag, CPT{authorlink}https://gethealthyu.com/daily-50-workout/Get Healthy U | Chris Freytaghttps://gethealthyu.com/wp-content/uploads/2024/09/favicon-96×96.png

The Daily 50 Workout Challenge Read More »

Wedding Arm Workout: MOB Exercises for Toned Arms

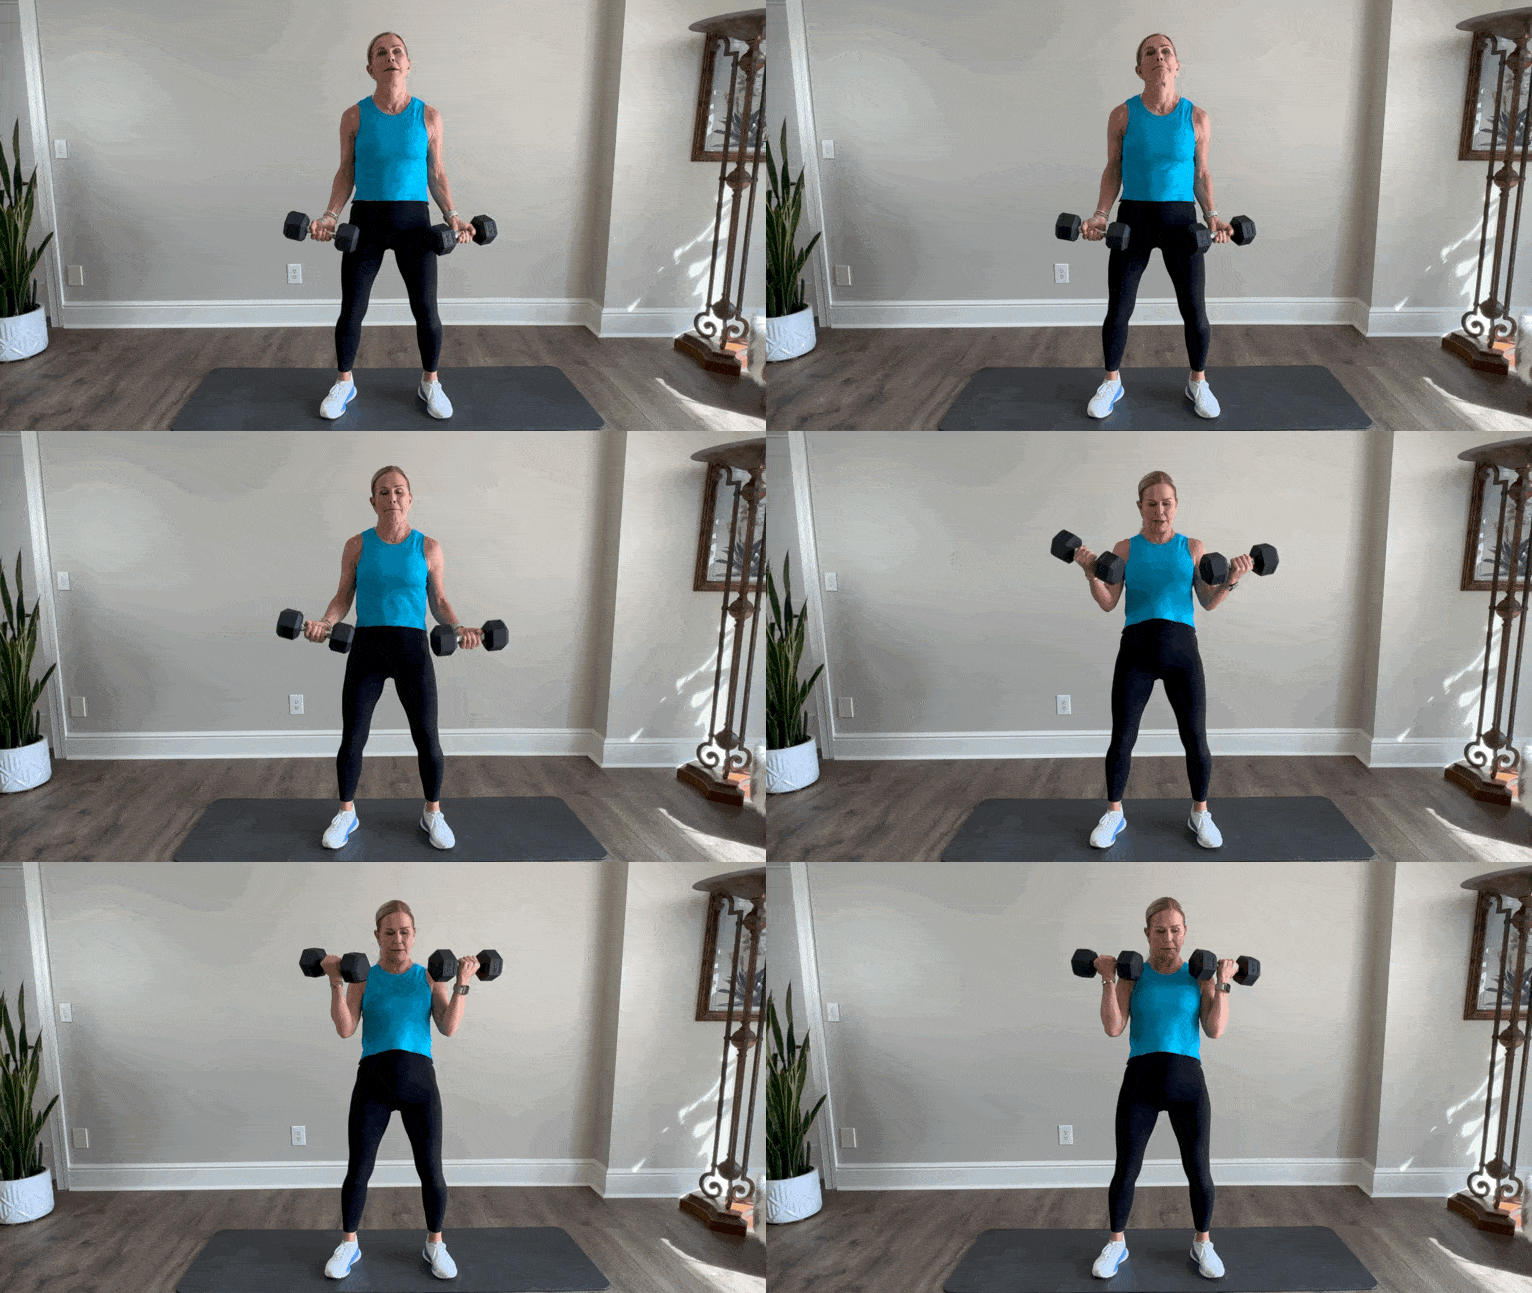
Wedding Arm Workout: MOB Exercises for Toned Arms Want to feel confident and strong in your mother-of-the-bride dress? This wedding arm workout is designed to tone and sculpt your arms so you feel fabulous from rehearsal dinner to the big day. Whether you’re the Mother of the Bride (MOB) or the Mother of the Groom (MOG), this is a once-in-a-lifetime moment. As someone who’s proudly played both roles—and now approaching 60—I understand how important it is to feel strong, confident, and radiant as you walk down that aisle. Let’s be honest: sleeveless dresses reveal everything. But here’s the empowering news—you don’t need a drastic transformation. You just need a little strength. Why Midlife Women Benefit from Strength Training for Their Arms Defined arms aren’t just for younger women. As we get older, building lean muscle becomes even more important—for metabolism, bone health, posture, and overall strength. And no, lifting weights won’t make you bulky. Instead, you’ll get that toned, graceful look that makes you feel amazing in your own skin. While you won’t see changes overnight, a consistent strength training routine using dumbbells can help you see noticeable results in just a few months. It’s your secret weapon for rocking that sleeveless dress on the big day. PS. These are the most flattering dresses for women over 50 on Amazon, picked and reviewed by me! Wedding Arm Workout Routine for MOBs and MOGs Here are five of my favorite upper body exercises designed especially for women over 40. These moves target your biceps, triceps, and shoulders—key areas that create sculpted, elegant arms. Wedding Arm Workout Instructions: 15 reps of each move 3 sets total Do this 2–4 times per week Increase weights as it gets easier Aim to feel muscle fatigue by the last few reps Let’s go! 1. Bicep Curls This classic move targets the front of your arms to help create strong, defined biceps—perfect for sleeveless styles. What it targets: Front of the arms Stand with feet hip-width apart, dumbbells at your sides Curl weights toward your shoulders Lower slowly and with control Keep elbows tucked in 2. Overhead Tricep Extensions Lift and tighten the back of your arms with this effective tricep toner—say goodbye to the dreaded arm jiggle! What it targets: Back of the arms Hold one dumbbell with both hands Extend arms overhead Bend elbows to lower the weight behind your head Straighten arms to return to start 3. Tricep Kickbacks A go-to move for sculpting the backs of your arms, tricep kickbacks add definition and polish to your upper body. What it targets: Tones and tightens triceps Hinge at your hips, keeping your back flat Elbows bent at 90 degrees Press dumbbells back Squeeze triceps, then return with control 4. Lateral Shoulder Raises This exercise helps shape and strengthen your shoulders for a balanced, elegant look in any dress style. What it targets: Shoulder shape and strength Hold dumbbells at your sides With a slight bend in elbows, lift weights to shoulder height Lower with control—no swinging 5. Overhead Shoulder Presses Build strength and definition through your entire upper body with this powerhouse shoulder move. What it targets: Shoulders and posture Start with dumbbells at shoulder height, palms forward Press weights overhead Lower slowly back to start Feel Confident and Strong on the Big Day This journey is about progress, not perfection. When you combine these exercises with nourishing food (hello, lean proteins and colorful veggies), lots of hydration, and good sleep, you’ll build not only strength—but confidence. You’ve already done the incredible work of raising a remarkable human being. Now it’s time to shine your own light. You’ve got this, mama—and yes, you’ll look absolutely stunning. P.S. You might also enjoy my 10 Minute Bicep Workout for Women and this Anti-Aging Arm Routine to Tackle Flabby Arms! Want to feel confident and strong in your mother-of-the-bride dress? This wedding arm workout is designed to tone and sculpt… Chris Freytag, CPT{authorlink}https://gethealthyu.com/wedding-arm-workout/Get Healthy U | Chris Freytaghttps://gethealthyu.com/wp-content/uploads/2024/09/favicon-96×96.png

Wedding Arm Workout: MOB Exercises for Toned Arms Read More »

9 Essential Stretches For Walking That Help Prevent Injuries

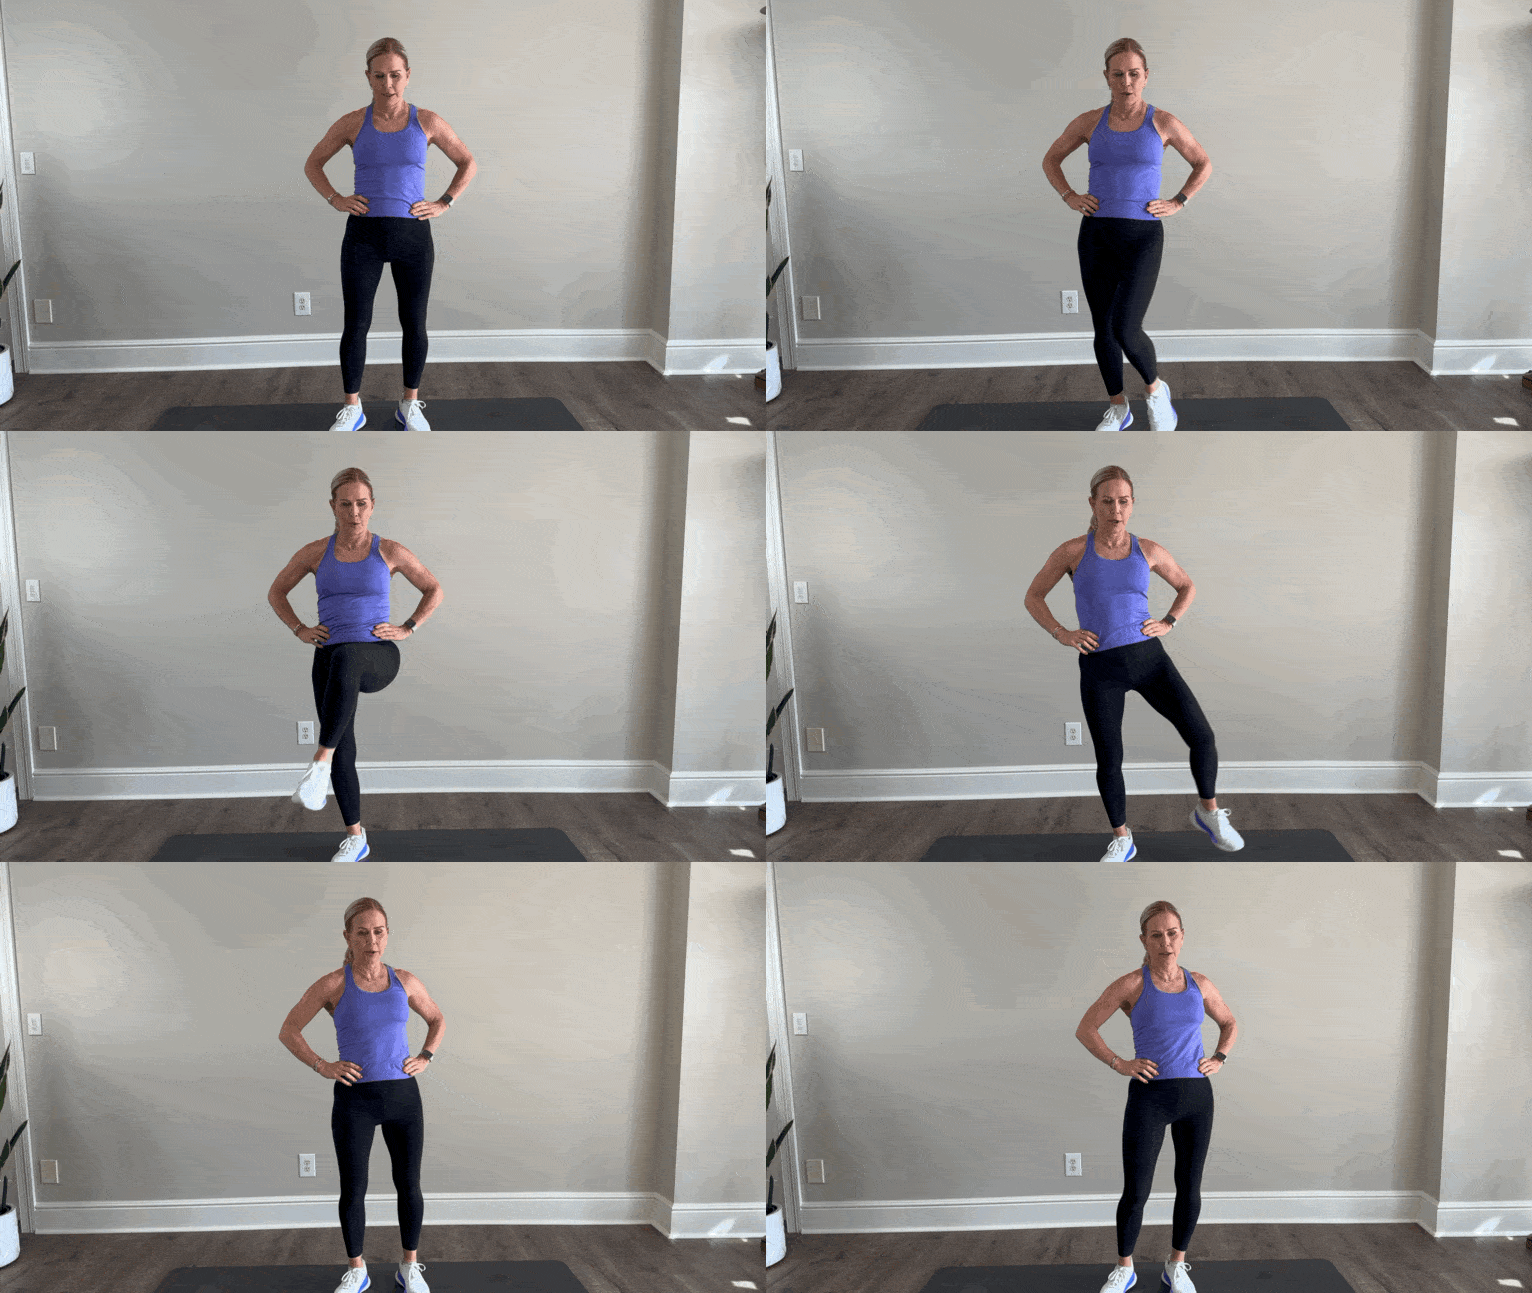
9 Essential Stretches For Walking That Help Prevent Injuries Boost your walks and prevent injuries with my 9 essential stretches for walking, perfect for casual strollers and seasoned hikers alike. I’m a health coach, personal trainer, and lifelong advocate for movement at every age. And one of my all-time favorite ways to move my body? Walking. Whether I’m squeezing in a couple mile power walk before work or getting in a longer 6-mile stroll with the dog, walking clears my head, gets my heart rate up, and just makes me feel good. But here’s the thing—if you’re putting in the miles, even if it’s “just walking,” you need to be stretching. Seriously. I’ve learned the hard way that skipping stretching exercises can lead to tight hips, cranky hamstrings, and an achy low back, especially as we get older. So let’s talk about why walking is such a fantastic low-impact workout and why a stretching routine—before and after—needs to be part of your workout. Why Walking Deserves More Credit Walking is often underestimated. But make no mistake—it’s one of the best low-impact ways to burn calories, get your heart rate up, and support your overall health. It’s gentle on the joints, accessible for most fitness levels, and can be done anywhere, anytime. Plus, walking helps with: Cardiovascular health Mental clarity (seriously, walking is my moving meditation!) Bone strength (especially when combined with resistance work- I wear a weighted vest.) Weight management Mood boosting from endorphins (your body’s natural happy drug.) If you’re in midlife like me, walking can be the perfect go-to cardio to stay active without over-stressing your body. But… tight muscles and limited mobility can sneak in if you’re not doing your part to warm up and cool down. Why Stretching Is Non-Negotiable for Walkers If you’ve ever noticed your hips or legs getting tight during or after a walk, you’re not alone. Walking uses a lot of repetitive motion, and if you’re doing it daily like I am, you’ve got to make time for flexibility and mobility. Stretching can help: Prevent injuries (yes, walkers can get them too!) Improve circulation Increase range of motion Relieve tension in overused muscles and reduces muscle soreness Support better posture and alignment Plus, let’s be honest—as we age, we get tighter. Our muscles and ligaments and joints are aging with us. It’s just the truth. But, it doesn’t mean we can’t work on staying mobile and feeling good in our bodies. It’s time to start paying attention to your body in a new way and being diligent about our self care which includes stretching. Let’s dive into my favorite pre-walk and post-walk stretches. I use them myself and recommend them to all my clients—especially those over 50 because our ligaments, tendons and muscles need a little more attention than they did 30 years ago! These movements are practical, quick, and effective and are easy for you to add to your walking routine. All you need is an extra 5 minutes on the front and back of your walk! Pre-Walk Stretches (Dynamic & Standing Only) Before a walk, you want to move the muscles—not hold static stretches. These dynamic stretching moves help to increase blood flow and range of motion in your joints while prepping your body for movement. 1. Standing Hip Circles This one’s for your hip joints—great for loosening up stiffness. How to do it: Stand tall, hands on your hips. Slowly lift your right leg in a circular motion (like you are lifting it up and over a step stool). And then bring it back the other direction. Do it 5 times on the right and then repeat on the left leg. Why it helps: Warms up the hip sockets and lower back area and gently activates your core. 2. Toe Touch Reaches I’m not talking about the static kind—this one gets your hamstrings moving. How to do it: Stand with feet shoulder-width apart. Reach both arms up to the sky, then sweep them down toward your toes in a flowing motion. Repeat 10 times. Why it helps: Warms up the hamstrings, glutes, lower back and upper back while encouraging circulation. Also opens up your shoulders. 3. Standing Side Stretch A gentle side bend that wakes up your spine and obliques. How to do it: Reach your arms overhead, then gently lean to one side. Come back to center, and lean the other way. Repeat 5 times each side. Why it helps: Opens up the sides of the body and helps with torso muscles used during walking. 4. Standing Knee Hugs We’re targeting the hips and glutes with this one. How to do it: Stand tall. Bring one knee up toward your chest, hugging it with your arms for a second or two, then release and switch sides. Alternate for 10 total reps. Why it helps: Activates the hip flexors and glutes while challenging balance a bit (always a good thing!). 5. Calf Raises Don’t forget those calf muscles—they do a lot of work while you walk! How to do it: Stand with feet hip-width apart. Slowly rise onto your toes, then lower back down. Do 10-15 reps. Why it helps: Strengthens your lower legs and promotes circulation before you hit the trail. Post-Walk Stretches (Gentle, Grounded & Static) Now that your body is warm, it’s the perfect time to go deeper. These stretches are designed to release tension, lengthen muscles and aid recovery post workout. 1. Toe Touch Hold Yes, again! But this time it’s a hold. How to do it: With feet hip width apart, gently fold forward from your hips and reach toward your toes. Let your head and neck relax. Hold for 30 seconds. Why it helps: A deeper hamstring and lower back release after your walk. 2. Deep Squat (aka Yoga Squat) This one’s my go-to for opening the hips. How to do it: Stand with feet slightly wider than hips, toes slightly out. Sink your hips down toward the floor, bringing your hands to prayer position at your chest. Elbows can gently press into your knees. Why it helps: Stretches your hips, ankles, and lower back—and feels amazing after walking hills or inclines. 3. Cat-Cow Stretch Perfect for

9 Essential Stretches For Walking That Help Prevent Injuries Read More »

Quick Love Handle Workout: Effective Exercises to Target & Tone

Quick Love Handle Workout: Effective Exercises to Target & Tone Let’s talk about that stubborn little roll that sits right around the waist — yes, I’m talking about love handles. Also, lovingly (or not-so-lovingly) called a muffin top, these side pockets of fat tend to sneak up on us in midlife — and once they’re there, they don’t want to leave without a fight. And if there’s one thing I hear from women over and over again, it’s this: ‘Chris, what can I do about my belly fat?’ It’s hands-down the number one area women want to tone up — especially as we age and our waistlines start shifting. So here’s the good news: with the right mix of strength training moves, core-focused exercises, and sustainable lifestyle habits, you can reduce love handles and feel stronger and more confident in your body. Let’s dive into what love handles are, why they show up more prominently in midlife, and how to work toward a leaner, stronger waistline — using my love handle workout below! What Are Love Handles (and Why Do They Appear in Midlife)? Love handles are those soft pockets of fat that sit on the sides of your waist and often extend toward your lower back. While the name sounds cute, many women find them frustrating — especially when clothes fit tighter around the midsection or that once-smooth silhouette starts to feel less defined. So, why do they creep up in midlife? Hormonal shifts: As we move through perimenopause and into post-menopause, estrogen levels decline — and fat distribution changes. Our bodies become more prone to storing fat around the belly and sides. Slower metabolism: We naturally lose muscle mass as we age (if we’re not actively strength training), which slows our metabolism and makes it easier to store excess fat. Increased stress: Cortisol, our stress hormone, is directly linked to fat storage — particularly around the midsection. And let’s be honest, midlife can bring its fair share of stress! See how I finally lowered my cortisol levels in middle age! Sedentary lifestyle: Busy schedules, caregiving, and career shifts can lead to more sitting and less moving, which means fewer calories burned throughout the day. But just because love handles are common doesn’t mean we’re stuck with them. You can absolutely make changes that support your waistline, boost your energy, and help you feel more in control of your body again. Your Go-To Workout to Target Love Handles This is a quick but effective love handle workout routine that focuses on the obliques, the entire core, and full-body fat burning. This is an easy at home workout that requires a dumbbell for two of the exercises. Love Handle Workout Instructions Perform each of these exercises for 30 to 45 seconds, then rest for 15 seconds between moves. Go through the circuit 2 to 3 times, depending on your fitness level. 1. Side Planks (Hold or Add Hip Dips) One of the most effective exercises to fire up your obliques. Start with a simple forearm side plank, then try adding slow hip dips up and down to increase the challenge. Repeat on both sides. Tip: Keep your hips stacked and focus on a long line from head to toe — it’s all about quality over quantity. 2. Russian Twists (Bodyweight or Dumbbell) Sit tall, engage your core, and rotate from side to side tapping the ground beside you. Add a dumbbell if you want more resistance. Tip: Keep your chest lifted, back extended and shoulders relaxed — no hunching! Rotate from the core abdominal muscles not just from the shoulders. 3. Bicycle Crunches An old-school favorite because it works! Make sure to fully extend your legs and reach your elbow across to the opposite knee to maximize the twist. Tip:  Get your shoulder blades off the ground using the strength of your mid back and pull your belly to your spine. 4. Standing Oblique Crunches Stand tall, hands behind your head, and bring your elbow toward the same-side knee, squeezing your side body. Move in a tick tock motion and imagine you have your body against a sheet of glass. Alternate sides. Tip: This is a great move if you don’t love getting down on the floor —it works the obliques and it doubles as balance training. 5. Mountain Climbers A cardio burst that also fires up your core. Start in a plank position, shoulders over the wrists and butt down. Pull your alternating knees in and keep the pace steady and your hips in line — no bouncing! Tip: Slow it down for a lower-impact option or try it with hands on a bench to reduce stress to the shoulders. 6. Woodchoppers (With Dumbbell) Start in a low squat, holding a dumbbell on one side of your body. Rotate and lift the weight diagonally across your body to the opposite shoulder. Control the movement both up and down. Repeat on both sides. Tip: This move mimics everyday rotation (think picking up a bag and putting it on a shelf or swinging a golf club!) and strengthens your core muscles in a functional way. 7. Plank Hip Dips From a forearm plank, gently drop your hips side to side, tapping the floor. It’s subtle but powerful for those deep obliques. Tip: Engage your glutes and core the entire time and imagine you are going up and over a basketball — avoid collapsing through the low back. 6 Lifestyle Changes That Can Help Get Rid Of Love Handles Now let’s get real: you can’t spot reduce fat — but you can reduce overall body fat and reshape your waistline by combining smart workouts with lifestyle habits that support your hormones, your metabolism, and your mental health. Here’s what really moves the needle: 1. Strength Train Consistently You’ve heard me say it before — muscle is the magic. It boosts your resting metabolism, helps balance hormones, and gives your body that toned, sculpted look. If you’re not lifting weights yet, now is the time! And yes, every strength exercise you do (squats, lunges, overhead presses) will call upon your core muscles. You need to

Read More »