Shoulder Workouts

Auto Added by WPeMatico

Build Your Upper Body More Efficiently With a Pull Day Workout

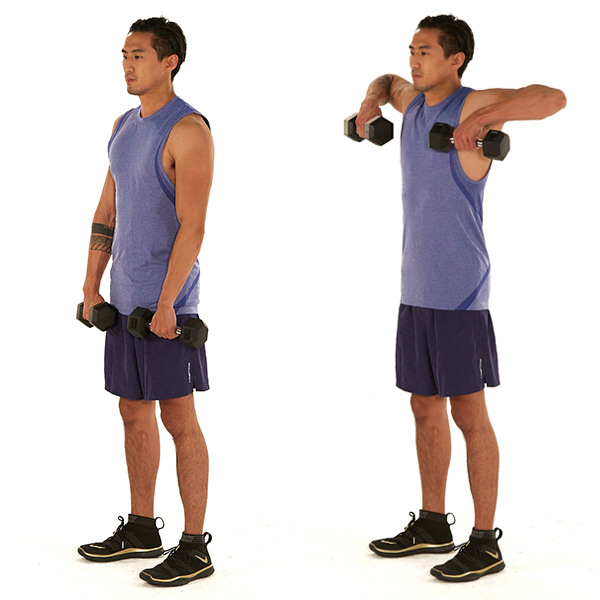
Build Your Upper Body More Efficiently With a Pull Day Workout Looking for a better, more systematic approach to strength training? Consider the pull day workout and its counterpart, the push day workout. Dividing your workouts between push and pull days is one of the most straightforward ways to create a fitness plan that will allow you to vary your movements, optimize your training time, and avoid injury. What Is a Pull Day? The typical pull day workout consists of upper-body exercises that utilize a pulling motion. They primarily engage the biceps, forearms, and back muscles. “Because a majority of the ‘pull’ muscle groups make up the back of the body (or posterior chain), these are extremely important for posture and mobility,” says BODi Fitness Programming Manager Amanda Herrera. Plus, pulling is key to everyday functional movement, whether you’re paddling a kayak or lifting grocery bags. How Is It Different From Push Day? A push day workout focuses on pushing exercises that target the opposing muscles, including the chest, shoulders, and triceps. Alternating between pushing and pulling exercises allows you to work one group of muscles while the other group recovers. This is why it’s possible to do a push day workout after a pull day workout without taking a rest day. Ultimately, this training method allows you to accomplish more strength training in a shorter period. Weightlifting programs on BODi — such as LIIFT4 and Body Beast — follow this principle by targeting different muscle groups on different days to make sure you hit every workout hard and maximize muscle building. What Are the Best Pull Exercises? Try incorporating these exercises into your training plan to get the most out of your pull day workout. 1. Dumbbell bent-over row Stand with your feet hip- to shoulder-width apart, holding a dumbbell in each hand. Brace your core, hinge at your waist to push your hips back, bend your knees slightly, and lower your torso until it’s nearly parallel to the floor. Keep your glutes engaged to protect your lower back. Let the dumbbells hang at arm’s length with your palms facing each other. Engage your shoulder blades to keep your shoulders pulled back. This is the starting position. Without moving your torso, and while keeping your elbows tucked and back flat, row the weights to your sides as you squeeze your shoulder blades together. Make sure there’s a 90-degree bend in the elbow, so you’re rowing to your ribs and not armpits. Pause, and then lower the weights back to the starting position. 2. Pull-up  Grab a pull-up bar with an overhand grip that’s slightly wider than shoulder-width. Hang at arm’s length with your arms straight (a position known as a dead hang) and your ankles crossed behind you. Without swinging or kipping (using momentum to propel you upward), engage your lats and squeeze your shoulder blades together as you pull your chin to the bar. Pause, and then lower yourself back to a dead hang. 3. Renegade row  Assume a push-up position with your hands gripping two hex dumbbells. Your hands should be in line with and slightly wider than your shoulders. This is the starting position. Keeping your core engaged, elbows tucked, and body straight from head to heels, lift the dumbbell in your right hand to the side of your torso. Make sure there’s a 90-degree bend in the elbow, so you’re rowing to your ribs and not armpits. Pause, and then return to the starting position. Repeat, this time rowing the dumbbell in your left hand. Continue alternating sides. 4. Dumbbell biceps curl Stand with your feet hip-width apart, holding a pair of dumbbells at arm’s length by your sides, palms facing forward. Keeping your core engaged and elbows at your sides, curl the weights toward your shoulders. Avoid swaying your body. Pause, and then slowly lower the weights to return to the starting position. 5. Upright dumbbell row Stand tall, holding a pair of dumbbells at arm’s length in front of your thighs, palms facing towards you. Keeping your core engaged, back straight, and weights close to your body, lift the dumbbells until your elbows reach shoulder height. Pause, and then reverse the movement to return to the starting position. 6. Zottman curl  Stand tall, holding a dumbbell in each hand at arm’s length by your sides, palms facing forward (underhand grip). Keeping your elbows tucked and locked by your sides, curl the weights toward your shoulders. Rotate the dumbbells 180-degrees, so your palms are now facing down. Lower the weights back down to your sides and then flip your grip again (to underhand) to return to the starting position. What’s a Good Push/Pull Day Schedule? One way to structure a push/pull training plan that targets the whole body is to combine leg and core exercises and alternate between the three types of workouts. So, for example, your weekly training schedule may look like this: Monday: Push day workout Tuesday: Pull day workout Wednesday: Legs and core workout Thursday: Push day workout Friday: Pull day workout Saturday: Legs and core workout Sunday: Rest However, If you’d prefer to have a mid-week rest day or combine core or leg work with your push and pull days, that’s fine too. Just be sure to keep your push and pull workouts on separate days. If you want to leave the workout programming to the experts, all the weightlifting programs on BODi utilize some sort of split training for better efficiency, optimized rest, and faster growth. The post Build Your Upper Body More Efficiently With a Pull Day Workout appeared first on BODi. Looking for a better, more systematic approach to strength training? Consider the pull day workout and its counterpart, the push day workout. Dividing your workouts between push and pull days is one of the most straightforward ways to create a fitness plan that will allow you to vary your movements, optimize your training time, and avoid injury. What […] The post Build Your Upper Body More Efficiently With a Pull Day Workout appeared first on BODi. Kayne

Build Your Upper Body More Efficiently With a Pull Day Workout Read More »
Do Your Front Delts Need Extra Training? Here’s What to Know

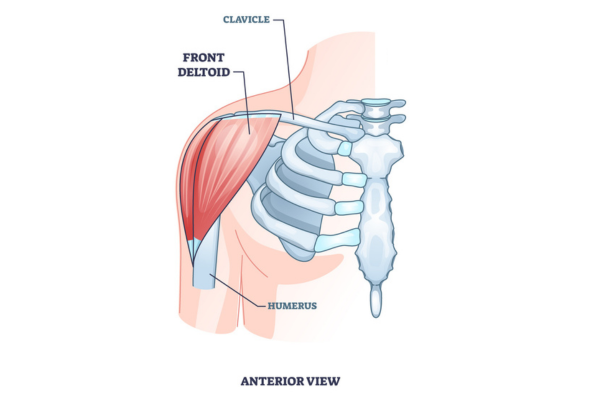
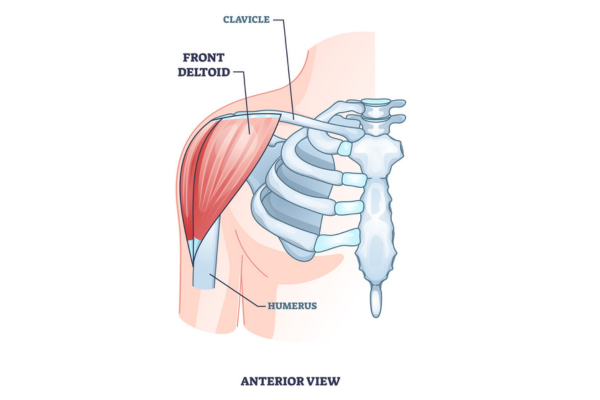
Do Your Front Delts Need Extra Training? Here’s What to Know Should I train front delts? is right up there with Do you even lift? as the most-asked question among gym veterans. So, do you really need front delt exercises in your lifting routine? The front deltoid — that showy strand of muscle on the front of your shoulder — is one of the more prominent areas in the upper body and activates whenever you press or push something with your upper body. So if you do any pressing movements at all— from push-ups to bench presses to dips to overhead presses — you’re already hitting your front deltoids pretty hard. Whether you also want to include isolation moves like the front raise in your program depends on your history and your goals. Here’s what training your front deltoids can do for you — and the best moves to use when you do. Shoulder Muscle Anatomy Your shoulder joint — the connection point between your upper arm and torso, nerdishly termed your glenohumeral joint — is widely considered your most mobile joint. Working in conjunction with your scapulae (shoulder blades) behind and your clavicles (collar bones) in front, your arm can cover more than a half-spherical range in front, below, above, and to the side. The three-headed deltoid muscle is responsible for a lot of that movement, with each distinct head responsible for moving your upper arm in a particular direction. The anterior (front) deltoid The front deltoid runs from the outer end of your collarbone to a spot on the outside of your upper arm called the deltoid tuberosity, a few inches below your shoulder joint. Like the other two heads of the muscle, its primary function is flexion — raising your arm in front of your torso. So if you place your arm by your side and raise it forward and up until you’re reaching overhead, voilà — that’s the anterior deltoid at work. That means that any movement where your upper arm traces a similar path stimulates the front deltoid, whether your arm is straight or bent. All overhead presses fit the bill, and, to a lesser extent, dips, and all flat, incline, and decline bench presses. The lateral (side) deltoid The lateral deltoid originates at a bony spot on the top of each shoulder called your acromion, which attaches to your shoulder blade. Like the anterior deltoid, it attaches at the deltoid tuberosity below the shoulder joint. As its name suggests, however, the lateral deltoid abducts your arm, raising it directly out to the side. The posterior (rear) deltoid The final head of the deltoid is the oft-neglected posterior delt, which originates at the outer end of the top edge of your shoulder blade, and connects — again — to the deltoid tuberosity. It’s responsible for extending your arm, or raising your arm behind you. The posterior delt also externally rotates your arm, turning it outwards at the shoulder joint. Do You Need Front Delt Exercises? All three heads of your deltoids deserve a place on your training menu. They all perform important functions, applicable to sports performance and daily life alike — and they look cool when they’re well developed as well. Miss any one of them, and your shoulder joint can start to get hitchy — like a wheel with a couple of spokes missing. But in most programs, the front delts aren’t the problem; the list of exercises that stimulate the front deltoids — directly or indirectly — is long, and most well-written strength-training programs include at least one of them. Do those moves consistently, and you’re unlikely to need to add an isolation move like a front raise into the mix, with a couple of exceptions: If you’re a bodybuilder and you feel your front deltoids are noticeably lagging in development compared to the rest of your upper body, even when you perform pressing exercises regularly. If you participate in a sport where deltoid strength is exceptionally important — tennis, boxing, throwing sports — then well-chosen, carefully-executed front deltoid work will strengthen that area and may make it less susceptible to injury. If you’ve tweaked your front deltoid — by overdoing it on the bench press, for example — and your doctor advises you to return to full activity slowly — then careful, slow front-deltoid work can be a great way to transition back to heavier pressing movements. 11 Best Front Delt Exercises If you’re structuring your workouts to include front delt exercises, pick a few of these effective moves. 1. Anterior deltoid raise Stand with your feet hip-width apart, holding a dumbbell in each hand with your arms at your side. Keeping a slight bend in your elbows, lift the weights up directly in front of you to shoulder height with your palms facing each other. Lower back down and repeat. 2. Overhead press Stand tall with your feet shoulder-width apart, holding two heavy dumbbells at shoulder height, palms facing each other. Keeping your elbows in, slowly press the dumbbells upward until your arms are straight. Lower your hands back to your shoulders and repeat. 3. Bench press Lie on a flat bench holding a pair of dumbbells directly above your chest with your palms facing forward. Your head, upper back, and butt should touch the bench, and your feet should be flat on the floor. Slowly lower the weights to the sides of your chest, keeping your elbows about 45 degrees away from your body. Pause, and then push the weights back up to the starting position. 4. Push press Stand tall with your feet hip- to shoulder-width apart holding a pair of dumbbells by your shoulders, palms in. Keeping your back flat and core braced, push your hips back and bend your knees, lowering yourself into a partial squat. Push up explosively with your legs as you extend your arms and press the weights directly above your shoulders. Lower the weights back to the starting position, and repeat.

Do Your Front Delts Need Extra Training? Here’s What to Know Read More »

8 Side Delt Exercises to Shape Your Shoulders

8 Side Delt Exercises to Shape Your Shoulders If you want improve the look of your upper body in a hurry, there are probably no movements more important to perform than side delt exercises. The deltoids — the muscles that lift, rotate, and articulate your upper arms — are visible from virtually any angle and look like halved coconuts on your upper arms and shoulders when they’re well-developed. Powerful side delts create dramatic detail in your upper arm, chest, and upper back, giving a rounded shape to your silhouette that screams, Hell yeah I work out. That’s a lot of bang for your buck for one part of a single muscle. Here’s how to develop them. Shoulder Muscle Anatomy Though we often think of it as a single joint, the shoulder is comprised of multiple joints: Glenohumeral joint, the main ball-and-socket joint connecting your upper arm and torso Acromioclavicular joint, between your collarbone and your shoulder blade Scapulothoracic joint, between your shoulder blade and your rib cage Sternoclavicular joint, between your sternum and your collarbone All these multisyllabic structures contribute to the extreme mobility of the shoulder joint, which allows your arm to move in virtually any direction. The three-headed deltoid muscle is responsible for a lot of that movement, with each distinct head responsible for moving your upper arm in a particular direction. The anterior (front) deltoid The front deltoid runs from the outer end of your collarbone to a spot on the outside of your upper arm called the deltoid tuberosity, a few inches below your shoulder joint. Like the other two heads of the muscle, its primary function is flexion — movement of your arm in a forward direction. Stand upright and raise your arm forward and up. That’s your anterior delt at work. The posterior (rear) deltoid Originating at the outer end of the top edge of your shoulder blade and connecting to the deltoid tuberosity is the posterior deltoid. Its main role is arm extension, or moving your arm backwards behind your body. If you raise your arm in front of you until it’s parallel to the ground, palm down, then trace a wide arc out to the side and behind you, that’s the main action of the posterior deltoid. The lateral (side) deltoid From the acromion, the bony spot on the top of each shoulder where the lateral deltoid originates, the side delt extends down the middle of your upper arm and attaches, like the anterior deltoid, to the deltoid tuberosity. As its name suggests, the lateral deltoid abducts the arm, lifting it directly out to the side. Since lateral abduction — side-raising — is also a component of overhead pressing and horizontal abduction, the side deltoid also assists the front deltoid in overhead pressing movements and the rear deltoid in many reverse-flying movements. It’s the muscle in the middle, always up for helping out the other delts. Benefits of Side Delt Exercises The side delts may be small — maybe the size and shape of three fingers — but their contribution to the health, function, and appearance of your upper body is outsized. 1. Improved shoulder function Most people — including many fitness enthusiasts — have front deltoids and upper chests that are disproportionately strong compared to their side and rear deltoids. This may be due to our tendency to overemphasize pushing movements (bench presses, pushups, etc.) for the chest and shoulders at the expense of pulling moves (rows, pull downs, etc.) for the back. That imbalance can lead to a host of issues, including limited mobility and poor function. Emphasizing side and rear deltoid development along with front deltoid work can help restore this muscle group to balance, making you more flexible and mobile in overhead reaching and pressing moves. 2. More strength If the muscles on one side of a joint are significantly stronger than those on the other, the joint can lose stability, which reduces its strength. By developing the side delts along with the often overpowering front deltoids and upper chest, you’ll help stabilize the shoulder, allowing it to express more strength in overhead pressing movements. Over time, that means more muscle for the entire deltoid — front, sides, and back. 3. An improved silhouette The side deltoids give your upper body a wider, more muscular look that’s immediately apparent when you walk in a room, even when you’re fully clothed. Visually, that inch of extra width in shoulders can make the waist appear smaller by comparison, emphasizing the V taper — wide shoulders and back and a narrow waist — that’s the hallmark of fit folks and bodybuilders. 8 Best Side Delt Exercises If you’re interested in growing and strengthening your lateral delts, these are the best exercises to do so. 1. Cable lateral raise Attach a “D” handle to the carabiner on a cable machine and select a light weight on the stack. Holding the handle in your left hand, stand with your right shoulder facing the machine with your right foot forward, and the toe of your left foot against the heel of your right, as if walking on a tightrope. Take hold of the upright on the cable machine with your right hand and lean your body to the left, keeping your shoulders and hips square. This is your starting position. Keeping your right arm straight and the palm of your left hand turned downwards, slowly raise the D handle out to your left side until your arm is parallel to the floor. Hold the top position for a moment, reverse the move, return to the starting position, and repeat for reps on both sides. 2. Dumbbell lateral raise Stand tall with your feet hip-width apart, holding a pair at dumbbells at arms’ length by your sides, palms facing inward. Maintaining a slight bend in your elbows, raise your arms directly out to your sides until they’re at shoulder level (your palms should be facing downward at the top of the movement). Slowly lower the weights

8 Side Delt Exercises to Shape Your Shoulders Read More »

Master the Cable Rear Delt Fly for Shredded Shoulders

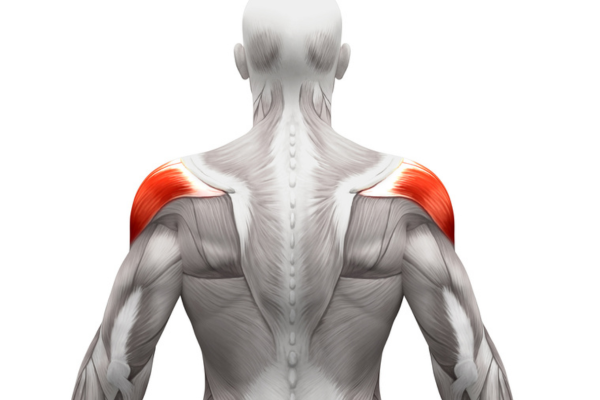
Master the Cable Rear Delt Fly for Shredded Shoulders Want better posture, more strength in pressing movements, more mobile shoulders, and a more impressive-looking upper body — from all angles? There’s a single move that can get you there that you’re almost certainly not doing: the cable rear delt fly. This simple, little-used exercise grows and strengthens the rear delts, a band of muscle that pulls your shoulder and upper arm backwards and, when strengthened, provides a host of other benefits as well. Cable Rear Delt Fly: Step-by-Step Instructions Select a light weight on both stacks of a dual cable machine, and slide the pulleys to around shoulder height. Face the machine and take hold of the cable for the stack on the right in your left hand and the cable for the stack on the left in your right hand (the cables will be crossed in front of you). Still facing the machine, assume a kneeling position — on a pad if necessary — about two feet behind the front stacks of the cable machine. Reach your arms directly forward and upward in front of you, about 45 degrees to the floor. This is your starting position. Keeping your arms slightly bent, slowly draw the cables in wide arcs down and behind you, squeezing your rear deltoids as hard as possible in the end position (think of pushing the pinkie-sides of your hands down and outward). Slowly reverse the movement, return to the starting position, and repeat for reps. Cable Rear Delt Fly Muscles Worked Compared to bigger lifts like the bench press, squat, or deadlift, the cable rear delt fly works small — but important — muscles that are often overlooked. Rear delts The rear delts originate at the top of your scapulae (shoulder blades) and insert, or attach, to the back of your upper arm a few inches below your shoulder joint. The function of this understated chunk of sinew is to pull your upper arm from a shoulder-height position in front of your body to a point behind your upper body in the same plane, a move known as horizontal abduction. The rear deltoids also rotate your upper arms outward (away from the center line of your body), a movement technically termed external rotation. Trapezius To a lesser degree, cable rear delt flys also work the lower portion of the trapezius muscles — the kite-shaped muscle that spans your mid and upper back — which help draw your shoulder blades downward. Small as they are, however, the rear delts and lower traps are crucial to shoulder function and posture. They counterbalance the action of the upper trapezius (which shrug the shoulders) and the pec muscles of the chest (which pull your shoulders forward and rotate your arms internally). Cable Rear Delt Fly Benefits Here are a couple reasons why cable rear delt flys deserve a place in your training. Prevents muscle imbalances The deltoids are a three-headed muscle responsible for raising your arm in numerous ways. Among workout regulars, the rear delts are by far the most-neglected: The front delts get plenty of direct action from pressing moves of all kinds — pushups, bench presses, overhead presses, and the like — and the side delts get tons of love from lateral raises. However, the rear delts typically get only indirect work from back moves like rows and pulldowns. This can lead to imbalances among the heads of your deltoids, limiting their strength and growth potential. The rear delt cable fly can help with that. Improves posture and shoulder function Underdeveloped rear delts can also lead to a forward-rounded posture that, over time, can cause pain in your neck and back, and poor function in the shoulder joint. A few sets of cable rear delt flys every week can help pull you out of the shrugged-shouldered, rounded-back position that many of us habitually assume throughout much of the day. This will help improve day-to-day posture while allowing you to reach your arm overhead more comfortably and press more weight overhead in your upper-body workouts. Rear Delt Cable Fly Alternatives The rear delt cable fly isn’t the only effective exercise for this underappreciated muscle. But it is one of the best, as it challenges the muscle through its entire range of motion, from the stretched position to the fully contracted position. Most rear-delt moves are primarily effective when your rear delts are shortened — or fully contracted — but are less effective in the lengthened position. This is true of the dumbbell reverse fly, which is challenging when the dumbbells are fully lifted, but very easy — almost effortless — when your arms are hanging straight down. This doesn’t make these alternative moves ineffective. You’ll certainly build and strengthen your rear delts using the moves listed below. They’re just somewhat less effective than the cable version. 1. Dumbbell reverse fly Stand with your feet shoulder-width apart, holding a dumbbell in each hand. Hinge at the hips (press the hips back as you lower your chest) until your chest is almost parallel with the ground. Allow the weights to hang straight down at arm’s length, palms facing each other. Keeping your back flat and your core braced, raise your arms out to your sides until they’re in line with your body. Squeeze your shoulder blades together at the top of the movement. Return to the starting position, and repeat. 2. Resistance band reverse fly Hold the handles of a resistance band and assume a shoulder width stance, using both feet to stand on the center of the band to secure it. Exchange handles between your two hands so that the bands cross. Bend your knees slightly and hinge at your hips until your torso is almost parallel to the floor and your back is flat. (If necessary, spread your feet wider to create more tension on the band.) Keeping your torso still, raise the handles as far as possible directly out to your sides, with the back of

Master the Cable Rear Delt Fly for Shredded Shoulders Read More »

5 Rotator Cuff Exercises for Better Strength and Mobility

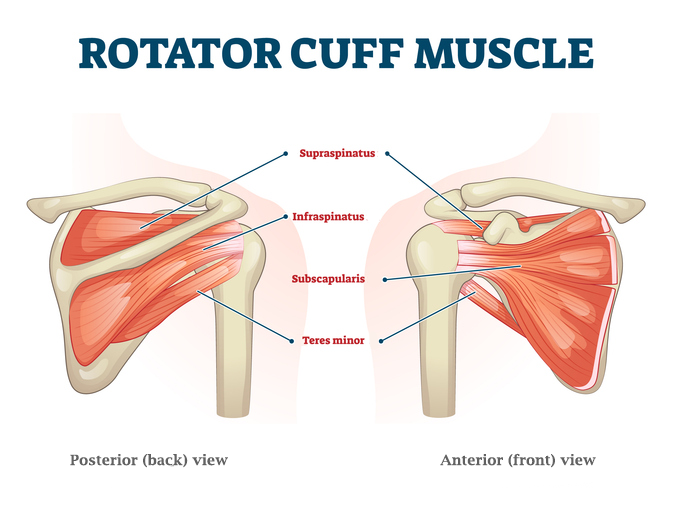
5 Rotator Cuff Exercises for Better Strength and Mobility When shoulder pain and injury in sports and everyday life is discussed, you often hear the term “rotator cuff.” This group of muscles and connective tissues is a common source of shoulder trouble for athletes and weekend warriors alike. Most common in sports and jobs that require repetitive arm motion (e.g., baseball, tennis, carpentry) as well as with people over 40, rotator cuff pain can make exercise and daily activity — even sleeping — uncomfortable, if not impossible. Associated discomfort in the shoulder most often takes the form of a dull ache. If you’re experiencing shoulder pain, your best course of action is to seek help from a health care professional. But for those looking to increase strength and mobility, rotator cuff exercises can help alleviate or prevent some symptoms. What Is the Rotator Cuff? The rotator cuff is a group of muscles and tendons that helps secure the shoulder joint, says Erika Mundinger, D.P.T., a physical therapist in Minneapolis, Minnesota. Those muscles include: Supraspinatus Infraspinatus Teres minor Subscapularis Located on the shoulder blade, their wide, flat tendons wrap around the ball of your shoulder’s glenohumeral joint, the ball-and-socket joint that’s among the most mobile in your body. That joint is part of a larger group of four joints often referred to as the “shoulder complex”:” Sternoclavicular joint: Also known as the “SC,” it’s located between the sternum and the clavicle. Acromioclavicular joint: The “AC” is the bony joint on the top of the shoulder. Glenohumeral joint: The ball-and-socket joint most commonly associated with the shoulder. Scapulothoracic joint: This is where the shoulder blade sits on the back of the ribcage. Rotator Cuff Injury Causes All four shoulder joints move together — you can’t affect one without affecting the others. If you injure one joint, or the shoulder muscles surrounding it are weak, that will change how you use the other three joints. This can lead to poor movement patterns, muscle imbalances, and — ultimately — pain and possible injury. “Muscle imbalances are what we refer to when we talk about overuse injuries, like tendinitis,” Mundinger says. And the muscles most commonly affected by overuse injuries in the shoulder are — you guessed it — the rotator cuff muscles. When shoulder mechanics change — whether by muscle weakness, injury, poor posture, or unnatural movement patterns — rotator cuff muscles can suffer overuse, resulting in irritation and inflammation (aka tendinitis or shoulder impingement). In this state, joint positioning can be altered and tendons can get compressed between the ball and shoulder blade. “The more this happens, the more angry and painful they become, and the weaker they get as a result,” Mundinger says. From there, weak rotator cuff muscles can then compromise stability of the glenohumeral joint. Rotator Cuff Strengthening Exercises You can keep your shoulders healthy and pain resistant by performing regular exercises to strengthen the rotator cuff. Rotator cuff exercises can also improve posture and stability, but “keep in mind that strengthening the rotator cuff is [only] one part of the movement equation,” says Cody Braun, C.S.C.S. As he notes, you must also increase shoulder mobility so your joints can move through their full range of motion. To build much-needed strength and mobility in and around the shoulder joint, Mundinger recommends performing the following five moves. Once a day, if possible. 1. Snow angels on foam roller Lie on the floor with a foam roller positioned lengthwise under your spine. Your knees should be bent, your feet flat on the floor, and your arms resting on the floor beside you, palms facing up. Keeping the backs of your hands on the floor, extend both arms out to the sides and bring them as far overhead as you can without arching your back or shrugging your shoulders. Then, sweep both arms out to the side and down toward your hips. Continue sweeping your arms as if making a snow angel for a total of 10 reps. 2. Prone scapular retraction Lie face-down on the floor with your arms at your sides, palms facing up. You may want to support your forehead on a folded towel. Gently bring your shoulder blades straight back and squeeze them together. Hold for two to three seconds and slowly release your shoulder blades to return to the starting position. Repeat for three sets of 10 reps, making sure not to shrug your shoulders at any point. 3. Wall angels Stand tall with your back against a wall, and gently press your lower back into the wall to neutralize your spine. Raise both arms out to your sides, and bend your elbows 90 degrees, keeping your back, elbows, and the backs of your hands in contact with the wall Without shrugging your shoulders or arching your lower back, slowly slide your arms upward. Don’t worry if you can’t move them very far at first. Once you’ve raised your arms as far as you can without causing pain, lower them back to the starting position. Repeat for a total of 10 reps. 4. Shoulder external rotation in 45-degree abduction Stand tall and raise your arms out to the sides 45 degrees from your body. Bend your elbows 90 degrees. Keeping your core engaged and your elbows locked in place, externally rotate your arms, bringing your forearms back as if you’re trying to touch them to a wall behind you. Then, rotate your arms inward. Repeat for three sets of 10 reps, rotating your forearms only as far as is comfortable and avoiding shrugging your shoulders. 5. Plank with scapular protraction/retraction Assume a standard push-up position, with your feet together, your body straight from head to heels, your arms straight, and your hands under your shoulders. Keeping your back flat, your head neutral, and your core engaged, protract your shoulders, pushing through your hands to spread your shoulder blades apart. Slowly return to the starting position. Then, retract your shoulders, letting your chest dip to bring your shoulder blades together. That’s one rep. Repeat for three sets of 10 reps without shrugging your shoulders during the

5 Rotator Cuff Exercises for Better Strength and Mobility Read More »

Learn the Turkish Get-Up: The Fullest-Body Exercise

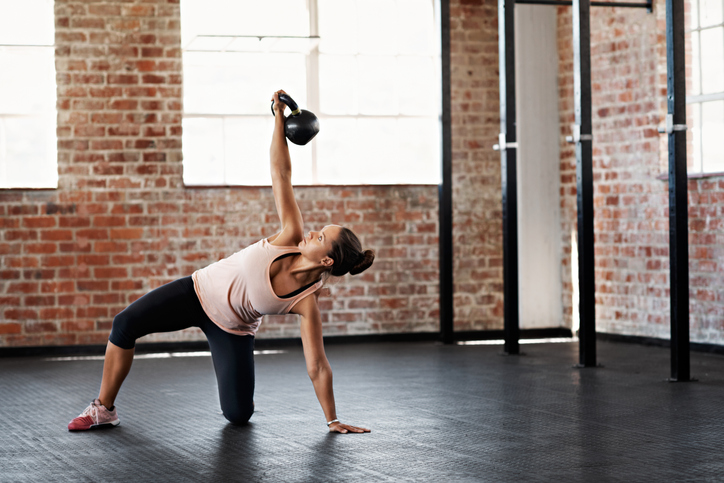
Learn the Turkish Get-Up: The Fullest-Body Exercise The Turkish get-up (or TGU) may very well be the consummate functional, total-body exercise. After all, it leaves roughly zero muscles untouched, hits every plane of movement, gets your heart rate up, and improves total-body strength and stability, explains Cody Braun, CSCS. When you consider that the Turkish get-up is really a flow through about a half dozen different exercises, it becomes clear why it’s so beneficial — and why performing the Turkish get-up with proper form can be complicated. Fortunately, despite its complexities, the Turkish get-up exercise doesn’t have to be hard to learn. By breaking down its steps one by one — practicing them using just your body weight — you can easily learn the exercise so that you can level up safely and effectively. Turkish Get-Up: Step-by-Step Instructions Get into starting position: Lying flat on your back, bend your right leg with your right foot flat on the floor while you keep your left leg extended just outside hip width. Make a fist with your right hand and extend your right arm straight toward the ceiling, keeping your left arm on the floor about 45 degrees from your body, palm facing down. Keeping your eyes fixed on your right fist throughout the entire movement, engage your core and use your abs to roll up onto your left forearm. Continue rising up to a seated position, straightening your left arm so that you are supported on your left hand. Keeping your left leg extended and right foot on the floor, push through your right heel and squeeze your glutes to lift your hips off the floor. Sweep your left leg underneath and behind you, placing your left knee on the floor where you were sitting. At this point, your left shin will form a slight angle. Sweep your left foot out to your left so that shin is parallel with your right thigh. Use your obliques to straighten your torso, removing your hand from the floor to assume a half-kneeling position. With your right hand still extended toward the ceiling, push through your back foot to come up to a standing position, bringing your left foot to meet the right. Reverse each step to return to the starting position. Perform equal reps on each side. How to Make the Turkish Get-Up Easier Try the quarter Turkish get-up, which involves performing only the first part of the exercise, and then returning to start. To perform it, press through your foot and hand to raise up onto your forearm, then your hand, and then extend your hips up toward the ceiling. Then reverse those steps to return to the starting position. Break down the other steps of the Turkish get-up into single exercises that you can perform one at a time. For example, you can practice sweeping your leg underneath and behind you from the bridge position, or you can perform lunges with one arm overhead. How to Make the Turkish Get-Up Harder Starting light and gradually progressing as you adapt to the load, hold a weight in the hand of your overhead arm throughout the move. You can use a dumbbell, a kettlebell, sandbags, or even at-home items like a milk jug. Use a heavier or less stable weight. What Muscles Does the Turkish Get-Up Target? The Turkish get-up benefits almost every major muscle group in the body, but it works overtime for these muscles. Deltoids: All three sections of the shoulder muscles have to work to support the raised arm and any weight it’s carrying. Upper back: Expect improved stabilization in the rotator cuff muscles as well as the traps and rhomboids. Abdominals: Both the deep-lying transverse abdominis and six-pack rectus abdominis go to work here. Obliques: The internal and external obliques help to resist rotation and tipping toward your weighted side. They also do work when you take your hand off the floor into the half kneeling lunge. Quads: You’ll feel these working as you rise up from the kneeling lunge and finish off the ascent of the move. Glutes: You’ll strengthen your gluteal muscles as you lift your hips and when you rise up from the kneeling lunge. Triceps: The tris of both arms can feel this move, whether they’re holding a weight overhead or helping to push you up from a seated position. The post Learn the Turkish Get-Up: The Fullest-Body Exercise appeared first on BODi. The Turkish get-up (or TGU) may very well be the consummate functional, total-body exercise. After all, it leaves roughly zero muscles untouched, hits every plane of movement, gets your heart rate up, and improves total-body strength and stability, explains Cody Braun, CSCS. When you consider that the Turkish get-up is really a flow through about […] The post Learn the Turkish Get-Up: The Fullest-Body Exercise appeared first on BODi. Kayne Toyosato{authorlink}https://www.beachbodyondemand.com/blog/turkish-get-up-exerciseBODi BODi is a Health Esteem platform to help you embrace the person you are today so you can take action to achieve all your health and fitness goals. https://bodiblog.wpenginepowered.com/wp-content/plugins/bod-blog/assets/vendor/beachbodydigital/wordpress-core-plugins/beachbody.png

Learn the Turkish Get-Up: The Fullest-Body Exercise Read More »

Push-Ups Getting Stale? Try These 17 Variations

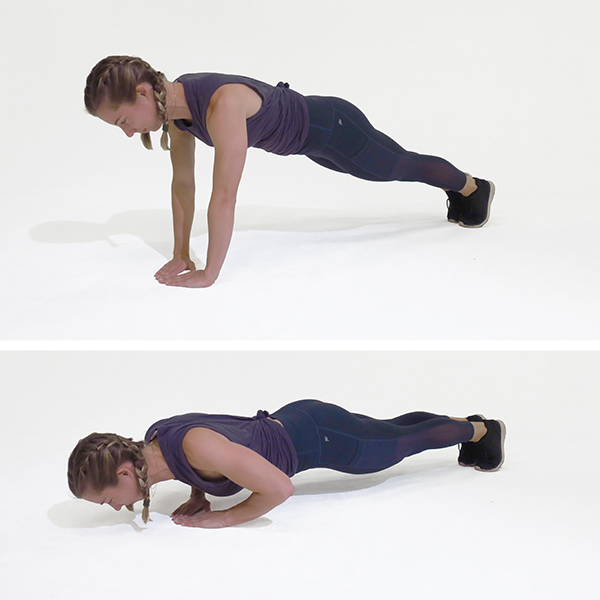
Push-Ups Getting Stale? Try These 17 Variations If you want to hit loads of muscles in a single rep, you can’t do much better than a standard push-up. But the base move is just the beginning. To see new gains in strength, muscular development, and mobility, there are dozens of push-up variations to try. Push-ups come in many different forms, making it simple to advance (or dial back) the classic exercise as needed. Various hand positions, body angles, props, and add-on moves work and emphasize different muscles, keeping the move fresh and effective. Try for yourself with the following push-up variations. 1. Classic Push-Up Muscles targeted: Chest, shoulders, triceps, and core Assume a high-plank position with your feet together, your body straight from head to heels, and your hands in line with (but slightly wider than) your shoulders. Engage both your glutes and your core to lock your body into position. Keeping your elbows tucked toward your body (your body should form an arrow when viewed overhead) and your head neutral, lower your torso until your chest is within a few inches of the floor. Pause, and then push yourself back up to the starting position as quickly as possible. 2. Incline Push-Up Muscles targeted: Along with the triceps and shoulders, this easier expression of the move shifts emphasis to the lower chest Place your hands slightly wider than shoulder-width apart on a bench or other stable, elevated surface, and assume a push-up position. Keeping your back flat and core engaged, lower your chest to within a few inches of the bench. Pause, and then push yourself back up to the starting position. 3. Plank Push-Up Muscles targeted: This more challenging push-up hits the usual muscles, with added emphasis on the triceps Assume a low-plank position with your forearms, palms, and balls of your feet on the floor, and your body straight from head to heels. Your feet should be shoulder width, your fingers spread wide, and your forearms parallel. Without shrugging your shoulders toward your ears, or letting your hips sag or lift, shift your weight onto your left forearm and place your right palm flat on the floor below your right shoulder. Still maintaining a perfectly straight body, shift your weight onto your right palm, placing your left hand flat, and straightening both arms to assume a high-plank position. Reverse the move, lowering your right forearm and then your left forearm back to low-plank position, keeping your body straight the whole time. Repeat the movement, this time placing your left hand in push-up position before your right hand. After both hands are in high-plank position, lower your left arm to low-plank position before your right arm. Continue the movement, alternating the initiating arm with each rep. 4. Diamond Push-Up Muscles targeted: The closer hand positioning demands more of the triceps in this more advanced push-up with still plenty of tension on the chest and shoulders From a push-up position, bring the tips of your thumbs and index fingers together so they’re touching (see the diamond?). This is the starting position. Keeping your elbows tucked (don’t let them flare), lower your torso until your chest lightly touches the backs of your hands. (Or as far as you can go without compromising form.) Pause, and then push yourself back up to the starting position. 5. Single-Leg Push-Up Muscles targeted: The lifted leg challenges core stability in addition to the chest, shoulders, and triceps Assume a push-up position, lifting your right leg off the floor. Keeping your elbows tucked toward your body, lower your torso until your chest is within a few inches of the floor. Pause, and then push yourself back up to the starting position as quickly as possible. Complete all reps on one side, then repeat on the other, performing equal reps on both. 6. Inchworm Push-Up Muscles targeted: Walking your hands forward places additional tension on the abdominal muscles and spinal erectors as you stabilize your spine, subsequently working your triceps, chest, and shoulders Stand tall with your feet hip-width apart and your arms at your sides. Keeping your core engaged and back flat, hinge forward at your hips and place both palms on the floor. Bend your knees slightly if necessary. Walk your hands forward until you assume a high-plank position. Your wrists should be directly under your shoulders and your body should be straight from head to heels. Lower your body, bringing your chest within a few inches of the floor, and then return to high-plank. Reverse the movement, walking your hands back toward your feet, to return to the starting position. 7. Wide-Arm Push-Up Muscles targeted: Moving your hands out farther to the sides shifts emphasis to the muscles of the chest Assume a push-up position, placing your hands on the floor twice shoulder-width apart. Keeping your elbows tucked toward your body, lower your torso until your chest is within a few inches of the floor. Pause, and then push yourself back up to the starting position as quickly as possible. 8. Push-Up to Side Plank Muscles targeted: Shifting to one arm at the top of the push-up places greater tension on the shoulder and triceps of the planted hand, and challenges core stability — particularly the obliques — with the rotational movement Assume a push-up position. Keeping your elbows tucked (not flared), core engaged, and head in line with your spine, lower your body until your chest is within a few inches of the floor. Pause, and then push back up to the starting position. Once you return to the starting position, shift your weight onto your left hand, stack your right foot on top of the left, roll your right hip back, and extend your right arm toward the ceiling (the only parts of your body on the floor will be your left hand and the outside edge of your left foot). Keep your body straight throughout the movement. Bring your right hand and foot back down to the floor, and repeat the sequence, switching sides on

Push-Ups Getting Stale? Try These 17 Variations Read More »

Landmine Press: The Best Shoulder Press You Aren’t Doing

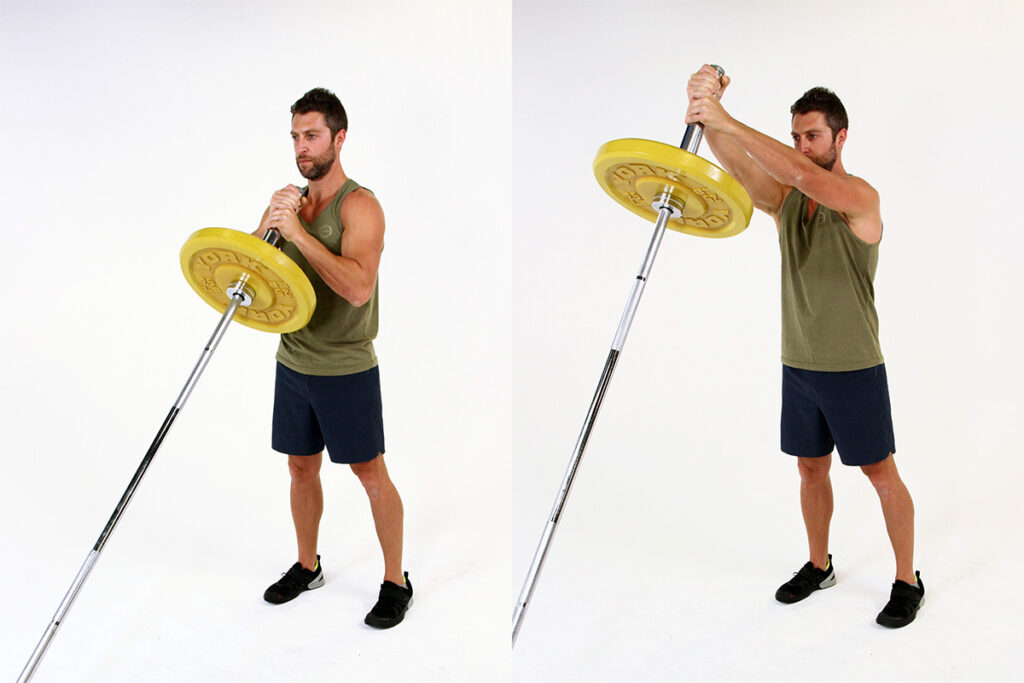
Landmine Press: The Best Shoulder Press You Aren’t Doing Vertical pressing exercises (meaning, you press weight overhead) can be power players in an upper-body workout. But the problem is that very few people actually have the mobility to properly perform them. That’s exactly what makes the landmine press so genius, says Baltimore-based strength coach Erica Suter, CSCS. When you try to press a weight overhead without the proper shoulder mobility, you have to compensate by arching and throwing your weight into your back. Not only is that poor form, but it can also cause significant back pain, explains Suter. Pressing straight overhead can also cause pain and clicking in cranky shoulder joints. Rather than requiring a straight-overhead motion, the landmine shoulder press involves pressing one end of a barbell diagonally up and forward, away from your body. The result: You get all of the benefits of overhead pressing without the risk to your shoulders or back. Think you have good shoulder mobility? Try this test: Stand with your back against a wall. Keeping your upper back, glutes, and the back of your head against the wall, reach your arms fully overhead. Can you touch the wall with the backs of your hands? If not… skip overhead pressing and go with landmine pressing instead. Landmine Press: Step-by-Step Instructions Affix one end of a barbell to a landmine. If desired, add weight plates to the free end and secure with a safety clip. Stand facing down the shaft of the barbell with your feet shoulder-width apart. Hold the weighted end of the barbell with both hands in front of your chest, one hand on top of the other. Brace your core. Press the weight up until your arms are extended. Pause, then slowly lower the barbell back to your chest. Repeat for all reps. What Can I Use Instead of a Landmine for the Landmine Press? Some gyms don’t have a landmine for performing shoulder work. That’s OK! You can easily perform a landmine press by placing one end of the barbell securely in a corner of your gym, a corner of a squat rack frame, or even in the nook created by two 45-pound bumper plates. As long as your barbell feels secure, anywhere is game. Just remember to be considerate of your gym’s equipment — to prevent any scuffing, you can wrap the end of the barbell in a towel or place it in a sneaker that then goes in the corner. Landmine Press Variations Once you feel confident with the dual-arm landmine press, try out these back-friendly shoulder, chest, and triceps workout exercise variations. They’re listed below from most beginner-friendly to most advanced. 1. Landmine single-arm press Take a staggered stance (you can step either leg forward) and press the bar up with one arm. 2. Landmine chest press Lie flat on your back on the floor, parallel to the barbell with the top of your head pointed to the anchor point. Hold the end of barbell at your chest and press the bar with one or both arms. 3. Kneeling landmine press Set up by kneeling on one or both knees. Then, you can perform either two-arm or single-arm landmine press variations. 4. Landmine shoulder-to-shoulder press Use both hands to press the bar up, lower to one shoulder. Press the bar back up, and then lower to the opposite shoulder. Continue alternating. 5. Landmine push-press Add a small bend to your knees and use your legs to help drive up the bar. This can allow you to press more weight. You can try this using one or both arms. 6. Landmine squat to press Lower into a full squat before driving the bar up. Lower into a full squat as you lower the bar to your chest. Then, come out of the squat to standing as you drive the bar up. Landmine Press Muscles Worked The landmine press exercise (and its variations) trains your pushing muscles, as well as your core. Depending on the landmine press variation you use, you will place greater emphasis on certain muscles while deemphasizing others. For example, by loading only one side of the body at a time, the single-arm landmine shoulder press introduces instability and forces the core to do overtime. The dual-arm press as well as single-arm shoulder presses from a kneeling position will be more stable and involve less core engagement, but will allow you to move more weight. And the landmine chest press is, like the name suggests, a major chest workout. Here’s a more detailed look at the muscles worked by this exercise: 1. Shoulders All presses train both the deltoids and rotator cuff muscles, which attach to the shoulder blades and stabilize your upper-arm bone (humerus) in your shoulder socket. 2. Chest The pectoral muscles help the shoulder extend the weight overhead and are a primary driver when pressing the bar directly in front of your chest. 3. Triceps Any time your elbow straightens, your triceps (in the back of your upper arm) are at work. 4. Core Your core — which includes muscles like your abdominals, obliques, and some back muscles — are responsible for securing a stable, safe spinal position throughout the exercise, and prevent you from tipping over during the single-arm work. The post Landmine Press: The Best Shoulder Press You Aren’t Doing appeared first on BODi. Vertical pressing exercises (meaning, you press weight overhead) can be power players in an upper-body workout. But the problem is that very few people actually have the mobility to properly perform them. That’s exactly what makes the landmine press so genius, says Baltimore-based strength coach Erica Suter, CSCS. When you try to press a weight overhead […] The post Landmine Press: The Best Shoulder Press You Aren’t Doing appeared first on BODi. Kayne Toyosato{authorlink}https://www.beachbodyondemand.com/blog/landmine-pressBODi BODi is a Health Esteem platform to help you embrace the person you are today so you can take action to achieve all your health and fitness goals. https://www.beachbodyondemand.com/blog/wp-content/plugins/bod-blog/assets/vendor/beachbodydigital/wordpress-core-plugins/beachbody.png

Landmine Press: The Best Shoulder Press You Aren’t Doing Read More »