Core Workouts

Auto Added by WPeMatico

9 Bench Ab Exercises That Will Light Up Your Core

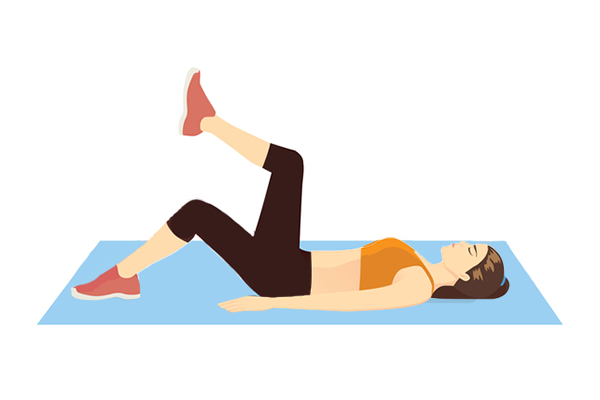
9 Bench Ab Exercises That Will Light Up Your Core Weight benches are good for more than just chest presses and seated biceps curls. If you want to add some spice to your go-to abs circuit or (literally) elevate your at-home core routine, try a bench ab workout. Brett Durney, a certified personal trainer and co-founder of Fitness Lab, explains that utilizing a bench during a core workout offers a variety of benefits. “By using a bench, you get a good level of stability and can, therefore, focus on using load to build strength,” he says. “You don’t have to spend time and energy focusing on balance and stability.” Working out on an elevated surface also opens you up to a broader range of motion. If your bench is adjustable, you can increase the intensity of some exercises by setting the bench at an angle. “For example, declined bench abdominal crunches are an excellent exercise,” Durney says. Ready to build your own bench ab workout? Check out the list of core exercises below to discover the best moves for you. 1. Reverse Crunch Lie face-up on a flat bench with your feet lifted and knees bent 90 degrees. (Your thighs should be perpendicular to the bench, your shins parallel.) Lift your arms overhead and grip the underside of the bench. Keeping your neck neutral and upper body anchored to the bench, contract your abdominal muscles to bring your knees to your chest. Slowly return to the starting position. 2. Iron Cross Crunch Lie face-up on a flat bench with your knees bent and your feet hip-distance apart on the bench. Extend your arms out to the sides. This is the starting position. Keeping your lower back pressed into the bench, contract your abdominal muscles to lift your shoulders and upper back off the bench, and bring your ribs closer to your hips. Squeeze your abs at the top of the movement, and then return to the starting position. 3. Copenhagen Side Plank Lie on the ground on your side, perpendicular to a flat bench with your feet facing the bench. Place the inner side of your top foot on top of the bench and lift up into a side forearm plank: forearm on the floor, shoulder stacked over elbow, and hips lifted so your body forms a straight line from head to heels. Lift your bottom leg so it hovers above the ground. To modify, allow the bottom foot to rest on the ground. Hold for the specified amount of time, then repeat the exercise on the opposite side. 4. Decline Mountain Climber Place your hands on the ground and the balls of your feet on top of a flat bench and assume a push-up position: feet together, core braced, body straight from head to heels, hands in line with and slightly wider than your shoulders. Lift your right foot off the bench and draw your right knee to your chest, keeping your back flat, your butt down, and the rest of your body stationary. Return your right foot to the starting position, and immediately repeat with the opposite leg. Continue alternating legs, performing equal reps on both sides. 5. Jackknife Sit sideways on a flat bench. Place your hands behind your hips and grab the underside of the bench for support. Maintaining a neutral spine, lean back and extend your legs in front of you, lifting them off the ground. Contract your abdominal muscles to simultaneously draw your chest and knees up and together, creating a V shape with your torso and legs. (To increase the difficulty level, keep your legs straight.) Pause, then lean back as you lower and extend your legs in front of you. 6. Leg Raise Lie face-up on a flat bench and allow your legs to hang off the front of the bench. Grip the sides of the bench with your hands for support. Draw your legs together and lift them to bench level. This is the starting position. Keeping your legs straight and back pressed against the bench, contract your abdominal muscles to lift your legs so that they’re perpendicular to the bench. With control, lower your legs to the starting position. 7. Weighted Straight-Leg Crunch Lie face-up on a flat bench with your legs straight, and your arms extended overhead, holding a dumbbell, medicine ball or weight plate with both hands. This is the starting position. Keeping your lower back pressed into the bench, engage your abs to bring your legs and arms straight toward the ceiling, lifting your shoulders and upper back slightly off the bench. Slowly lower your arms and legs to return to the starting position. 8. Flutter Kicks Sit on the end of a flat bench and, maintaining a neutral spine, lean back. Grab the edges of the bench with both hands for support. Contract your abdominal muscles and lift both legs to bench level. Keep both legs straight as you alternately lift each foot in a fluttering motion. Complete an equal number of reps with each leg. 9. Bicycle Crunch Lie face-up on a bench with your feet flat on the bench. Place your fingertips behind your head and lift your shoulder blades off the bench with your elbows pointed outward. This is the starting position. Maintaining a neutral neck, bring your left knee toward your chest, and rotate your torso to bring your right elbow toward your left knee as you straighten your right leg. Reverse the motion by rotating your torso to the right and drawing your right knee toward your chest and your left elbow toward your right knee, as you straighten your left leg. Continue alternating sides, performing equal reps on each. The post 9 Bench Ab Exercises That Will Light Up Your Core appeared first on BODi. Weight benches are good for more than just chest presses and seated biceps curls. If you want to add some spice to your go-to abs circuit or (literally) elevate your at-home core routine, try a bench ab workout. Brett

9 Bench Ab Exercises That Will Light Up Your Core Read More »
Front Squat vs Back Squat: Which Barbell Squat Is Right for You?

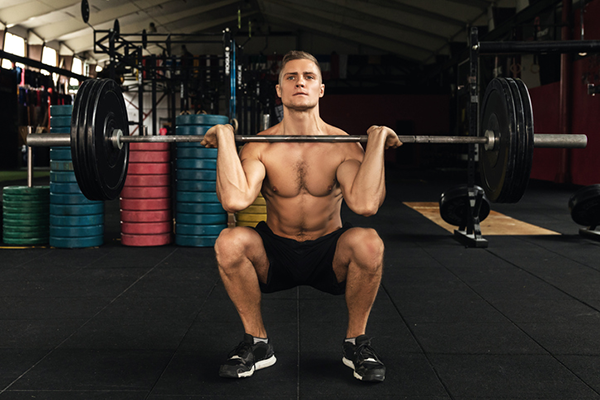
Front Squat vs Back Squat: Which Barbell Squat Is Right for You? We don’t question all the available squat variations. We understand that each one — from the curtsy squat to the split squat — builds lower-body strength while bringing something a little different to a workout. But there’s something about squatting with a barbell that invites a comparison between the front squat vs back squat. Which is harder? Is one more effective at building muscle? Do you need to do both? Before investigating the merits of the front squat vs. the back squat, it’s important to understand the differences between the two movements. Both use a barbell, but the placement differs: When back squatting, you hold the barbell behind your shoulders so that it rests across the trapezius (upper-back muscles) and rear deltoids (posterior shoulder muscles). During a front squat, you hold the barbell (with a full grip or your fingertips, depending on your mobility) in front of your shoulders with your elbows pointing forward so that the bar is resting on your front deltoids. Is a Front Squat Harder Than a Back Squat? Because of the front-loaded positioning of the barbell, most people find the front squat to be more difficult than the back squat. “This is because in a front squat there is much more demand put on maintaining posture, and the bar has to stay within a smaller path to be able to hold onto it,” says Kate Meier, CPT, Certified USA Weightlifting Level 1 Coach. While both squats engage the upper body, the front squat poses a greater challenge to the core and back muscles. Some lifters also struggle to hold the barbell in a front squat, says Robert Herbst, 19-time World Champion powerlifter and member of the AAU Strength Sports Hall of Fame. “The front squat is more difficult to perform because most people lack the flexibility to hold the bar,” he explains. “Some can do it Olympic clean style [with their elbows up and fingers under the bar], while others cross their arms, but many find it uncomfortable. A back squat is easier to hold because the bar is up on your traps or farther down on your back and held in place by the mechanical force of your arms.” Do Front Squats and Back Squats Work the Same Muscles? When comparing the muscles used in front squats vs. back squats, there are some differences. Meier explains: The front squat will work your upper back muscles and mainly the quads in the lower body. The back squat will work more of the glutes and hamstrings in addition to the quads. It also engages the lower back muscles more than the front squat does. And while both the front squat and back squat will test your core strength, the challenge is typically greater in a front squat. Can Front Squats Replaces Back Squats? Meier says that a well-rounded strength routine typically includes both front squats and back squats. But it’s not necessary to do both, especially if you’re training for general fitness and not a specific sport. “Depending on your body type, one may feel better on your joints than the other,” Meier says. “The important thing is to include a squatting movement in your program in general.” If you prefer front squats, it’s fine to make them your default squat option. Should You Add Front Squats to Your Routine? As previously noted, front squats don’t need to be part of your training plan, especially if you find them uncomfortable. But if you’re at all interested in sports like CrossFit or Olympic weightlifting, front squats are unavoidable. Alternatively, you can try a goblet squat with a dumbbell or kettlebell positioned in front of your chest. Like the front squat, this movement demands core and back strength, but it’s easier to scale down the weight, and the grip requires less mobility. How to Perform a Front Squat Before attempting a front squat, it’s a good idea to work with a personal trainer to ensure you’ve mastered the proper form for a bodyweight squat. “Many times people hurt themselves because their squat movement isn’t correct, and then they throw weight on top of it,” Meier says. As with any lift, start with a light load and progress gradually over time. With the barbell resting on a squat rack, grip the bar with your hands shoulder-width apart. Bring your shoulders underneath the barbell so that your elbows are bent and facing forward, and the bar is resting on the underside of your palms or fingers. Step back, lifting the bar out of the rack, and stand tall with your feet slightly wider than shoulder-width apart. Keeping your back flat, chest up, and core braced, push your hips back, bend your knees, and lower your body until your thighs are at least parallel to the floor. Pause, and then push through your feet to return to a standing position. The post Front Squat vs Back Squat: Which Barbell Squat Is Right for You? appeared first on BODi. We don’t question all the available squat variations. We understand that each one — from the curtsy squat to the split squat — builds lower-body strength while bringing something a little different to a workout. But there’s something about squatting with a barbell that invites a comparison between the front squat vs back squat. Which […] The post Front Squat vs Back Squat: Which Barbell Squat Is Right for You? appeared first on BODi. Kayne Toyosato{authorlink}https://www.beachbodyondemand.com/blog/front-squat-vs-back-squatBODi BODi is a Health Esteem platform to help you embrace the person you are today so you can take action to achieve all your health and fitness goals. https://bodiblog.wpenginepowered.com/wp-content/plugins/bod-blog/assets/vendor/beachbodydigital/wordpress-core-plugins/beachbody.png

Front Squat vs Back Squat: Which Barbell Squat Is Right for You? Read More »

Best Lower Ab Workout For Women (15 Toning Exercises!)

Best Lower Ab Workout For Women (15 Toning Exercises!) Discover the best lower ab workout for women to strengthen your core, improve stability, and alleviate back pain. The benefits of a strong core extend way beyond toned abs—it can improve your daily life, too! After decades of experience training women, I can tell you my lower abs workout for women is a great way to help build that necessary core strength. Whether you bend, lift, twist, or stand, your core is essential for maintaining balance and stability. (Not to mention, it can also alleviate lower back pain.) You may have weak abdominal muscles if you live a more sedentary lifestyle (i.e., lots of sitting and not enough activity), struggle with losing menopause belly fat, or if you’ve given birth or have a condition called diastasis recti, in which the ab muscles begin to separate during pregnancy.  By adding my lower ab exercises to your overall core exercise routine (while maintaining a healthy diet), you’re bound to see improved stability, less back pain, and more defined lower abs. Each of my handpicked lower stomach exercises can help tone and strengthen your core, reduce lower back pain, and keep you feeling fit, strong, and energized. Be sure to take your time and maintain good form (these are not about speed!), and remember to breathe. Here are the 15 best lower abs exercises to incorporate into your workout routine:  1. Plank The plank is a staple of most ab workouts because it recruits the entire core! Try my 8 minute plank challenge to build your muscles! How to perform a plank: Begin kneeling on all fours with your hands directly under your shoulders and toes on the mat. Tighten your abdominals and raise your body up off the floor, lengthening your legs behind you. Hold your entire body tight, and remember to breathe. 2. Bird Dog Bird dogs strengthen the lower back and abdominals while promoting stability and balance. How to perform a bird dog: Kneel on the mat on all fours. Reach one arm long, draw in the abdominals, and extend the opposite leg long behind you. Repeat on the other side. 3. Forearm Side Plank The forearm side plank move doesn’t just target your core, it also strengthens your shoulders and upper back. How to perform a forearm side plank: Being lying on the floor with your forearm on the mat and your shoulder stacked over your elbow. Legs are long, with your feet stacked on top of each other. Lift your body into a side plank position, keeping your lower knee on the floor and your abdominals engaged. Try not to let your hips rise or drop. Repeat on the other side. 4. Bend-Extend Ab Tuck Bend-extend ab tucks are great for working your lower abdominal area and protecting your lower back. How to perform a bend-extend ab tuck: Start seated on the mat with arms behind you, hands on the mat, and fingers facing your backside. Sit back on your hands and lift up your feet off the mat, keeping the knees bent. Keep abs tight, press your legs out long, and your lower back down slightly (you should feel your lower abdominals working). Push yourself back up and pull your knees in to return to the start position. 5. Bicycle Crunch Performing bicycle crunches help build coordination and a strong core. How to perform a bicycle crunch: Start lying on your back with your feet off the floor and legs in a tabletop position. Hands are behind your head, and your head, neck, and shoulders are flexed off the mat. Bring one knee in and to the opposite elbow, reaching towards it. Repeat on the other side in a crisscross motion working the obliques. 6. Toe Reach Performing toe reaches will focus on core engagement and target your transverse abdominis. How to perform toe reaches: Start on your back with your legs long-reaching towards the ceiling. Bring your head, neck, and shoulders off the mat and reach your arms up towards your feet. Return to the tips of the shoulders and repeat. 7. V-Up V-ups are one of the best lower ab workouts for women! How to perform v-ups: Lie flat on the floor and extend your arms behind your head. Keep your feet together and your toes pointed. Keep your legs straight and lift them up as you raise your upper body off the floor. Keep your core tight as you reach for your toes with your hands. Slowly lower yourself back down to the starting position. 8. Bridge The bridge move stretches the chest, neck, spine, and hips while strengthening the glutes, core, and lower back. It also promotes good posture! How to perform a bridge:  Begin lying on your back with your knees bent and feet flat on the floor close to the glutes. Place your arms flat on the floor next to you, tucking your shoulders under your back. Align your knees with your hip bones. Press your palms down as you lift your hips high and squeeze the glutes and abdominals. Keep your neck relaxed on the mat. Continue to breathe and hold for 30 seconds. 9. Full-Body Roll-Up Performing full-body roll-ups challenge your core and give you a great stretch for your back.  How to perform a full-body roll-up: Start lying on the mat with your arms extended overhead, legs long, and feet flexed. Inhale as you lift your arms up and begin curling your chin and chest forward. Exhale as you roll the entire torso up and over your legs, keeping your abs engaged while reaching for your toes. Inhale as you begin rolling your spine back down one vertebra at a time, and exhale as the upper portion of the back lowers and your arms reach pack overhead.  Repeat moving slowly and using the abdominals to lift and lower.  10. Dead Bug Dead bugs are low-impact and promote coordination, posture, and core strength while working the lower abs. How to

Best Lower Ab Workout For Women (15 Toning Exercises!) Read More »

20 Standing Ab Exercises For Women At Any Age

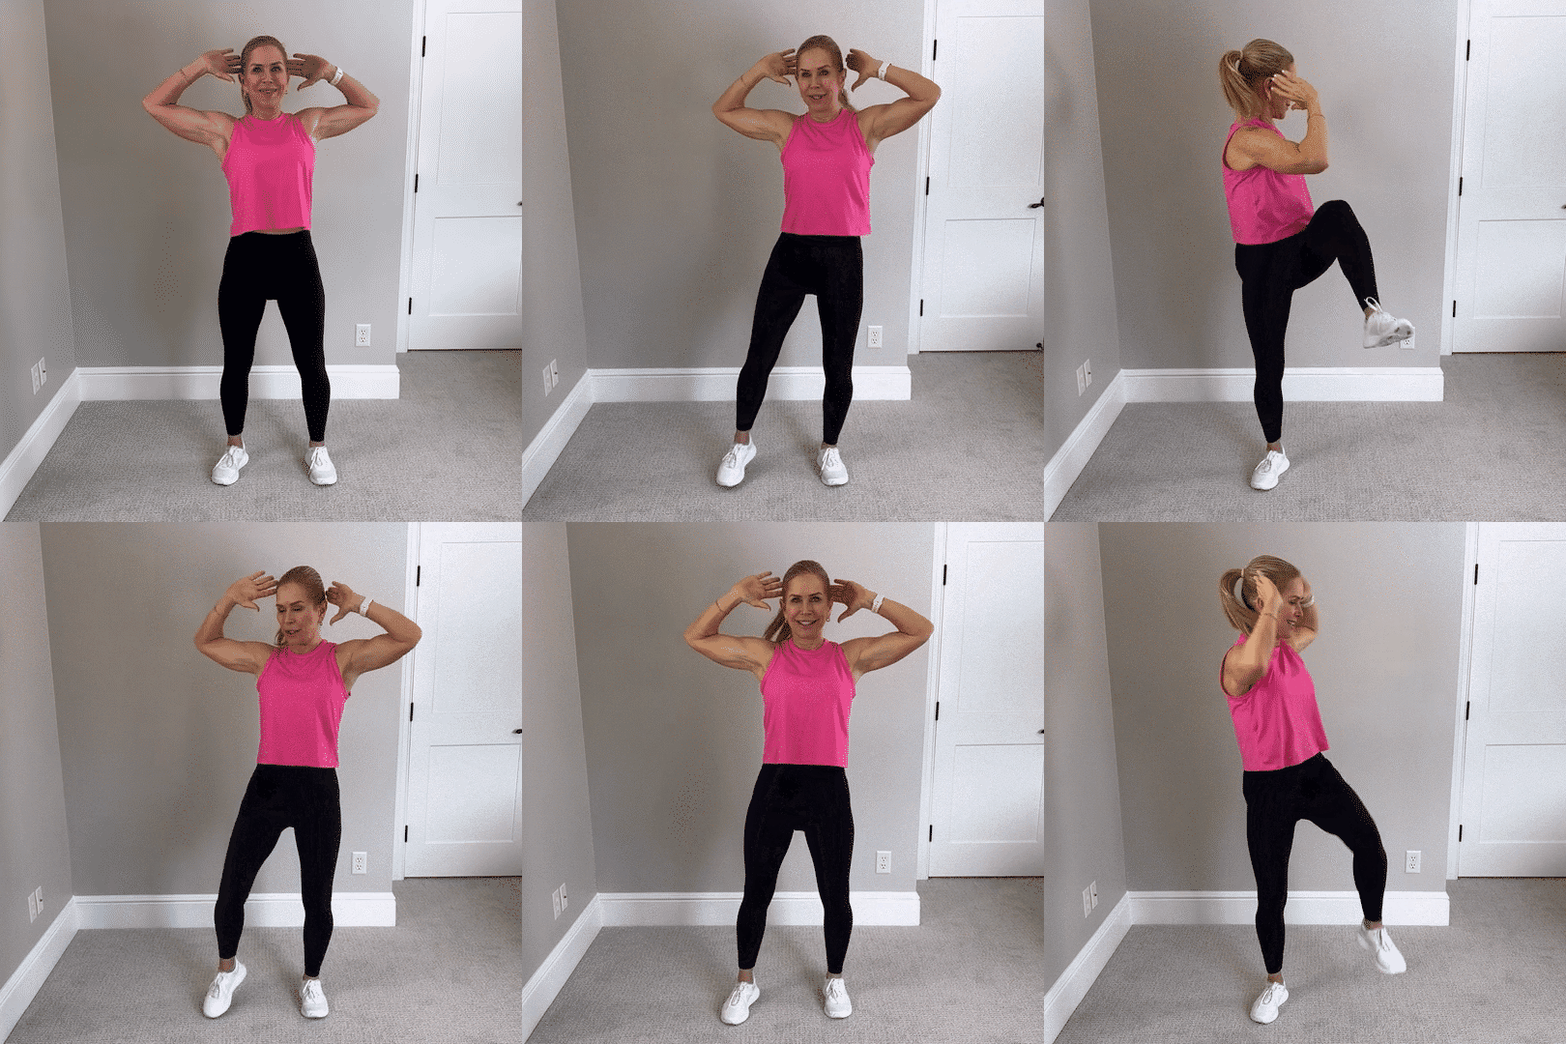
20 Standing Ab Exercises For Women At Any Age Discover 20 standing ab exercises designed for women of all ages to help achieve a flat stomach. These effective standing ab workouts target your core, offering a convenient and powerful way to tone your abs without getting on the floor. Perfect for all fitness levels! As a Certified Personal Trainer, I’ve recorded hundreds of ab workouts in the last few decades, and no doubt, the abs are the most requested body part to train.  I love a good plank series and core work on the mat, but my Pilates training taught me that you can work your abs both lying down and standing up, which is why I love these standing ab exercises.  Yes, standing up exercises for a flat stomach can be as effective if not more effective than core work on the mat. And I’m not surprised, because my fans have been asking me for the best standing abs workouts and off-the-floor exercises for years. Standing workouts are popular for anyone dealing with back and knee pain, because it’s easier than getting up and down off the floor. These exercises also mimic normal everyday activities, meaning they make a great functional strength training workout! The good news is you can do these standing core exercises right at home with minimal equipment.  Some of them are bodyweight exercises, and a few use a dumbbell, which you could substitute for a soup can, water jug, or even just use a throw pillow. As a Certified Personal Trainer and Pilates instructor, here are my 20 recommended best standing ab exercises to add to your next workout. 1. Cross-Body Bicycle Crunches Performing cross-body bicycle crunches will engage your entire core, emphasizing oblique muscles for improved rotational strength. How to Perform Cross-Body Bicycle Crunches: Stand with feet hip-width apart, knees slightly bent, hands behind head. Keep low abs pulled in tight and lift left knee up as right shoulder rotates towards knee. Lower back to start. Repeat on the opposite side. 2. Cross-Body Leg Lifts This standing ab exercise will strengthen your lower abs and hip flexors, enhancing stability and balance. How to Perform Cross-Body Leg Lifts: Stand with feet hip-width apart, knees slightly bent, hands behind head. Keep low abs pulled in tight and lift left leg straight up as right-hand reaches towards toes.  Keep your back straight and your head up.  Lower back to start. Repeat on the opposite side. 3. Cross-Body Wood Chop This cross-body wood chop move boosts core power and coordination by combining rotational movements with resistance. How to Perform Cross-Body Wood Chop: Stand with feet hip-width apart, holding a dumbbell end to end. Start in a squat position with your chest lifted, your abs tight, and the dumbbell to your right hip.  Stand up and swing the dumbbell up overhead over the left shoulder while contracting your abs.  Return to starting squat position. Repeat on the other side.  4. High Knee Lifts with a Dumbbell This standing exercise increases core engagement and cardiovascular endurance, targeting the lower abs. How to Perform High Knee Lifts with a Dumbbell: Begin standing. Extending one arm up, holding a dumbbell and the other arm out for counterbalance.  Alternate lifting your knees up to hip height, engaging your core to maintain balance.  Do desired reps total and then switch the dumbbell to the other hand and repeat.   5. Standing Oblique Crunches This standing oblique exercise focuses on the obliques, enhancing side core strength and definition. How to Perform Standing Oblique Crunches: Stand with your feet shoulder-width apart. Lift right arm up overhead.  Bring the right knee up to the side to meet your right elbow, engaging through your obliques.  Return to standing. Repeat on the other side.  6. Dumbbell Halos I love the dumbbell halo exercise for enhancing upper body and core stability, improving shoulder mobility and coordination. How to Perform Dumbbell Halos: Stand with your feet hip-width apart. Hold one dumbbell end to end at the right hip.  Slightly bend your knees.  Bring the dumbbell up to your opposite shoulder and halo around the back of your head, ending with the dumbbell down at your left hip.   Keep alternating for the desired amount of repetitions.   7. Fully Body Circles Performing full body circles activates your entire core while enhancing flexibility and balance. How to Perform Fully Body Circles: Stand with your legs hip-width apart.  Raise both arms up and clasp your hands overhead. Slightly soften your knees and contract your abs.  Bend forward at the hips and slowly draw a full circle with your body.  After several circles, one way, change directions.  8. Oblique Burners This standing oblique exercise specifically targets your oblique muscles, improving side torso strength and toning. How to Perform Oblique Burners: Stand with wide feet, heels in, and toes turned out. Sink into a plie with knees bent and hands lightly touching the back of your head. Bend to the right, reaching your right hand to the middle of your right calf.  Return to the center. Repeat on the other side. 9. Lunge Crunch This standing ab exercise combines leg and core work, enhancing stability and lower abdominal strength. How to Perform Lunge Crunches: Begin in a lunge position with your front knee bent at a 90-degree angle and the other leg extended behind you. Extend both arms out in front of you, holding a dumbbell end to end.  Engaging your core, drive the back knee up and in toward your chest while bending your elbows and pulling your arms into your abs. Extend your leg back to the starting position and repeat. Keep crunching on the right side. Complete 15 reps, then switch sides and repeat. 10. Reverse Lunge Twist Performing the reverse lunge twist engages your entire core, particularly the obliques, for improved rotational power. How to Perform the Reverse Lunge Twist: Start with your feet hip-width apart, with your arms holding a dumbbell end to end out in front of you. Step back into a

20 Standing Ab Exercises For Women At Any Age Read More »

Round Out Your Core Routine With the Russian Twist

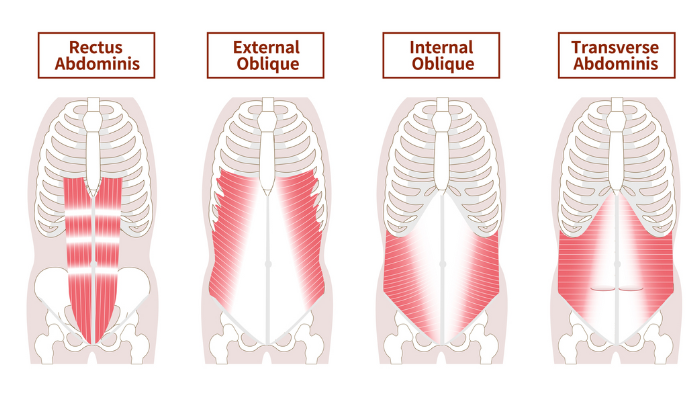
Round Out Your Core Routine With the Russian Twist If your core workouts are all about bending with crunches and holding it right there with planks, it’s time to add the Russian twist to your routine. “In life, we use many movements that include all planes of motion, one of which is rotation,” says Cody Braun, C.S.C.S. He explains that rotation is one of the most undertrained movement patterns of the human body. And when you skip it, you open yourself up to huge strength and functional deficits. Whether you’re changing directions on the soccer field or reaching behind you into the backseat of your car, you need a strong, stable core that’s able to brace itself and protect your spine while rotating from side to side, Braun says. Plus, if you want a core that looks chiseled from every angle, you need to get with oblique twist exercises — like the Russian twist. A Word of Caution Before Performing the Russian Twist When performing any exercise, form is of paramount importance. But with the Russian twist, as soon as your form slips, you will feel it — most likely in your low back. To properly work your core muscles and avoid dumping stress into your low back, it’s important to focus on maximally squeezing your core — like you’re about to be punched in the gut — throughout the entire exercise. This will keep your torso rigid and in proper alignment. If at any point during Russian twists you feel the arch in your low back exaggerate, try a variation of the move (see below) or cut your set right there and rest before starting up again. Russian Twist: Step-by-Step Instructions  Program: Rough Around the Edges Workout: Total Body Killer Core Sit on the floor, holding a pair of dumbbells in front of your chest, and balance on your butt with your knees bent and feet together a few inches off the floor. Keeping your back flat and core braced, rotate your torso to your right and lower the weights toward the floor outside your right hip. Return to the starting position, and repeat to your left. Continue alternating sides, performing equal reps on each. Russian Twist: Muscles Worked Obliques: Including both the deep-lying internal obliques and more superficial external obliques, these muscles sit along the sides of your torso and are the primary drivers of both rotation and lateral flexion. Transverse abdominis: Called the TVA for short, the transverse abdominis is in charge of stabilizing your spine, acting like an internal corset that keeps everything nice and tight. Rectus abdominis: These crave-able six-pack muscles work to flex the lumbar spine and help keep the torso lifted — crunch-style — throughout the exercise. How to Make the Russian Twist Easier If Russian twists are too difficult for you or are uncomfortable for your back, try performing them using just your body weight and/or with your feet on the floor. “When you place your feet on the ground, you increase stability through points of contact,” Braun says. This reduces the amount of work the core has do to keep you supported and can help ease stress on your low back. Alternatives to the Russian Twist Also, whether or not you perform Russian twists, there are plenty of other rotational core exercises you can add to your routine that place minimal stress on your back. Try out these core moves and stick with the ones that feel good for you. 1. Bicycle crunch Lie on your back with your legs out straight, and interlace your fingers behind your head, gently resting your head on your fingers. Keep your elbows pointed out to the sides and try to relax your neck. Press your lower back to the ground, engage your core to lift your shoulder blades off the ground, and bring your right knee in toward your chest as you rotate your torso to bring your left elbow toward your right knee. Keep your left leg straight. Reverse the motion by straightening your right leg as you bend your left leg and bring it in toward your chest as you rotate your torso to bring your right elbow toward your left knee. Continue for reps, and once you’ve conquered the proper form, switch legs and rotate faster to introduce a cardio element. Your lower back should stay on the floor for the whole movement. 2. Standing band rotation Secure a resistance band to a sturdy object at navel height. Stand next to the anchor point with your feet hip-width apart, knees slightly bent. Hold the handle with both hands, arms fully extended in front of your chest and torso rotated to face the station. Brace your core and rotate your torso so that you face away from the station, arms still extended in front of your chest. Pause, then slowly reverse the movement to return to start. 3. Low-to-high dumbbell chop Grab a dumbbell with both hands (one hand on each end), and lower into a quarter-squat position. Hold the dumbbell to the outside of your right knee, your arms fully extended and diagonal from your body. Your torso should face the weight. Keeping your arms fully extended and torso facing the weight, squeeze your abs, pivot to the left and release the right heel as rotate your hips to pull the dumbbell up and across your body until it’s above your left shoulder. Pause, then slowly reverse the motion to return to start. Repeat on the opposite side. 4. Plank cross tap Start in a high plank with your arms straight, hands in line with (but slightly wider than) your shoulders, feet together, and body straight from head to heels. Keeping your back flat, lift your right foot and bring your right knee to your left elbow. Return to the starting position. Do equal reps on both sides. The post Round Out Your Core Routine With the Russian Twist appeared first on BODi. If your core workouts are all about bending with crunches and holding it right there with planks, it’s time to add the Russian twist to your

Round Out Your Core Routine With the Russian Twist Read More »

Strengthen and Shred Your Midsection With the Oblique V-Up

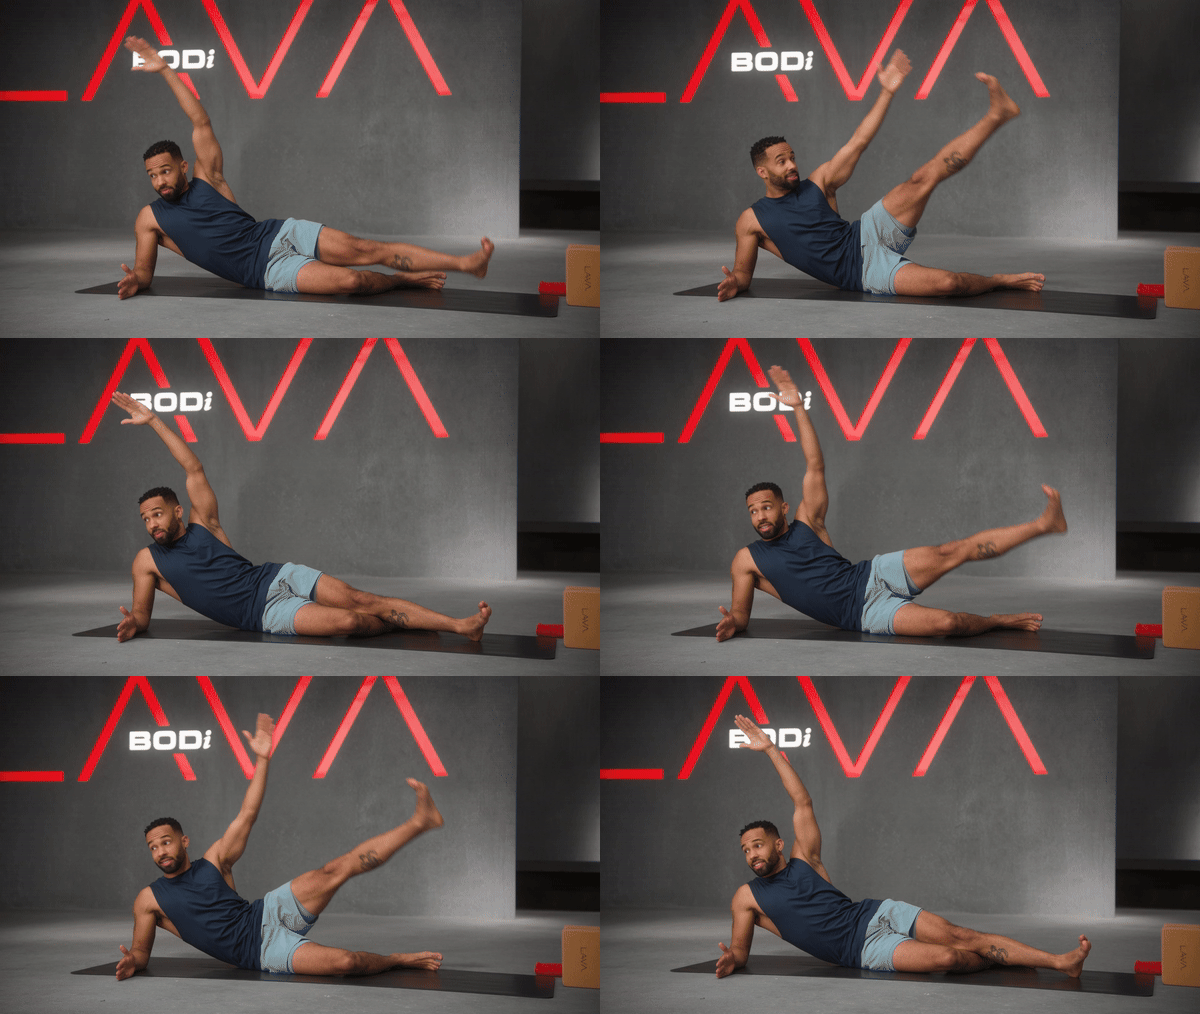
Strengthen and Shred Your Midsection With the Oblique V-Up Want a convenient way to work some of the most neglected muscles in your core? Look no further than the oblique V-up. Most exercisers think the core is another word for your rectus abdominis, or the “six-pack muscles” on the front of your abdomen. Just as essential, however, are your obliques — the sheets of muscle flanking the sides of your waist that extend from the bottom of your rib cage to just above your hip bones. These muscles help you twist, crunch, bend to the side, and stabilize your torso during athletic movement. Oblique V-ups target these muscles directly, helping to strengthen, tighten, and define them. Here’s a guide from Elise Joan in her power yoga program BODi LAVA on how to do them with proper form. Oblique V-Up: Step-by-Step Instructions Lie on your right side with both legs extended, your feet stacked, your right palm and forearm on the floor and your left arm extended overhead. This is the starting position. Lift both legs toward the ceiling as you touch your left arm to the outside of your left foot so that your torso and legs form a “V”. Pause at the top of the movement, squeezing your obliques as hard as you can, and then slowly return to the starting position. Perform equal repetitions on both sides. How to Make the Oblique V-Up Easier Having a tough time with the oblique V-up? Don’t be discouraged: You’re lifting your torso and your legs with a relatively small set of muscles — repeatedly. That makes it an advanced-intermediate exercise — something few people can do on their first day in the gym. Here’s a step-by-step roadmap to the full move. 1. Perform oblique sit-ups Set up by lying on your side with your knees bent and feet stacked. Keep your legs down and lift your upper body only. 2. Lift only your top leg From the same set-up, lift your upper body and your top leg only, keeping it bent throughout. Once you’ve mastered that version, try it with your top leg straight, holding the top position for a one-count. 3. Perform partial reps Got those techniques down? Try partial reps, lifting your legs just a few inches from the floor. Increase your range of motion over time. How to Make the Oblique V-Up Harder If you can pull off three sets of 15 perfect oblique V-ups, you’re in pretty rarified fitness territory. But if you want to make the move even harder, here are a few variations. Do ‘pulse’ reps: At the top of the move, lower your legs and upper body two inches, then squeeze again. Repeat three times each rep. Perform ‘balance’ reps: Do the move without using your lower arm for balance. This is a huge stability challenge and will make the move much harder. Add resistance. Place a light medicine ball — four pounds will be plenty at first — between your feet as you perform the move. The post Strengthen and Shred Your Midsection With the Oblique V-Up appeared first on BODi. Want a convenient way to work some of the most neglected muscles in your core? Look no further than the oblique V-up. Most exercisers think the core is another word for your rectus abdominis, or the “six-pack muscles” on the front of your abdomen. Just as essential, however, are your obliques — the sheets of muscle […] The post Strengthen and Shred Your Midsection With the Oblique V-Up appeared first on BODi. Andrew Heffernan CSCS, GCFP{authorlink}https://www.beachbodyondemand.com/blog/oblique-v-upsBODi BODi is a Health Esteem platform to help you embrace the person you are today so you can take action to achieve all your health and fitness goals. https://bodiblog.wpenginepowered.com/wp-content/plugins/bod-blog/assets/vendor/beachbodydigital/wordpress-core-plugins/beachbody.png

Strengthen and Shred Your Midsection With the Oblique V-Up Read More »

Take Your Planks to the Next Level With the Stability Ball Knee Tuck

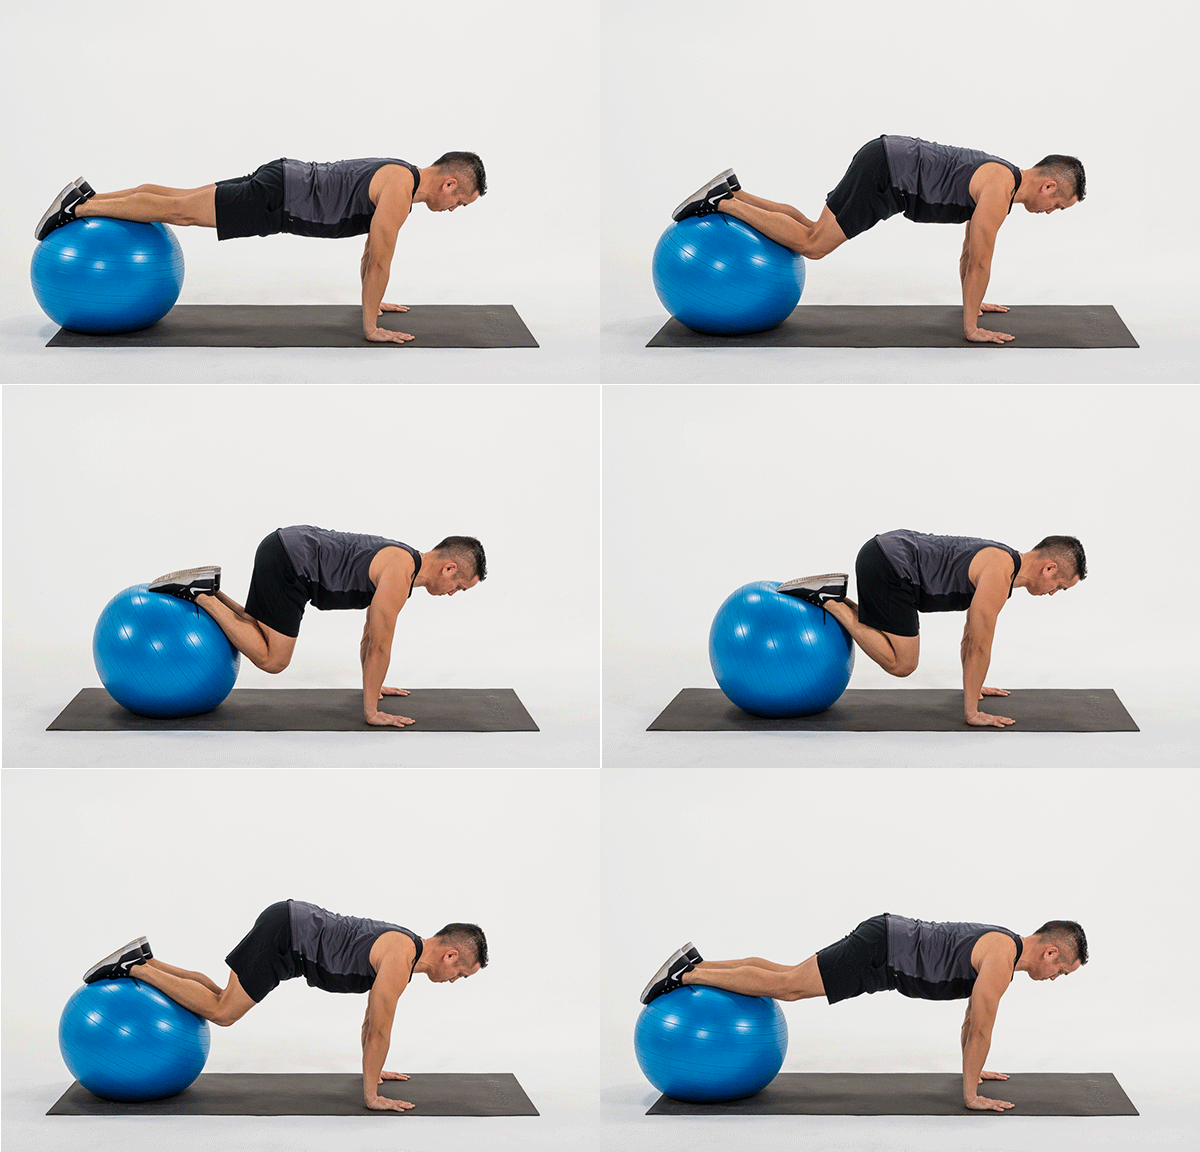
Take Your Planks to the Next Level With the Stability Ball Knee Tuck If you’re looking for a killer core workout that challenges your balance and gets every abdominal muscle engaged, look no further than your exercise ball. One of the best ways to use it: stability ball knee tucks — also known as a jackknife. (And once you’ve nailed this one, here are other stability ball exercises to master.) Stability Ball Knee Tuck: Step-by-Step Instructions Get in a high-plank position with your hands directly underneath your shoulders and your shins on top of a stability ball. Brace your core to keep your body in a straight line from head to toes. This is your starting position. Engage your core and bend your knees to roll the stability ball toward your hands until only your toes are resting on the ball, keeping your hips down as you do so. Pause, then slowly straighten your legs back behind you, returning to the starting position. How to Make the Stability Ball Knee Tuck Easier Reduce the range of motion of your knee tuck. Use a smaller stability ball. Instead of your shins, rest your knees or thighs on top of the ball to reduce the work needed from your core to stabilize the movement. Stability Ball Knee Tuck: Muscles Worked Stability ball knee tucks are a great way to target your abs, as well as some other key muscle groups. Abs The main muscles you’re working during stability ball knee tucks are your abs. This exercise targets your entire core, from your six-pack rectus abdominis to the side obliques to your underlying “corset” abs (the transverse abdominis). Hip flexors Your hip flexors, or psoas, support your abs and help to bring your knees to your chest. So if the front of your hips are feeling sore the next day, that’s totally normal. Shoulders While you’re holding a plank position, your shoulders are stabilizing your position — and, also important, they’re keeping you from face-planting. The post Take Your Planks to the Next Level With the Stability Ball Knee Tuck appeared first on BODi. If you’re looking for a killer core workout that challenges your balance and gets every abdominal muscle engaged, look no further than your exercise ball. One of the best ways to use it: stability ball knee tucks — also known as a jackknife. (And once you’ve nailed this one, here are other stability ball exercises to […] The post Take Your Planks to the Next Level With the Stability Ball Knee Tuck appeared first on BODi. Kayne Toyosato{authorlink}https://www.beachbodyondemand.com/blog/stability-ball-knee-tucksBODi BODi is a Health Esteem platform to help you embrace the person you are today so you can take action to achieve all your health and fitness goals. https://bodiblog.wpenginepowered.com/wp-content/plugins/bod-blog/assets/vendor/beachbodydigital/wordpress-core-plugins/beachbody.png

Take Your Planks to the Next Level With the Stability Ball Knee Tuck Read More »

Hula Hoop Workout: Burn Calories While Having Fun

Hula Hoop Workout: Burn Calories While Having Fun Discover the transformative power of hula hoop workouts for weight loss. This fun form of low-impact cardio exercise will enhance your overall health while slimming your waistline. If you’re sick of doing the same old exercise routine day in and day out, it’s time to shake things with a hula hoop workout! My first encounter with a weighted hula hoop was a decade ago with the ladies from Hoopnotica. I did a hula hoop workout for 30 minutes straight, and my abs were so sore the next day….I was hooked! Hula hoop workouts provide a similar heart rate and calorie burn as boot camp classes, step aerobics, and cardio kickboxing. And these workouts pack a serious punch! You’ll burn approximately 210 calories per 30 minute session. Ready to give it a try? Here’s my calorie burning hula hoop workout that will keep you smiling as you exercise! My Hula Hoop Workout Follow the instructions below for my heart pumping hula hoop workout that will burn calories just as effectively as other types of cardio exercise! This workout includes a short warm up followed by 3 sets of hula hoop exercises. Keep scrolling to see my recommendations for choosing your hula hoop. [adthrive-in-post-video-player video-id=”Hdv5RPZO” upload-date=”2021-07-14T02:59:39.000Z” name=”Hula Hoop Workout” description=”Try this 25-Minute cardio workout using just your bodyweight and a hula hoop! ” player-type=”static”] Hula Hoop Warm Up (4 Minutes) Always remember to warm up your body as needed. Complete the following exercises to get warmed up and ready for your hula workout: 1 Minute Jumping Jacks 1 Minute Walking Lunges 1 Minute Squats 1 Minute Hula Hoop around your waist Take a 30 seconds rest before starting the bulk of the workout. If you need to take a longer warm-up feel free to do the above circuit again or add on any other movements. Hula Hoop Workout SET 1: Follow this set of exercises for the first set of this hula hoop workout: 1 Minute – Hula Hoop around your waist 1 Minute – Jump Through the Hoop (like a jump rope) 1 Minute – 2 Feet Hops Forward and Back* Repeat Circuit x 2 Sets Take a 30 second rest *To Perform 2 Feet Hops Forward and Back: Step 1: Place the Hula Hoop down on the ground Step 2: Start by standing behind the Hula Hoop Step 3: Hop with 2 feet into the center of the Hula Hoop Step 4: Hop with 2 feet forward over the top of the Hula Hoop Step 5: Then repeat with 2 feet hopping back into the center of the Hula Hoop Step 6: Finally, jump with 2 feet back again, back to the starting position of behind the Hula Hoop Continue this pattern, hopping with 2 feet forward and back for the full minute. Hula Hoop Workout SET 2:  Follow this set of exercises for the second set of this hula hoop workout: 1 Minute – Hula Hoop around your waist 1 Minute – 2 Feet Hops Side to Side* 1 Minute – Hula Hoop around your waist Repeat Circuit x 2 Sets 30 Second Rest *To Perform 2 Feet Hops Side to Side: Step 1: Place the Hula Hoop down on the ground Step 2: Start by standing on one side of the Hula Hoop (right or left side; it does not matter) Step 3: Hop with 2 feet into the center of the Hula Hoop Step 4: Hop with 2 feet forward over the opposite side of the Hula Hoop Step 5: Then repeat with 2 feet hopping back into the center of the Hula Hoop Step 6: Finally, jump with 2 feet back again, back to the starting position of the side of the Hula Hoop Continue this pattern, hopping with 2 feet from side to side for the full minute Hula Hoop Workout SET 3:  Follow this set of exercises for the third set of this hula hoop workout: 1 Minute – Hula Hoop around your waist 1 Minute – Hula Hoop Squats* 1 Minute – Line Jumping** 1 Minute – Hula Hoop around your waist Repeat Circuit x 2 Sets *To Perform Hula Hoop Squats: Step 1: Start by standing with your feet shoulder-width apart (squat position) Step 2: Hold the Hula Hoop overhead with straight arms (in an overhead press position) Tip/ Modification: If the overhead press position is too much with the squat, bring the arms slightly forward at an angled position. Or you can bring the Hula Hoop straight out in front of you. By bringing the Hula Hoop overhead, you are forced to use more core in your squat position. Step 3: Continuously perform squats for 1 straight minute, keeping the arms extended overhead **To Perform Hula Hoop Line Jumping: Step 1: Place the Hula Hoop on the ground Step 2: Start behind the Hula Hoop Step 3: Place the right foot into the center of the Hula Hoop, then bring the left foot into the center next to the right foot. Step 4: Return the right foot back to the back of the Hula Hoop, allowing the left leg to follow along. Step 5; Continue this pattern in and out of the Hula Hoop for 1 straight minute. Line Jumping Pattern = Right Foot, Left Foot (into the center of the Hula Hoop), Right Foot, Left Foot (to the back of the Hula Hoop) What Muscles Do Hula Hoop Workouts Target? The hula hoop workout will primarily target your core muscles! Along with your abs, your thighs and glutes are getting toned. Your lower back muscles are getting put to work as well by supporting and stabilizing your posture while you spin your hoop. The best part is that you are also secretly sculpting your waistline while you are simultaneously laughing and doing aerobic exercise. It’s a little bit like riding a bike, the movement comes back to you in the first 10 minutes, and the weighted hoop is entirely different than

Hula Hoop Workout: Burn Calories While Having Fun Read More »

Need to Amp Up Your Abs Routine? Try Flutter Kicks

Need to Amp Up Your Abs Routine? Try Flutter Kicks If you’re bored with crunches and have already experimented with every imaginable plank variation, try switching up your ab exercises with flutter kicks, also known as butterfly kicks. Just as effective as leg lifts, flutter kicks offer a more dynamic (and maybe even more fun) alternative to the typical ab exercise. And if it’s a defined midsection you’re after, flutter kicks can help round out your existing ab work by targeting different muscles than other common core exercises. Flutter Kicks: Step-by-Step Instructions Performing flutter kicks with proper form ensures that you will gain the ab exercise’s core-strengthening benefits while also guarding your neck and lower back from injury. To execute the flutter kick with proper form like in the above clip from LIIFT MORE: Lie flat on your back with your legs straight and your arms at your sides or resting underneath your tailbone. Engage your core and press your head, shoulders, and lower back into the floor as you raise both legs about 12 inches off of it. Keep both legs straight as you alternately lift each foot in a fluttering motion. Complete an equal number of reps with each leg. How to Make Flutter Kicks Easier Flutter your legs higher off the ground. Perform supine toe taps: Lie on your back with your feet lifted and knees bent so your legs and hips form a 90-degree angle (shins parallel to the floor). Keeping your knee bent, slowly lower one leg until your heel taps the floor. Make sure your core stays engaged and your other leg stays in place in the air. Slowly return the lowered leg to its starting position, and repeat with the other leg. How to Make Flutter Kicks Harder Implement one or more of these intensifiers to your flutter kicks to make them more challenging. Raise your head and shoulders slightly off the ground to further engage your abdominals. Flutter your legs faster while still maintaining control. Perform the exercise in a hollow body position, extending your arms straight overhead. Benefits of Flutter Kicks 1. Improved posture Like other ab exercises, including leg raises, planks, bird dogs, and leg lifts, flutter kicks target the core muscles. Strong core muscles are crucial to overall health, as they stabilize the spine and pelvis, thereby supporting proper posture and helping to prevent the slouching, slumping, and rounded shoulders that can lead to chronic health problems such as back pain. 2. Injury prevention “Proximal stability equals distal mobility” is a common refrain in the physical therapy realm and a tenet of human movement. Essentially, it reasons that the stronger and more stable your core is, the better mobility you’ll have in your body’s extremities. A weak core can result in poor mobility and movement dysfunctions in the arms, shoulders, and legs, which can, in turn, lead to injury. Incorporating flutter kicks and other core exercises into your fitness regimen can help keep your body moving effectively and avoid injury. 3. Defined abs Sure, proper posture and injury prevention are important, but what can butterfly kicks do for your physique? When paired with other ab exercises like planks and crunches, a lot, says Trevor Thieme, C.S.C.S. “Any exercise that targets your rectus abdominis engages the entire muscle, but most people take a top-down approach to working it, focusing their ab-sculpting efforts on crunches and sit-ups,” he says. “That’s what makes the flutter kick a valuable addition to any exercise arsenal — it provides a novel challenge for your abs that can help you build a six-pack even faster.” 4. Calorie-burning cardio The dynamic nature of flutter kicks makes them a great addition to cardio circuits. While flutter kicks will fire up your muscles, they’ll also elevate your heart rate. Try mixing 30 to 60 seconds of flutter kicks into your next HIIT workout. The post Need to Amp Up Your Abs Routine? Try Flutter Kicks appeared first on BODi. If you’re bored with crunches and have already experimented with every imaginable plank variation, try switching up your ab exercises with flutter kicks, also known as butterfly kicks. Just as effective as leg lifts, flutter kicks offer a more dynamic (and maybe even more fun) alternative to the typical ab exercise. And if it’s a defined midsection you’re after, […] The post Need to Amp Up Your Abs Routine? Try Flutter Kicks appeared first on BODi. Kayne Toyosato{authorlink}https://www.beachbodyondemand.com/blog/flutter-kicksBODi BODi is a Health Esteem platform to help you embrace the person you are today so you can take action to achieve all your health and fitness goals. https://bodiblog.wpenginepowered.com/wp-content/plugins/bod-blog/assets/vendor/beachbodydigital/wordpress-core-plugins/beachbody.png

Need to Amp Up Your Abs Routine? Try Flutter Kicks Read More »

Yoga for Core Strength: 8 Poses You Can Do Anywhere

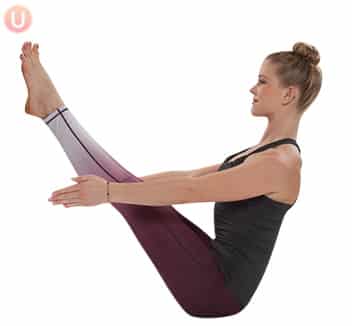
Yoga for Core Strength: 8 Poses You Can Do Anywhere I love using yoga for core strength training because it encourages you to engage your abs, align your spine and stabilize your body. Yoga is so beneficial for a number of things. Most commonly people think of it when they want a deep stretch, to lengthening muscles, and calm their mind. However, any yogi can tell you that yoga is also all about core strength! From planks to side planks to boat pose, many yoga poses call upon all of your core muscles. They use your stabilizing muscles, help you work on balance and posture, and challenge your ability to engage your muscles and hold steady. I call it sneaky. It’s not alwasy traditional ab work as you know it but often after a yoga class, your core is on fire the next day. In general, practicing yoga can help you develop a stronger mind-body connection and learn how to properly activate your core. As you build up strength overtime, you can yes, flatten your abs but more importantly you can reduce low back pain, improve balance, and develop a strong core for every day activity. I’ve put together my 8 favorite yoga poses that emphasize core strength into a simple workout for you to try. Follow the instructions below to start your journey towards a stronger more stabilized core! Yoga for Core Strength Workout Instructions Perform each pose, holding each one for 30 seconds. Go through the entire sequence twice. For moves that are one-side, do one side the first time through, and the other side the second time through. Once you try these yoga for core strength poses, check out the yoga poses I recommend doing every day. 1. Boat Pose A boat pose is a challenging position that forces you to pull in your lower abdominals to keep your legs lifted. Don’t worry if your legs aren’t perfectly straight—most people have tight hamstrings, which will inhibit this. Just extend your legs as long as you can and do your best to let your hip flexors relax to keep the focus on the abs. 2. Star Plank  Star plank is a great way to strengthen your obliques and lower abs while practicing balance and focus. To get started you can try practicing with your legs together in a full Side Plank, then work your way toward lifting the leg into a full star. 3. Chaturanga While chaturanga (low plank) may seem very upper-body focused, it is actually your core strength that supports your body and allows you to lower down slowly without letting your back sag. Be sure to keep your spine aligned, abdominals tucked in tight, and elbows close to your side. 4. Bird Dog  Bird Dog challenges you not only to hold your long leg and arm away from your body but also adds the challenge of holding your body very still. This challenge can be met by drawing the abdominals up and in and keeping them tight as you breathe smoothly. Every time you feel a little wobbly or like you are tipping one way or another, draw your abs in a bit tighter. 5. Warrior 3 Warrior 3 is a standing balance pose. This pose gets you to focus on lengthening your body and, obviously, practicing balance. However, in order to hold that balance steady while keeping your body aligned and straight, you must use a great amount of core strength. Draw your belly upward into your spine and breathe with a strong exhale. 6. Side Plank Scoop Side Plank Scoop takes a basic Side Plank pose to the next level! Not only are you working to hold yourself up in your side plank using your obliques, but you are now adding the strength of those low abs (called the transverse abdominus) to scoop your arm under your body and add the rotation without falling over. To modify, you can either place your bottom knee on the ground or you can do it on your forearm if your wrist bothers you. 7. Crow Pose  This is going to be your challenge pose! Crow pose is an arm balance move, but that doesn’t mean your arms are riding solo. In fact, there is virtually no way you will be able to accomplish this pose without using a significant amount of core strength. After bringing your knees toward the back of your arms, be sure to draw your transverse abdominus in before you lift your feet off the ground to get your balance. To modify, gently place your head down on the floor as well and practice Tripod Pose instead. 8. Windshield Wiper  This will be a great pose to end on. You’ll get a great finishing stretch while also working your obliques by moving your legs slowly from side to side. You and your abs are going to feel strong, powerful, and amazing after this yoga practice! More Core Strengthening Exercises 5 Pilates Moves To Sculpt Your Core The Best Core Exercises for Seniors How To Get Rid Of Lower Belly Fat + A 15- Minute Workout I love using yoga for core strength training because it encourages you to engage your abs, align your spine and stabilize your body. Yoga is so beneficial for a number of things. Most commonly people think of it when they want a deep stretch, to lengthening muscles, and calm their mind. However, any yogi can […] Chris Freytag, CPT{authorlink}https://gethealthyu.com/yoga-poses-for-core-strength/Get Healthy U | Chris Freytag

Yoga for Core Strength: 8 Poses You Can Do Anywhere Read More »