Back Workouts

Auto Added by WPeMatico

You Can Do a Muscle-Up. Here’s How

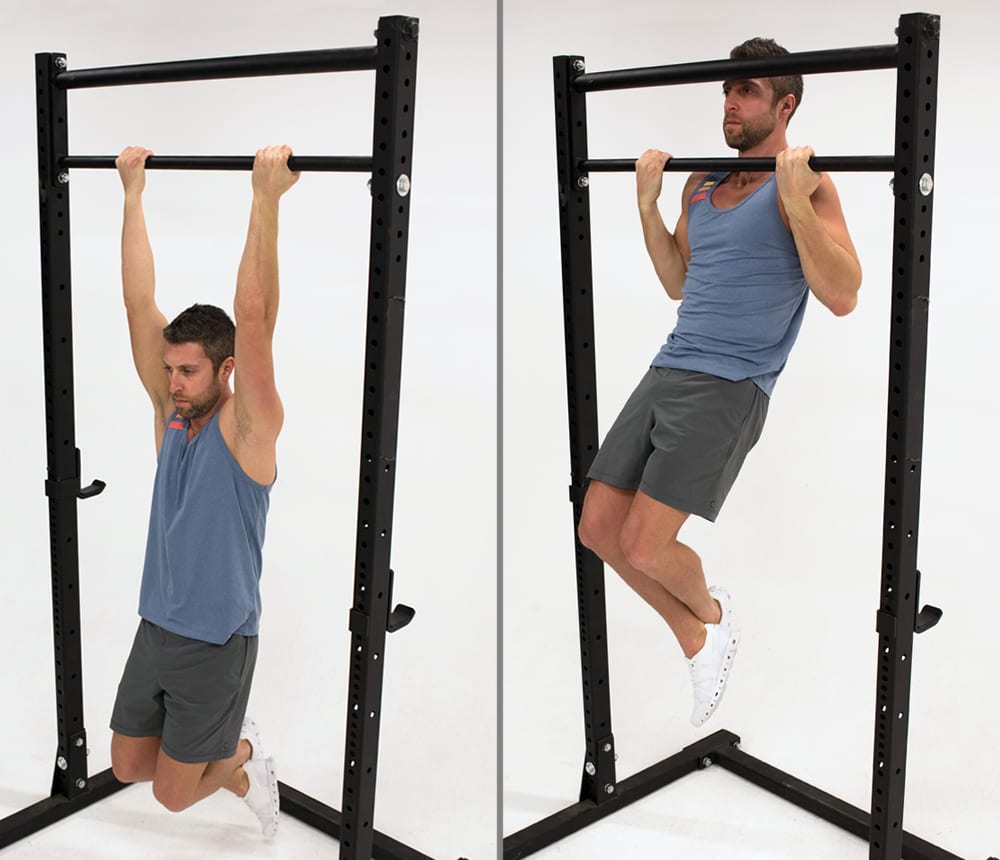
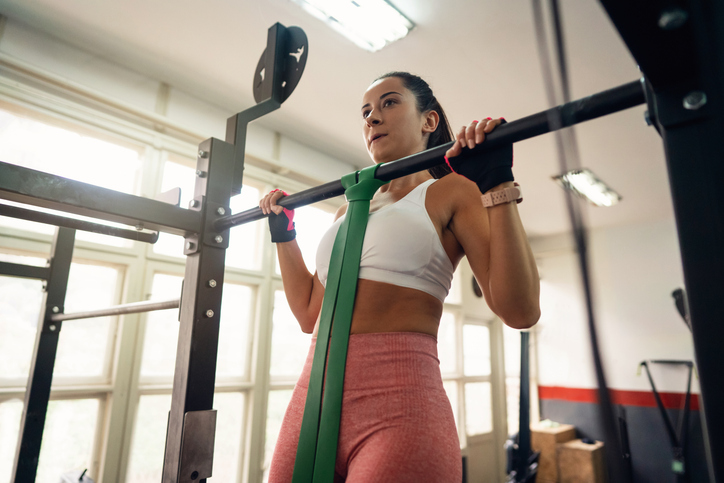
You Can Do a Muscle-Up. Here’s How Unless you’re already a trained gymnast, bar muscle-ups are one of the most challenging bodyweight movements you can attempt. In addition to requiring significant core and upper-body strength, muscle-ups demand excellent mobility, body awareness, coordination, and timing. If you’re determined to add muscle-ups to your gym repertoire, know that there’s a right and wrong way to develop this skill. The wrong way: Repeatedly swinging and slamming your body against the bar until you’re fatigued, frustrated, and possibly injured. The right way: A muscle-up progression. A muscle-up progression is a series of increasingly difficult movements that gradually develops your muscle-up technique while building your strength. Each stage of the progression includes benchmarks indicating your readiness to move on to the next drill within the progression. The final stage is, of course, a muscle-up safely executed with confidence and impeccable form. 6-Step Bar Muscle-Up Progression Dr. John Gallucci, Jr., MS, ATC, PT, DPT, CEO of JAG Physical Therapy, explains that a muscle-up is actually a series of smaller movements strung together: Kip swing Knee raise Leg raise Chest-to-bar pull-up Triceps dip To do a muscle-up, you must be comfortable performing each of these movements repetitively. That’s where the muscle-up progression comes in. Developed with input from Gallucci and Jeff Waters, registered USA Boxing coach and owner of Watters Performance, the following muscle-up progression starts at a beginner level. Depending on your gymnastic experience and current strength levels, you may be able to skip ahead. Step 1: Hanging knee/leg raise Grab a pull-up bar with an overhand grip that’s slightly wider than shoulder-width. Hang at arm’s length with your arms straight (a position known as a dead hang) and your legs straight and together. Bend your knees 90 degrees and lift them to hip level. Hold for one second, then return to the starting position. Once you’re able to perform three sets of 10 reps, perform the same movement keeping your legs straight so that your body creates an L shape. Once you’re able to perform three sets of 10 reps of straight-leg raises, move on to the next step. Tip: “Ensure that you’re not swinging and using momentum to get your legs up, and all the work is coming from the hip flexors and the core,” Gallucci says. Step 2: Assisted chest-to-bar pull-up Loop one end of a large resistance band around the pull-up bar. Grab the bar with an overhand grip that’s slightly wider than shoulder-width and place one foot in the other end of the resistance band. Hang at arm’s length with your legs straight and core and glutes engaged. Without swinging or kipping (using momentum to propel you upward), engage your lats and squeeze your shoulder blades together as you pull your chest to the bar. Pause, and then lower yourself back to a dead hang. Tip: “Start with a thicker band,” Watters says. “If you can do 10 full pull-ups, use a thinner band. Over time, keep working your way down until you can do 10 strict pull-ups with the thinnest band. Then move on.” Step 3: Strict chest-to-bar pull-up Grab a pull-up bar with an overhand grip that’s slightly beyond shoulder width. Hang at arm’s length with your arms straight, and your ankles crossed behind you. Without swinging or kipping, engage your core, glutes, and lats as you squeeze your shoulder blades together and pull your chest to the bar. Pause, and then lower yourself back to a dead hang. Once you can do three sets of 10 reps, move on. But continue to practice chest-to-bar pull-ups while working on new skills. Tip: “At this stage, it’s important to also be working on the ‘push‘ feature that you use in a muscle-up,” Watters says. He suggests incorporating push-ups into your training plan, including leverage push-ups, in which you lower yourself all the way to the ground and temporarily lift your arms before pushing up into plank in order to eliminate any momentum from the movement. “Start from the floor position to halfway up, then lower yourself back to the ground. This is the hardest part of the push, which is why we emphasize it,” he says. Step 4: Triceps dip Grab the handles of a dipping station and jump or step up to the starting position: feet off the floor, arms straight, and ankles crossed. (To make the movement easier, you can loop a large resistance band across the handles and place your knees on it.) Keeping your forearms vertical and elbows tucked in (not flared), allow your torso to lean forward as you lower your body until your elbows form about a 90-degree angle. Reverse the movement, returning to the starting position. Once you can do three sets of 10 reps, move on. Step 5: Kip swing Grab a pull-up bar with an overhand grip that’s slightly wider than shoulder-width. Hang at arm’s length with your arms straight and your legs straight and together. Assume a hollow-body position: engage your core and lats to flex (round) your spine and tilt your pelvis back (tuck your tailbone). Use the shoulders to thrust your chest forward and arch your spine, allowing your legs to swing behind you. Use your shoulders, lats, and core to swing back into a hollow-body position and begin to pull up in the same way you do for chest-to-bar pull-ups. Once you’re able to complete three sets of 10 reps of kip swings during which your chest meets the level of the bar, progress to a full muscle-up. Tip: Make sure you’re using your shoulders, not your hips, to generate the swing. Step 6: Muscle-up Grab a pull-up bar with an overhand grip that’s slightly wider than shoulder-width. Hang with your arms straight and your core and glutes engaged. Initiate a kip swing: starting from a hollow-body position, use the shoulders to thrust your chest forward and arch your spine. Then, use your shoulders, lats, and core to swing back into a hollow-body position. (Once you’re behind the bar, lean back and

You Can Do a Muscle-Up. Here’s How Read More »
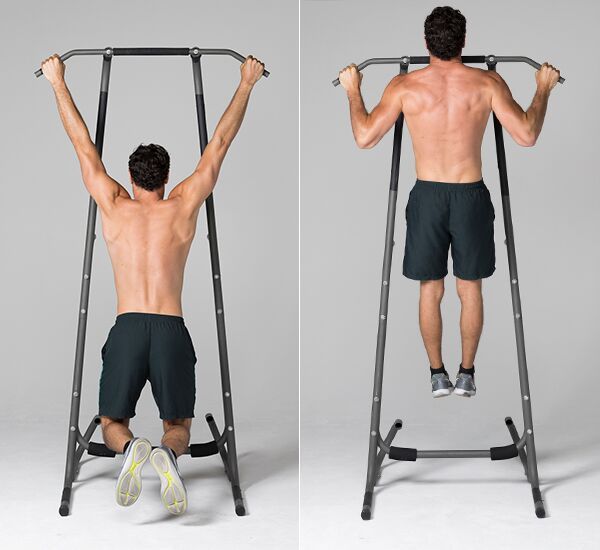
Is a Push/Pull/Legs Routine Fastest for Building Muscle?

Is a Push/Pull/Legs Routine Fastest for Building Muscle? If figuring out how to organize and manage your strength-training routine feels more challenging than a heavy set of deadlifts, it’s time to consider a push/pull/legs schedule. Popular among weightlifters of all levels, this divide-and-conquer approach to training designates specific days — push days, pull days, and leg days — for targeting different muscle groups. Amanda Herrera, CPT, describes this type of training plan as “strategic,” as it allows you to build strength and muscle mass in all areas of the body with minimal rest. “It’s the idea of separating and working similar muscle groups on one day,” she explains. “That way, on the following day, you’re training the opposing muscles and not overworking or overtraining your body. Sometimes in full-body workouts, some muscle groups get used in multiple exercises, and you don’t realize it, so they’re actually working more than you think,” she adds. “This push/pull/legs way of training is great to prevent injury for everyone.” Below is an explanation of each type of day, sample exercises, and a straightforward seven-day schedule that can help provide structure to your workouts. Push Day Workout A push day workout is an upper body workout that targets the muscles used during pushing movements — primarily the triceps and the muscles of the chest and shoulders. Here are few common push exercises that require minimal equipment (you’ll need one set of dumbbells). 1. Push-up Assume a high-plank position with your feet together (or slightly apart for balance), your body straight from head to heels, and your hands in line with (but slightly wider than) your shoulders. Engage both your glutes and your core to lock your body into position. Keeping your elbows about 45-degrees away from your body and your head neutral, lower your torso until your chest is within a few inches of the floor. Pause, and then push yourself back up to the starting position. 2. Dumbbell lateral raise Stand tall with your feet hip-width apart holding a dumbbell in each hand at arm’s length by your sides, palms facing in. Keeping a slight bend at the elbow, raise your arms to your sides until they’re level with your shoulders. Keep your palms facing downward. Pause, and then lower the weights back to the starting position. 3. Dumbbell overhead triceps extension Sit on a bench or chair, cupping one end of a dumbbell in both hands directly overhead. This is the starting position. Keeping your chest up, core engaged, and back flat, bend the elbows to lower the weight behind your head without moving your upper arms. Elbows should stay close to the ears and be pointed forward. Pause, and then press the weight back up to the starting position. Pull Day Workout A pull day workout engages the opposing upper body muscles: the biceps, forearms, and back muscles. The sampling of exercises below requires a set of dumbbells and a pull-up bar. 4. Dumbbell bent-over row Stand with your feet hip- to shoulder-width apart holding a dumbbell in each hand at arm’s length by your sides, palms facing in. Brace your core, hinge at your waist to push your hips back, bend your knees slightly, and lower your torso until it’s nearly parallel to the floor. Keep your glutes engaged to protect your lower back. Let the dumbbells hang at arm’s length with your palms facing each other. Engage your shoulder blades to keep your shoulders pulled back. This is the starting position. Without moving your torso, and while keeping your elbows tucked and back flat, row the weights to your rib cage as you squeeze your shoulder blades together. Make sure there’s a 90-degree bend in the elbow, so you’re rowing to your ribs and not armpits. Pause, and then lower the weights back to the starting position. 5. Zottman curl Stand tall, holding a dumbbell in each hand at arm’s length by your sides, palms facing forward (underhand grip). Keeping your elbows tucked and locked by your sides, curl the weights toward your shoulders. Rotate the dumbbells 180-degrees so your palms are now facing down. Lower the weights back down to your sides and then flip your grip again (to underhand) to return to the starting position. 6. Pull-up Grab a pull-up bar with an overhand grip that’s slightly wider than shoulder-width. Hang at arm’s length with your arms straight (a position known as a dead hang) and your ankles crossed behind you. Without swinging or kipping (using momentum to propel you upward), engage your lats and squeeze your shoulder blades together as you pull your chin to the bar. Pause, and then lower yourself back to a dead hang. Legs and Core Day Workout While leg day is typically devoted to strengthening the hamstrings, quadriceps, glutes, and calves, it’s common practice to also incorporate core work. Below are some bodyweight core exercises and basic lifts that target multiple muscle groups of the lower body. 7. Romanian deadlift Stand tall, feet hip-width apart and parallel, with your knees slightly bent, holding a pair of dumbbells in front of your thighs, palms facing towards you. Keeping your back flat, core engaged, and the dumbbells within an inch or two of your body, push your hips back and lower the dumbbells until your torso is nearly parallel to the floor. Pause, and then reverse the movement to return to the starting position. 8. Dumbbell squat Stand with your feet hip to shoulder-width apart, holding a pair of dumbbells at arm’s length by your sides, palms facing in. Keeping your back flat and core braced, push your hips back, bend your knees, and lower your body until your thighs are parallel to the floor. Pause, then push yourself back up to the starting position. 9. Bulgarian split squat Stand facing away from a bench, holding a pair of dumbbells at arm’s length by your sides, palms facing in. Place the toes of your left foot on the bench behind you. Keeping your torso upright,

Is a Push/Pull/Legs Routine Fastest for Building Muscle? Read More »

Build Your Upper Body More Efficiently With a Pull Day Workout

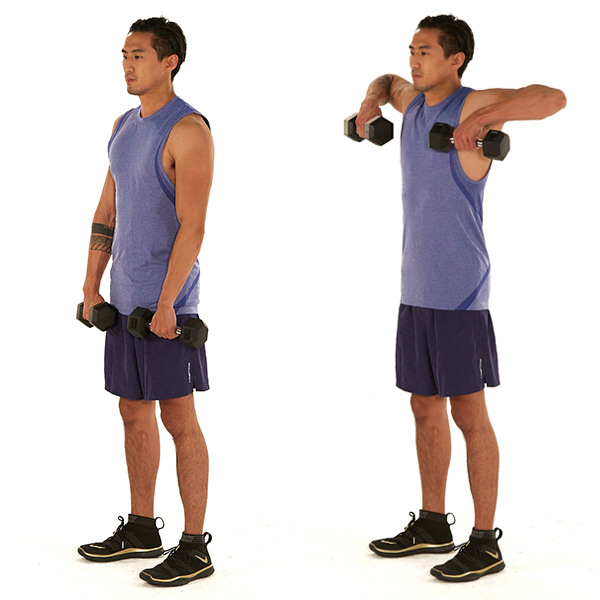
Build Your Upper Body More Efficiently With a Pull Day Workout Looking for a better, more systematic approach to strength training? Consider the pull day workout and its counterpart, the push day workout. Dividing your workouts between push and pull days is one of the most straightforward ways to create a fitness plan that will allow you to vary your movements, optimize your training time, and avoid injury. What Is a Pull Day? The typical pull day workout consists of upper-body exercises that utilize a pulling motion. They primarily engage the biceps, forearms, and back muscles. “Because a majority of the ‘pull’ muscle groups make up the back of the body (or posterior chain), these are extremely important for posture and mobility,” says BODi Fitness Programming Manager Amanda Herrera. Plus, pulling is key to everyday functional movement, whether you’re paddling a kayak or lifting grocery bags. How Is It Different From Push Day? A push day workout focuses on pushing exercises that target the opposing muscles, including the chest, shoulders, and triceps. Alternating between pushing and pulling exercises allows you to work one group of muscles while the other group recovers. This is why it’s possible to do a push day workout after a pull day workout without taking a rest day. Ultimately, this training method allows you to accomplish more strength training in a shorter period. Weightlifting programs on BODi — such as LIIFT4 and Body Beast — follow this principle by targeting different muscle groups on different days to make sure you hit every workout hard and maximize muscle building. What Are the Best Pull Exercises? Try incorporating these exercises into your training plan to get the most out of your pull day workout. 1. Dumbbell bent-over row Stand with your feet hip- to shoulder-width apart, holding a dumbbell in each hand. Brace your core, hinge at your waist to push your hips back, bend your knees slightly, and lower your torso until it’s nearly parallel to the floor. Keep your glutes engaged to protect your lower back. Let the dumbbells hang at arm’s length with your palms facing each other. Engage your shoulder blades to keep your shoulders pulled back. This is the starting position. Without moving your torso, and while keeping your elbows tucked and back flat, row the weights to your sides as you squeeze your shoulder blades together. Make sure there’s a 90-degree bend in the elbow, so you’re rowing to your ribs and not armpits. Pause, and then lower the weights back to the starting position. 2. Pull-up  Grab a pull-up bar with an overhand grip that’s slightly wider than shoulder-width. Hang at arm’s length with your arms straight (a position known as a dead hang) and your ankles crossed behind you. Without swinging or kipping (using momentum to propel you upward), engage your lats and squeeze your shoulder blades together as you pull your chin to the bar. Pause, and then lower yourself back to a dead hang. 3. Renegade row  Assume a push-up position with your hands gripping two hex dumbbells. Your hands should be in line with and slightly wider than your shoulders. This is the starting position. Keeping your core engaged, elbows tucked, and body straight from head to heels, lift the dumbbell in your right hand to the side of your torso. Make sure there’s a 90-degree bend in the elbow, so you’re rowing to your ribs and not armpits. Pause, and then return to the starting position. Repeat, this time rowing the dumbbell in your left hand. Continue alternating sides. 4. Dumbbell biceps curl Stand with your feet hip-width apart, holding a pair of dumbbells at arm’s length by your sides, palms facing forward. Keeping your core engaged and elbows at your sides, curl the weights toward your shoulders. Avoid swaying your body. Pause, and then slowly lower the weights to return to the starting position. 5. Upright dumbbell row Stand tall, holding a pair of dumbbells at arm’s length in front of your thighs, palms facing towards you. Keeping your core engaged, back straight, and weights close to your body, lift the dumbbells until your elbows reach shoulder height. Pause, and then reverse the movement to return to the starting position. 6. Zottman curl  Stand tall, holding a dumbbell in each hand at arm’s length by your sides, palms facing forward (underhand grip). Keeping your elbows tucked and locked by your sides, curl the weights toward your shoulders. Rotate the dumbbells 180-degrees, so your palms are now facing down. Lower the weights back down to your sides and then flip your grip again (to underhand) to return to the starting position. What’s a Good Push/Pull Day Schedule? One way to structure a push/pull training plan that targets the whole body is to combine leg and core exercises and alternate between the three types of workouts. So, for example, your weekly training schedule may look like this: Monday: Push day workout Tuesday: Pull day workout Wednesday: Legs and core workout Thursday: Push day workout Friday: Pull day workout Saturday: Legs and core workout Sunday: Rest However, If you’d prefer to have a mid-week rest day or combine core or leg work with your push and pull days, that’s fine too. Just be sure to keep your push and pull workouts on separate days. If you want to leave the workout programming to the experts, all the weightlifting programs on BODi utilize some sort of split training for better efficiency, optimized rest, and faster growth. The post Build Your Upper Body More Efficiently With a Pull Day Workout appeared first on BODi. Looking for a better, more systematic approach to strength training? Consider the pull day workout and its counterpart, the push day workout. Dividing your workouts between push and pull days is one of the most straightforward ways to create a fitness plan that will allow you to vary your movements, optimize your training time, and avoid injury. What […] The post Build Your Upper Body More Efficiently With a Pull Day Workout appeared first on BODi. Kayne

Build Your Upper Body More Efficiently With a Pull Day Workout Read More »

Build a Bigger Back With These 5 Lat Exercises

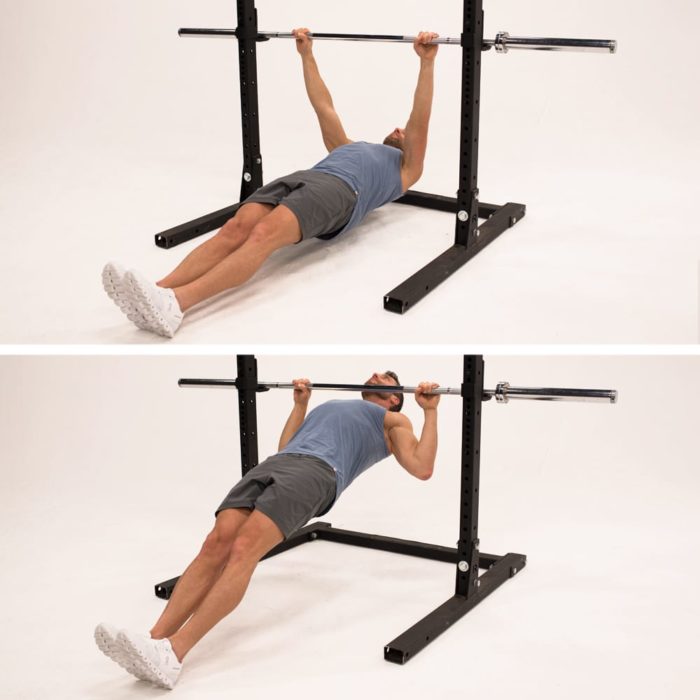
Build a Bigger Back With These 5 Lat Exercises On the quest for a V-shaped torso? You’re probably already focusing on building your chest and shoulders. Makes sense — they’re the muscles you see in the mirror every day. But don’t ignore the chiseled rear view that lat exercises can build. Your latissimus dorsi (aka “the lats”) are the broadest back muscles (you have one on either side of your spine), and targeting them can help give you a broad-shouldered, slim-waisted, fitness model physique. Even if bodybuilder aesthetics aren’t your priority, it’s still worth your time to incorporate lat exercises into your workouts. “Strong lats are essential to having a strong core, which is critical to maintaining good posture, lowering your risk of back pain, enhancing athletic performance, and increasing total-body strength, power, and stability,” explains Trevor Thieme, CSCS. The following moves are some of the best lat exercises you can perform. While they aren’t your only options for targeting your lats and sculpting a V-shaped upper body, none do it more effectively. 1. Inverted Row Secure a bar in a Smith machine or power rack at waist height, and lie on the floor underneath it. Grab the bar with an overhand grip that’s slightly wider than shoulder width, and hang with your arms fully extended and your body straight from head to heels. Your shoulders should be directly below your hands, and your feet should be hip-width apart. This is the starting position. Keeping your core engaged, pull your chest to the bar. Pause, and then slowly lower yourself back to the starting position. 2. Pull-Up Grab a pull-up bar with an overhand grip that’s slightly wider than shoulder width, and hang at arm’s length (a position known as a dead hang). Keeping your core and glutes engaged and elbows close to your sides, pull your chest to the bar, so that at least your chin clears it. Pause, and then slowly lower yourself back to a dead hang. 3. Lat Pull-Down Sit at a lat pull-down station and grab the bar with an overhand grip that’s slightly wider than shoulder width. Your arms and torso should be straight. This is the starting position. Keeping your back flat and core engaged, squeeze your shoulder blades together as you bring the bar to your chest. Pause, and then return to the starting position. 4. Dumbbell Pullover Grab a dumbbell, and lie with your back flat on a bench. With your feet firmly on the ground and your core engaged, extend your arms toward the ceiling, cupping one end of the dumbbell in both hands above your chest. Keeping your arms straight and low back pressed into the bench, slowly lower the dumbbell behind your head until your biceps are next to your ears. Pause, and then return to the starting position. 5. Dumbbell Bent-Over Row Stand with your feet hip-width apart, holding a dumbbell in each hand by your sides. Engage your core, push your hips back, and hinge forward at your waist until your torso is almost parallel with the floor. Let your arms hang straight down, palms facing each other. This is the starting position. Keeping your back flat, knees slightly bent, core engaged, and elbows tucked, pull the weights to your sides as you squeeze your shoulder blades together. Pause, and then slowly return to the starting position. Lat Exercise Tips You’ll need access to basic gym equipment for most of these exercises, but some can be adapted to equipment you might have at home. For example, you can use a resistance band in place of dumbbells for the bent-over row and in place of a cable machine for the lat pull-down (you’ll need a door attachment for the latter exercise). For loaded exercises (e.g., those requiring weight), always choose a weight that challenges you to complete all of your reps with good form. If you find the pull-up too challenging, Thieme recommends using a resistance band for assistance, or focusing on other lat exercises until you’ve built enough strength to complete at least five reps with good form. To achieve optimal results and allow your muscles time to recover between workouts, target your lats two to three times a week on nonconsecutive days. Before your working sets, do a few lat-focused warm-up sets with light weight to prime your muscles for action. Lats Anatomy and Function The latissimus dorsi are a pair of large, fan-shaped muscles that flank your back on either side of your spine. They have multiple points of origin — the thoracic and lumbar vertebra, the sacrum, the lower ribs, and the hip — and insert on the back of each humerus (upper arm). The latissimus dorsi function to move your arms in three different ways: Draw them toward your body’s midline (adduction), such as when performing a pull-up or row. Extend your arms (think of them swinging backward when you walk). Rotate your arms inward at the shoulder. The post Build a Bigger Back With These 5 Lat Exercises appeared first on BODi. On the quest for a V-shaped torso? You’re probably already focusing on building your chest and shoulders. Makes sense — they’re the muscles you see in the mirror every day. But don’t ignore the chiseled rear view that lat exercises can build. Your latissimus dorsi (aka “the lats”) are the broadest back muscles (you have one on either […] The post Build a Bigger Back With These 5 Lat Exercises appeared first on BODi. Kayne Toyosato{authorlink}https://www.beachbodyondemand.com/blog/lat-exercises-workoutBODi BODi is a Health Esteem platform to help you embrace the person you are today so you can take action to achieve all your health and fitness goals. https://bodiblog.wpenginepowered.com/wp-content/plugins/bod-blog/assets/vendor/beachbodydigital/wordpress-core-plugins/beachbody.png

Build a Bigger Back With These 5 Lat Exercises Read More »

Work Your Back, Shoulders, and More With the Kettlebell Row

Work Your Back, Shoulders, and More With the Kettlebell Row Now that you’ve got your own shiny, new kettlebell, what (besides the kettlebell swing) are you supposed to do with it? Try the kettlebell row! The kettlebell row is a challenging upper-body exercise that will fire up your core and test your balance as it works your back. It looks like a simple movement but requires practice to master, so use a lighter weight until you learn the proper form. Kettlebell Row: Step-by-Step Instructions Assume a staggered stance with your right leg forward, your left leg back, and a kettlebell in your left hand. Keeping your back flat and core engaged, bend your knees and hinge forward 45 degrees at your waist, resting your right forearm on your right thigh. Allow the kettlebell in your left hand to hang at arm’s length toward the floor, palm facing inward. This is the starting position. Keeping your shoulders square and elbow close to your body, pull the kettlebell to your ribs. Lower the kettlebell back to the starting position and repeat. Do equal reps on both sides. Make it easier: Use a lighter weight. Make it harder: Use a heavier weight, and/or pause at the top of the move before lowering the weight back to the starting position. Mistakes to Avoid Dr. Jordan Duncan, DC, owner of Silverdale Sport & Spine in Silverdale, Washington, cautions against a few common mistakes people make when learning how to do kettlebell rows. As you pull the kettlebell toward your chest, avoid rotating your body at the waist. “The kettlebell row should target the upper extremity and shouldn’t incorporate too much motion of the trunk,” Duncan says. “Also, avoid shrugging your shoulders toward your ears.” This kind of movement compensation will shift the emphasis away from the back muscles and onto the tops of the shoulders, which are not the intended target of the kettlebell row. What Muscles Do Kettlebell Rows Work? While it will challenge your overall balance and coordination, the kettlebell row is primarily an upper-body strength move that targets the back and shoulders. According to Duncan, the muscles worked during the single-arm kettlebell row include: Latissimus dorsi Posterior deltoid Rhomboids Middle/lower trapezius muscles The post Work Your Back, Shoulders, and More With the Kettlebell Row appeared first on BODi. Now that you’ve got your own shiny, new kettlebell, what (besides the kettlebell swing) are you supposed to do with it? Try the kettlebell row! The kettlebell row is a challenging upper-body exercise that will fire up your core and test your balance as it works your back. It looks like a simple movement but requires […] The post Work Your Back, Shoulders, and More With the Kettlebell Row appeared first on BODi. Kayne Toyosato{authorlink}https://www.beachbodyondemand.com/blog/kettlebell-rowBODi BODi is a Health Esteem platform to help you embrace the person you are today so you can take action to achieve all your health and fitness goals. https://www.beachbodyondemand.com/blog/wp-content/plugins/bod-blog/assets/vendor/beachbodydigital/wordpress-core-plugins/beachbody.png

Work Your Back, Shoulders, and More With the Kettlebell Row Read More »

9 of the Best Bodyweight Back Exercises

9 of the Best Bodyweight Back Exercises News flash: You don’t need a fully-stocked gym to build a strong, muscular back. Sure, lat pulldowns and bent-over rows are effective, but all you really need to create an enviable rear view is your own body weight. Don’t believe it? Here are nine of the best bodyweight back exercises to strengthen your upper body. Sprinkle these moves into your weekly workout routine. 1. Pull-Up Benefits: This total-body strength builder hones in on the lats, traps, biceps, and core. Grip a pull-up bar with an overhand grip with your hands about shoulder-width apart, and hang with your arms fully extended. Brace your core and engage your lats to squeeze your shoulder blades together to pull your chest to the bar. Pause, and then lower yourself back down until your arms are fully extended again. Wide-grip variation For greater focus on your lats, widen your grip beyond shoulder width. 2. Chin-Up Benefits: Like pull-ups, the chin-up targets your lats, shoulders, upper back muscles, and core, but adds emphasis to the biceps. Grip a pull-up bar with an overhand grip with your hands about shoulder-width apart, and hang with your arms fully extended. Brace your core and squeeze your shoulder blades together to pull yourself upward until your chin clears the bar. Pause, and then lower yourself back down until your arms are fully extended again. 3. Cobra Pose Benefits: Strengthen your spine with this classic yoga pose. Lie face-down on the floor with your legs extended behind you. Walk your hands so they’re directly under your shoulders, elbows tucked at your sides. Squeeze your shoulder blades together to open up your chest. Keeping your elbows tucked at your sides, press into your palms and the tops of your feet to lift your chest off the floor. (The goal is to straighten your arms, but make sure you only lift your chest to a height that feels comfortable and doesn’t pinch your lower back. If this feels challenging, try these back stretches to help improve your range of motion.) Keep your neck neutral and open your chest, drawing your shoulders away from your ears. Hold for a few breaths. 4. Superman Benefits: Improve your posture by strengthening the muscles that support your spine. Lie face-down on the floor with your arms extended overhead and your legs extended behind you. Keeping your neck in line with your spine, lift your arms, chest, and legs off the floor simultaneously. Squeeze your glutes at the top. Pause briefly, and then lower back down to the floor. 5. Inverted Row Benefits: Hit all the major muscle groups in your back, along with your core and biceps. Set up a barbell in a Smith machine or rack at waist height. Lie face-up on the floor beneath it so the bar is over your chest. Make sure the bar is secure. Hold the bar with an overhand grip, hands slightly wider than shoulder-width apart. Hang so your arms are fully extended and your body is in a straight line from your head to your heels. Your heels should be hip-width apart. (If keeping legs straight is too challenging, bend your knees so your feet are flat on the floor.) Squeeze your shoulder blades together to pull your chest to the bar. Pause, and lower yourself back to the starting position with control. 6. Pilates Swimming Benefits: Build healthy posture muscles with this Pilates move. Lie face-down on the floor with your arms extended overhead and your legs extended behind you. Lift your arms, chest, and legs off the floor. Keep your neck in line with your spine and squeeze your glutes at the top. With your arms, chest, and legs lifted, begin pumping your opposite arm and leg in small pulses. Alternate right arm/left leg and left arm/right leg pulses. Continue alternating for reps. 7. Sphinx Reaches Benefits: This yoga-inspired move gently strengthens your spine and glutes. Lie face-down on the floor with your legs extended behind you. Walk your hands so they’re directly under your shoulders, elbows tucked at your sides. Squeeze your shoulder blades together to open up your chest. Press into your palms and the tops of your feet to lift your chest off the floor. Squeeze your glutes while you’re in this lifted position. With your neck neutral, reach forward with one hand. Place your hand back on the floor and repeat with the opposite hand. Keep alternating for reps. 8. Prone IYTs Benefits: This move strengthens your mid-back and shoulder muscles. Lie facedown with your stomach on a stability ball and your legs extended out straight behind you, digging your toes into the floor for support. Brace your core so that your body forms a straight line from head to heels. Let your arms hang straight toward the floor, holding your hands in fists with your thumbs up. Squeeze your shoulder blades down and away from your ears. This is your starting position. Leading with your thumbs, raise your arms straight up and close to your ears, keeping your shoulders pressed down. This is the “I” formation. Lower your arms down toward the floor, then lift your arms up again, but this time diagonally, making a “Y” formation. Lower your arms down toward the floor, then lift your arms straight out to your side to form a “T” formation with your palms facing the floor. 9. Plank Row Benefits: Light up your upper- and mid-back muscles with this plank variation. Start in a high plank position with your hands directly under your shoulders and legs extended. Your body should form a straight line from head to heels. Brace your core and lift one hand off the floor. Row your elbow toward your ribs, keeping it close to your side. Keep your hips square to the floor and don’t let your lower back sag. Return your hand to the floor and repeat with the other arm. Alternate sides for reps. The post 9 of the Best Bodyweight Back Exercises appeared first on BODi. News flash: You don’t

9 of the Best Bodyweight Back Exercises Read More »